Modern Sliced Bob Haircut By Kelly Gorsuch
- Posted on 18 February, 2016
- Bob Hairstyles
- By Anonymous
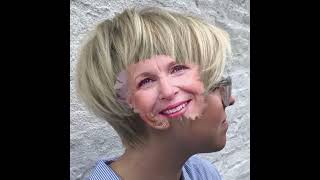
Dry-finishing a bob using horizontal slicing.
Kelly horses today we're going to be working with a pretty blunt pot here and we're going to kind of modernize it through utilizing. A shallow and deep texturizing techniques really doing some deep slicing and basically taking that the cut of the heaviness and the way in the back and kind of blending it with the looseness of the front. So we're going to attack in two different two different ways like what, in the back is always gon na, be a little bit heavier. So we're going to use our slicing and be a little more aggressive in the back and then incorporate that to the front. Just giving a little bit more negative space to it to allow it to swing and make this a more modern, wearable upscale here, son, alright, sorry, alright! So the back of the hair is a little bit heavier more dense. You can see when I start to push it around. It'S not swinging a lot. So what we want to do it to put a little more swing and incorporate that into that area and make it a little bit more, give it a little more pizzazz. So I'm I'm gon na start by taking for a second and it is dry cutting. So this is the finished part of the haircut I'm going to come in and take two sections here and just get mowed the bulk of the hair out and it's defecated, and what close to the best density it's possible in this first section. Then I'm going to go and lift up and that lifting up it's going to give me a slight bit of elevation, which is going to give me a little softness to the slicing right off of that. And then I'm going to go in and just attack. And what I don't want to do and just go in and thin. I really want to get negative space in between each section. You can see when I drop it. It really doesn't go in and make huge holes in here. So I'm very controlled with this and her hair is a little thicker. So I'm actually going to close the blade a little bit as I'm slicing through, and it just takes a little time to practice to get a nice control over and I'm also I'm also shooting for the exact same spots that I've already hit. So I'm not just going in and thinning over the parts that I'm leaving more dense so dropping that section and then the next section is going to be right around the occipital boom and then lifting up that next section to about a 45. But it doesn't really matter just depends on how soft I wanted you can see when I drop you're also going to get a very blended color line out of this, so someone has like a spot in their haircut. That is like super heavy with color. You want to kind of loosen it up a little bit. You can attack that spot, and so I don't want a bricklayer this. So it's a very fluid motion, as I'm slicing through to kind of achieve a soft soft barbell. So I'm going to attack the back. First, so we can attack that heavier density and then we'll go in and blend it to the front, make sense right and so now I'm a little deeper there's a little more here. But I don't want to go too deep, because I don't want to add too much prettiness to this we're in an area and Washington DC, where the summers will make this brutal for the client. If you go too deep and you can start to see it's really starting to blend together, that color is looking stronger and we're getting a nice playful feel out of that hair shade go right up into the crown, so I have a bass. This is an important part of texturising I'm. I have a bass that I'm making a bridge that I basically steady my hand on her head. So these two fingers are giving me a nice beige and they're, actually a small tug with my grip fingers that are going to allow me to like really keep it. Steady, steady, calm, aim at this hair and then slice through. So that way, I don't have to worry about the bass wobbling and that hair moving around, and so I'm watching the hair. If she has like less color in one area, I'm not going to attack that color all right, bringing that last section down and you can see, I can check that color just to be safe, see how it's incorporating in I'm a little heavier in the corners than I am in the center, so I'm going to attack the corners a little more, and this is actually the part of the hair you're going to see from the side. So it's going to be a little bit. It'S going to be nice to loosen that up a little bit, give it some more negative space to kind of move around. So basically, we went through the whole back section. I haven't been into the Front's yet so within the whole back section, utilizing affordance of horizontal slicing and breaking do that. So what I'm starting to see is I have a nice movement on that hair, but I'm still a little petty here. So now I'm going to kind of show you how to blend that out. So I'm the slice through this, basically I'm just going to usually take through my weight spots, where I want to where I want to create some separation. What I don't want, it's that this is still like this advice and moveable, and then I have this like weight line moving around and like kind of just taking the eye and we're going to take the curse off of that heaviness all right. So it's going to come in from the side kind of channel through it. If they had fine and she had finer hair, we probably would be able to skip this step. But since her hair's a little dense, we're going to go in and like really hit that separation and now, since I'm cutting it at natural, fall. I'M giving wherever I put that scissor in and channel that way down it's going to give me negative space right there, so you can see like right away softened it right right up at the bottom. So now we have a kind of a nice movement all the way through the exterior that air. Now, just slightly I'm going to lift up with assistance and just point that right into that just to like soften that line up just a hair more and I'm trying to be somewhat aggressive, because if you're not you're, not actually going to do anything to that long. Just visually personalizing that all right so now that's the back. I feel pretty good about that and then we're gon na go into the front and just cut in a little bit of the heaviness of the color out and then we're going to just incorporate the back to the front all right. Just picking up the back. I know it's lights. Do this, so I'm just going to pick a little bit of the back up and I always want to be careful right around the ears. So I'm going to tack this a little slower all right and then we can just pick up that it and that hair is less debt. So I'm not gon na go in there and be quite as aggressive as I was in the back flipping that wheat side up taking my next section and I try to work in a little larger sections, because you're in too small of a section you're actually just Thinning the hair down too much and you're unable to see visually, what's what's happening at a natural fall, so you see when I even slice this I'm trying to keep it as close to natural fall as possible. Just lifting up slightly to give myself just to get myself a little softness and I'm trying to stay pretty deep here and that will encourage it to be a better negative space and a little more swing. I want to be careful to not cut off the corner of that Bob. So when you see me get up to the front there anything that's going to be the corner of the haircut, I'm just going to be a little bit more careful and you see this is already a little light. So I don't have to do much and then we'll basically already have that blend out and then I can come in here from the side and visually kind of slice how any extra weight we kind of blend this haircut out and now we'll do her strong time. So this is a strong side and you can see how heavy I am right here in the front and I get loose up towards that for graduation and dining area. So I'm just going to continue the same thing horizontal seconds, elevating slightly and really attacking that way. So lifting up and right here behind the ear, a little heavy, so we're just going to tack that - and you see when I get into the front of this - I just naturally without thinking - take it a little closer to the end. So I can just be a little bit more delicate in the for graduation since there's less hair there and then in the back. I can be a little bit more. That'S something really kind of attack that we. So it's not it's not about just putting the same trick all over the haircut, I'm actually changing the way I cut hair constantly, with the amount of density that I have to work with, and the color the color has a huge adds, a huge weight and what I do with with my texturizing you see how on that is right there right. So it's going to change the way that density looks there in the front actually going to make it few little whiter, just working right up but strong side the whole way. So now I'm into a little bit of the layering on top and into the bangs and for graduation. So I want to be careful to not change my shape as I go to the front and the same on the top. I don't want to go in here and like I would prefer to be almost like an inversion. So a little bit of the layering is a little a little taller, a little higher or a little more layer than the very front. So we don't get any square lines in here, but I'm also staying really really soft so as to not achieve that and then I won't even touch the front of that will handle those that's the bank afterwards and then the last step here just coming making sure These two are funded now, it's fairly well blended, but you can see like there's like a little bit of a weight there. So the same as I get on the other side, it's just incorporating the sides. Now I don't want to cut that off and make it like a G bottle. I just want to allow it to swing into that air. It'S going to do a little blast drying technique where we just are going to try to shoot for added separation with Wimmer with this with spray shine, so we're just going to spray it into cold air and that that whole air is going to disperse it into The haircut to give it separation, so the trick with that is to spread it in front of the airflow and let the air pull push it on to the hair, and then it gives his beautiful separation and shine to the end. The Finnish technique is, please finish here, and we just took her car Bob and like really modernized it like made it an upscale haircut and give it that light that we were looking to give


Comments
Diana Pascucci: I love this! It looks great!
Darlene Ruiz: Going to ask for this at the salon :)
cat: Great eye..and natural talent..common sense cutting, not everyone has this ability.
AKM: love it