Bob Haircut - How To Cut A Graduated Bob With A Side Bang Similar To Kelly Ripa'S New Haircut
- Posted on 23 August, 2013
- Bob Hairstyles
- By Anonymous
BEST WAY TO FOLLOW US:
1. SUBSCRIBE ON YOUTUBE
2. FACEBOOK http://www.facebook.com/freesaloneduca...
3. TWITTER @saloneducation
4. LAST AND MOST IMPORTANT... OUR WEBSITE http://www.FreeSalonEducation.com
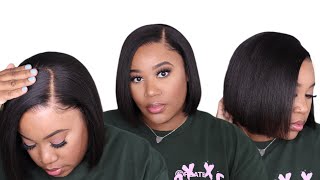
Watch as Matt Beck founder of Gratitude Education shows you how-to cut a Layered Bob similar to the New Haircut worn by Kelly Ripa on LIVE
MORE FREE SALON EDUCATION AT http://www.freesaloneducation.com
Thanks for watching
Full length haircutting video on How to cut a Balanced Bob. Classic cut with a modern twist. featuring Matt Beck founder of Gratitude Education
Gratitude Education has been developed from the pure love of education and passion for the hair industry. We are a company dedicated to inspire and coach each individual stylist. Gratitude Education thrives on sharing ideas and pushing the creativity of others. You can expect a very prepared classroom that boasts high energy, music, and hands-on techniques for an exciting learning experience. Feel free to ask us questions and please check back frequently for class dates and times near you.
Gratitude Education offers In-Salon Hands-On Classes, In-Salon Demos, Distributor Workshops, Sales Trainings, DVD education, and Much More.
Hey guys, this is Matt BEC from gratitude education and today what I'm going to be doing is a balanced Bob. The balanced part is going to be that the shape around the front in the are the sides in the back are going to be very balanced. So all the layering and everything is going to fall very symmetrical and very polished and then the top we're going to go in and have a little bit of fun with so we're going to start off by taking a centre-back section. Pour that down so we'll break that into two, then we're going to go from the occipital bone down to right behind the ear slight diagonal forward section to start the haircut, so you can see out right now, I'm taking it in my fingers. You could cut this along the neck. If you wanted to you know it's personal preference. Sometimes I do sometimes I don't with this haircut. I like to have just a slight bit of elevation right here, so I'm gon na fingers width from fingers, width section then we're going to pull down. Everything is square in the back, so that'll be kind of our balanced feel so we're going to square it off straight line in the back. So once we get to that corner near the clip that you can see there, that's going to be over directed slightly back to create that corner. Then, when I go in because I held in my fingers, I would have a slight bit of hair kind of a slight bit of graduation to there. I just go in and clean that line up, so any stragglers that I see then I can start building my graduation from there. So everything with this haircut zero degrees. So you will see a slight elevation. Some of you may look at this as a 45 degree because I'm elevating it, but I'm looking at the head, shape, that's something that you know. I preach a lot because the head shape changes, so you really got ta. Look your angles based on the head shape. So with this haircut, it's not 45 degrees because, as your head starts to move away, I need to elevate the hair to keep it nice and light, but still keep it at that zero degree angle. Just moving up the head working with horizontal sections, I like, when I'm creating a bob type haircut to work horizontally, you can work vertically, which we're going to in a minute but to get a strong base and to keep the shape very strong. I like to personally use horizontal sections, some folding more of the shape in my hand and the elevation you know I can keep pretty consistent still holding it horizontally, so you'll see my hands slightly drop on, as I work my way over again this just because the Head shape is changing so as the head shape changes, I want to keep it still at a zero degree. Angle so drop my hand just a little bit another horizontal section, everything, nice and clean, and when you practice haircuts like this, it's really just the most important thing is how you call them hi section and how you get the hair up out of the way. Really because the hair that you're cutting the cutting part is easy, it's really difficult to comb. Well, so just really work on your combing, your sectioning, and how professional you look as a stylist on your doing working through cutting palm to Palm now, you're gon na see me kind of shift, but so we cut palm to palm horizontally all the way up. Until this point now, I'm going to comb the hair down, I'm gon na start working vertically and the reason I'm going to do. That is because, as I'm working on that round of the head, I want to start layering now and vertically. I can work more with my weight control, so I'm going to take out a little extra weight, so I can work vertically and get a more consistent weight. Removal on the circle so now we're going to start layering using the shape of the head. So pretty easy to follow so you'll see when you shift up as the head starts to move they're just more and more elevation. Nice soft fall to the haircut thing I like about this. Is it keeps it nice and balanced but and everything's getting over directed back? So we're keeping a little bit of that square feel we will round it slightly in the corner. But the thing I like about it most as we created that really strong base on this haircut and now we're going to put a nice light kind of rooftop feel to it. So I don't want to have that heavy bob line that you'll see in a lot of air cuts. It'S too much graduation because the head starts to peel away and we don't change our elevation in the haircut. So you'll see here. Changing the elevation move into a layering technique. It cuts it nights so keeping the square so everything's straight back in the haircut. What this is going to do is allow more weight to push behind the ear we're gon na mess up that weight later, but haircutting is really thinking about your next move. It'S almost like playing chess in a way. So where are you holding the hair and where is it going to push the weight? So then later you have that way to work with so right now I just pushed a bunch of weight. You'Ll see a little slight disconnection kind of see that slight disconnection underneath yet right there. So that's something we can mess with later. That'S not going to stay like that, because this is going to be a really solid line on the bottom, but it pushed more weight behind the ear that we can work with. We do the same thing on the opposite side, so section finger way, just cutting a nice square line, I'm using a wire comb. I really like these combs because they have just kind of a tooth in the front of the comb, so it allows that real, clean, easy section in there. So that's why I chose that again. Watch the head shape, keeping the elevation out of zero degree angle and then, as the head starts, to drop down. So at the beginning of this section where the occipital bone is and where that point is in the in the triangle section. That'S definitely a different shape than right behind the ear. So as we get to behind the ear, we're definitely going to drop our elevation down to keep a zero degree angle and to keep the weight. That'S really the important thing I held everything up at the same elevation throughout then the weight would be so much lighter behind the ear, and you don't want that because you actually lose hair behind the ear so being able to maintain that weight as you work through The hair cuts really important. You'Ll see me comb the hair over and over again and know it's important to get consistent, combing and if you think about that, guess that you've had where you had to chase her up to the front. Because you missed that one little piece of hair. And it's just hanging there randomly or they told you about it when they came back in that they had to cut it. You know it's just it's really important to stay professional and really clean through each haircut and the better you comb, the hair, cut the more consistent it's going to be. You know I strive every day to get a more and more perfect haircut, I'll, never get the perfect haircut probably, but you know every day you just work to get better at it. So you, you know, you watch videos like this, because you just take little tips and tricks. So combing to me is the most important part of a haircut yeah. I'M dropping that elevation elevation is different at this point than it was towards the middle of that. Now. We'Re going to move into our vertical sessions so working on the base, keeping a strong shape the beginning of this, and now we're in elevate and remove weight and soften that line. That'S going to happen and build up on this putter here you see I'm kind of shifting things around, probably didn't see the guide there, I'm assuming so just combing and working through you don't find your guide, don't cut and that's you know it's really important to to Make sure that you keep up with the guide and follow through with that we're still working vertical sections everything's coming straight back from where it lives so we're not over directing. I think it's important, especially in the balance when we call this a balance Bob, you know, keeping the shape balanced, so we're not over directing weight and pushing it anywhere, just bring it straight out from where it lives and cutting it nice and square and see I'm Working through with one one scissor blade moving the reason for that is, scissors really developed to only have one blade moving, so it's going to cut the hair the best and, as you'll see we kind of pushed through it quite a few times. It'S not like. I'M just going in one swipe and cutting, because the tip of the scissor is going to cut a more perfect line. So you'll see it quite a few different times throughout this haircut that just that tip of the scissor comes through and works its way up. The hairs the section and cuts it just using the tip a little bit at a time. One thing to focus on right at this point is: you can see, I'm not grabbing a bunch of Hera once and I'm not just grabbing random hair. So if you watch hairdressers around you mean you might see just pulling up about a big wad of hair into a section and cutting it and layering it or whatever. But you got to keep it organized. If you don't keep the hair organized, then you're gon na lose your place and some hair. Just so don't even ever have a place. They just keep cutting and removing wait and go by the eye, which is great. The problem is you're not benefiting the guest on when you do that, because they're not gon na be able to recreate this haircut. This is drea we're cutting this haircut or not. I work with her. She works at the salon, so I saw her come in to the salon. We cut this hair actually yesterday her voiceover in today, but she walked in the salon, say, and the haircut looked great and you know it's not because she's a hairdresser and she can style. It'S because it's cut precise, so it falls the way that it should. So I want to get back to this point right here. You can see I'm cutting with the pointed scissor put that weight that we left on before, where I told you we're pushing extra weight behind the ear. Now we're going to go through and cut that into a straight line and what you can see there is how solid this line gets, and this is a coolest part about this haircut. Is we over direct it, so it pushed extra weight behind the ear, and now we can cut that into a straight line, preserving the weight behind the ear, but still getting that straight line out. So is it pretty cool point right now, just really following? I want to go slightly below her cheekbone for the end result of this haircut, so just kind of following that line. We do a little tap above the ear, seeing this quite a few times. Other hairdressers do that just gives it a little freedom, so the hair. That'S falling over here doesn't get in the way and it doesn't screw up the line in the haircut now we're going to work diagonal back, but still directly straight out from the head so we'll round this shape a little bit kind of open it off of her Face and still layering and the key point here is - I want to start working. This is going to be her heavy side, so she's going to have a really deep parting, which you can see on her left hand side. So we're going to be working from the weighted side, so I want to remove a really nice amount of weight from this side. So that's where I'm starting, so I want to start. This is going to be to me the interior of the haircut, so the inside of the haircut. I want to take all the way out of it. So nice 90-degree elevation on the hair, remove as much weight as possible using that bottom piece. The very bottom base line as my guide and just going through and removing all that excess weight and then that top panel is a bit sectioned away, will fall over top of it and it'll be nice and light not grabbing a lot of hair. Making sure that these nice clean sections - and I follow that guideline - high-elevation keeping 90 degrees, I'm just gon na work back to behind the ear, so not not going all the way back through the head. Just that warm section that I had and then stop. That'S a bit so we've now removed a weight from underneath there now we're going to let the top down and we're going to work over directing. So this can be the first part of the haircut where we're really over directing the hair still going to cut it. In an open kind of shape, so it's going to be pushing the weight off of her face. So you'll see it shifting my elbow up and cutting short too long in the back, so shorter set the fringe and working triangular, basically straight up on the hair. So you'll see my over direction just working, so then it'll be a long point in the back, so we'll keep taking those sections and the partings through and then over directing them over top of the first section. So we created a stationary guide at the beginning and now we're going to over director it into it still cutting using that tip of this desert. It'S the easiest way to work through and cut a straight line, keeping the Coleman consistent. You can see that over direction, so right over top of the part, is where we're headed with with all the weight of the idea of this was we created all the layering in the back. We removed all the weight from the heavy side. So now this is gon na fall over top, so it'll push extra weight over top of those layers that we cut and then we'll push a cool little disconnection into the back of the air cut that she can kind of scrunch up. She likes to wear her hair a little bit wavier and fun, so this will allow you know that disconnection to have a little bit of length towards the back of the haircut almost all the way through. Basically, I'm going to cut this until there's no more hair that will reach over there so that every little bit of the hair is connected together. So it's the last little bit, you see, there's barely any hair left so now now we're going to work our way to the weaker side. So that's a hairdresser. You can't look at both sides as equals, so normally we're going to when we're cutting hair. We think. Okay, so we held it at 90 degrees on one side. Now we have to hold it at 90 degrees on the other. So basically the reason I cut the top and I removed so much weight from it was so that it would lay and look symmetrical. But that doesn't mean that each line is caught symmetrical as long as you explain that to the guests and they understand why. Each little bit of their hair might be a different length. Then you then you'll be alright. It'S just educating the guests on that. So when we work on the weak side, we're going to go through cut the line right below the jawline and then we're going to work our way through again real simple, directing everything straight out from the head. Just removing that tad bit of weight on the haircut. But still working 90 degrees, keeping with our balanced shape theme, there's been a lot of talk of you know. Should we speed these haircuts up? Should we do things I personally like that you can walk through this haircut step-by-step. I feel like this is something that you know you can take to a beauty school and you can learn it that way or you know you can sit in the salon on your time off and really just kind of watch through the haircut and mimic what's happening. So I think I'm liking the the haircuts. Are this length? You can definitely comment with us. Let us know we love feedback on how you feel about the haircuts. But hopefully hopefully you get a lot out of this one with the length that it is and there you go nice little balance sheet, we're going to move into a little bit of dry cutting again using that point of the scissor. This is the key thing and no haircut is done until it's detailed dry. That'S what I think. So. I'M gon na have her kind of toss, her hair back and forth, and look at how the hair falls and then I'm gon na go back in with the point of the scissor and keep working that line until it. It falls perfectly every time she shakes her head. What that's going to do is in turn when she goes to blow dry. Her hair she'll still have a perfect line in her haircut. Those lines are what make haircuts stand out. I know that I'm attracted to those kind of lines when I see anybody's work anywhere. I like seeing some kind of line in it, whether it's choppy or messy throughout the whole haircut. But if there's a nice solid line in there somewhere, it always catches my eye. So now we're going to go through with the teasing technique just to finish it off, but this will do is just add little light layers to it. So you know taking the perfect haircut and then just making it a little bit imperfect and adding that texture. This technique is cool. It'S very simple to do. You work your way in you're, half closing the scissor, so it's actually we're gon na pull it out for and show you slowed down version of it in just a second. So we're going to work our way in half closing the scissor just kind of teasing. You can see right there, it's a half, closed motion so, as you push the scissor in a little half close to it and you're not actually teasing the hair you're not trying to shove the scissor and just shake it back and forth on the hair, you're. Actually, half closing it as you work your way in so just start off um, you know working on, maybe a mannequin with it. You can work on a guest with it. Just you know, try a couple sections see how it's helped, but um. It'S not something that you can drastically mess up they're doing, but once you perfect the technique, it creates a really cool texture to the hair. So that is our balanced Bob. If you guys enjoy it, you you

Comments
Alexandra Seppey: I've been out of beauty school for almost two years and I have never been able to find ANYONE who could explain to me how to create balanced layers on both sides, so that the length LOOKED the same on both sides, but were not actually cut the same when you pulled them up. I can't even handle how happy I am right now. This is the technique I've needed for cutting layered cuts for clients who always wear side parts oh my God I'm so HAPPY.
Yolitzitzkiani Aguila: this is such a great video and you display such great technique. I love how neat and organized every section is. I have worked at salons that don't practice this method and have pushed me to not be neat but I refuse because precision is the key to a beautiful cut. keep up the good work. and keep the tutorials step by step because they add a level of professionalism that is lacking in free educational videos.
Chris Holtsoi: You're videos are extremely well made. I love seeing the entire cut from beginning to end. Please continue doing them like this. :)
Heather Phillips: Great cut! Like the real time. Love that you can give "tips & tricks." Love to use your videos to further my education. Thanks so much! Keep up the great work!
atownRUKAS: Great work! I'm a new cosmo student and following you and watching these videos is very inspirational! I'm learning the importance of sectioning and combing being key throughout a hair cut and it's awesome to see that someone of your talent still reflex "back to basics"! The way you take the time to explain each step makes it seem easy enough to do! I might have try this on my doll. Thank you!
Deadshelia: I've been doing hair for a long time and your videos refresh my cutting and make my work better and more fun for me still after many years behind the chair. I get in that space where no body is in the salon but my client and myself. It's pure meditation. Thank you Nancy
Michael Bermudez: Amazing videos ! Thank you for the step by step and taking your time with it . Yes, I could actually mimic this cut on a Doll head and just practice . Thank you . Freesaloneducation ❤️
Mazie Styles: Absolutely love the step by step videos. Don't change a thing. I think the clarity in step by steps is what sets your tutorials apart from most.
stephanie wells: Matt Beck, you are my hero! All the videos are absolutely amazing! Your cutting with your head series really made me understand the head shapes. The concept has really elevated my haircutting. I did the short disconnected Miley Cyrus haircut on a mannequin the other day and it turned out awesome! Thank you so much for these videos!
Hair Candi: Beautiful cut! I love the step by step techniques!
kelcie simmons: love this tutorial. It's easy to follow and I love that they use professional terminology. It was very informative loved all the tips not only about cutting this style but tips i can use for any haircut. Totally going to try this on my friend today!!
Aaron Truman: I appreciate all the videos y'all put up. Great commentary. As a beginning stylist it is awesome to learn all the techniques and styles from a master stylist. So thank you all!
Tammy Smith: Great tutorial! If only my teacher in Cosmetology School would have been so educational I may have learned something beneficial instead of being fearful of every move I made! You do a great job with your explanation and I really appreciate the step by step instructions. Very clear and precise. Keep up the good work. Thank you!
Mandy Leger: Beautiful work. Very helpful. I appreciate your clean, precise technique. Extremely easy to follow, I can't wait to cut my mannequin. THANK YOU
el Faust: Thank you! Really appreciate the long-play, step-by-step instruction! Great teaching.
Ana Maria Mendez: I love your step-by-step tutorial, thank you for sharing your talent and knowledge. Btw, how do you make your hair partitions/sections? Any product you usually apply prior to haircut to keep a neat sectioning? Thanks a lot!
mamaboo cee: I love how at the end you took a perfect haircut and made it "slightly imperfect" which has always concerned me with bobs. It gives the cut some individual personality! Beautiful job!
Cindy Mitchell: As a new stylist your videos are such a great help!! Your techniques are helping me as I grow into the stylist I want to become!! Keep those videos coming!! I live them
maegan noelle: I loved this video, for someone who just got out of beauty school it's nice to be able to learn a haircut step by step and feel confident!
Stanley Rama: Very good video, with good explanation of the technique. It's hard to find such complete and well produced educational videos. THANKS!
Rochan Cris: Love the real time video as well, love seeing the entire process, wonderful, thanks:)
usaearthling: Awesome tutorial...lovely results. Your partings are very clean and that makes for a great cut. Thanks for sharing.
Jessi Red: Love the step by step! Don't change. I guess I could see more experienced stylists wanting it a little faster so maybe making two versions of a video if there is a higher demand for faster videos. If not, then the step by step is just perfect, especially for us newly graduates :) I personally love it that way.
Courtney Edwards: loved this tutorial! partings looked perfect cant wait to perfect mine while in beauty school.
kateri bardin: I love the videos and the voice over! Don't stop! I am in beauty school and the detail you give to these cuts is so helpful!!!!
kateri bardin: I love the videos and the voice over! Don't stop! I am in beauty school and the detail you give to these cuts is so helpful!!!!
captivapbc: Love the real time videos. Thats a beautiful cut. I hope I can re-create it. Thanks for sharing your knowledge or free!!!
Maria Flores: I love how you take your time to show step by step,and the clean way you cut. Thank you.
Jamie Evenson: Great job all around! Good camera angles, great voice over and awesome cut. Thank you
Stephanie Holmes: Definitely keep the length of the video! I love the step by step, and this haircut is beautifully done!
Aprill Roberts: Step by step, perfect . extremely helpful. Thank you.:)
carole clare: Great cut and very clearly explained. Don’t stop doing in real time. Thank you for sharing ♀️
Priscila Dickson: I really enjoy the full hair cut without speeding it up! I would love more tutorials :-)
pure goddess2: Love the cut and color. Keep the videos this long it really help me in prove my cutting. Thank you so much.
Joe Cooper: Thank you for showing how patient you need to be at the end of a haircut. Sometimes it seems that our stylist get in a hurry when the cut is almost finished and then the haircut isn't symetrical.
Stephanie C: This video was so helpful! Thank you so much! Awsome job! I'm in love with this cut
Linda Colgan: Used to do hair until shoulder injury and this stopped my hair cutting days. Which I loved so. Your hair cut was wonderful for me to watch. If I could do this again cutting hair I'd be running to take a class from you. Thank you so, Linda
Robin Hanff: I am a hairdresser and love watching your videos. Keeps people updated on the right ways to do a haircut..Thank you!!
Carla Foster: Absolutely love this haircut tutorial! Hair color was nice also
james eastman: I love this color and the cut is awesome...my hair has a lot more body but I hope my husband can recreate this look on me...I appreciate the detailed walkthru.
Elizabeth Castro: One of the best tutorial videos I've seen so far. The step by step is perfect and the haircut is awesome. Tks for sharing.
Tina Brewer: I love the step-by-step approach!! I can really understand and follow along, easily.
dave mcbeth: LOVE! this tutorial. Can't wait to try! Thanks:^)
§təphªniə: This saved my hair. I cut it all off to do a Bob but messed my left side up bad and the back and I watched what u did and my hair looks amazing now. Yay.. I don't even have to go get it touched up.. thank you for sharing..
kitkat21ify: matt I absolutely love your videos . Thank you soooo much, they really help me when I loose my flow in a haircut
Angela Acheé: Love this cut! I appreciate the length of this video. I'm a student is I really need the step by step!
Sharon La Tour: I like it when step by step, real time hair cuts are shown. Very nice cut!
Jana Cobb: I love these real time, step by step videos. Please don't speed them up!
mrs_music_teach: Fantastic!! Absolutely love these techniques!!
Robin Hanff: Love it!! I am a hairdresser and I had to go to 3 different stylists to get mine right. No one seems to be able to cut hair right any more. Sure wish I could have you do it right it'd frustrating having to find someone that can do a good hair cut!!
lidoosh: One of the best graduated bob haircut I’ve ever seen, Thank you for your perfect description!
TheArelis56: Outstanding! I really enjoyed the detailed description from the educator.Thank You!
blackmoonpearl: You are a fabulous Educator. Thank you for helping me become a better stylist. I love how you explain every detail. Just beautiful.
demouxfamily: Thanks, worked out really well for my daughter and I.
United Hope for Animals: No problem at all with the time the cut takes! All my great cuts have taken more time than one would expect.
juliana dovalle: great tutorial anyone can learn with it, a great hairdresser and a great teacher congrats
Frico1964: Awesome cut Matt, for sure I'm trying this at the salon. Thank you...You guy's are awesome.
Cecily McGee: Love the speed of the haircuts videos. The more detail and explanation, the better! Thank you:-)
Lauren Alvarez: love this haircut and the fact that you don't speed up the video in between. It's nice to be able to follow along step by step :D
John Cortesi: Beautiful cut mat! You are the Top! I’ve never seen a bad haircut from you! I love to watch you perfect haircuts! Thank you for the inspiration! John
Ray L: You are Awesome Matt ! Love the step by step process - Keep the Length of the videos !! Thank You
AhhCHOO: Its so satisfying watching the hair being cut :) Love the colour too!
Cathy Espinoza: I agree with you, you definitely pick up each point you're trying to make without speeding up the cut. I would definitely continue using actual time for each cut! I enjoy your videos. Keep up the great work.
Gina McCartney: I've been a stylist for 39 years, and I can say with all those years of experience that YOUR videos are the very best hands down! I'm so glad I found them!!! We should always be learning in our biz, and though I have done MANY of theses bobs, I learned from you- THANK YOU. I love your down to earth approach and your step by step procedure. PLEASE don't change a thing... and I would really love to see more on color because I am fairly new at even the basics of color. Thank you Matt!!
Kourtney Yowell: Awesome! love the step by step! thank you!
methinksish: I'm not a hair dresser but i cut my own hair. gave me some tips! great thorough video!
a google user: omg what an amazing job! the video is perfect too! thank you for sharing this!
Beverly Evans: I love it thank you so much for your teachings im learning a great deal from you
Wolffenhaus Merry: For the organization, clean and considerate workmanship I cheered. For the respect to the art and science of hairdressing, I breathed a sigh of relief. Bravo.
carrie zirbas: I like the step by step process! Very helpful
Free Salon Education: That's Awesome! Thank you for watching and please share with all your stylist friends!
Judy Klynstra: Nicely presented and done, thank you!
Christie Spry: Love, love, love it! I love that it can be very sleek, but then wild and fun with that texturing.
Free Salon Education: Thank you! It's at 0 because the head shape curves. As the head shape curves I start to elevate the hair but only to keep with a consistent 0 degree angle. If you get a chance check out our website and click live web classes. I have a web class on there you can watch that is all about angles and head shape. Any other questions do not hesitate to ask. Thanks again for your support!
Crowns by Crystal Nicole: Love Love Love! Thanks for the education. I’m a cosmetology student and appreciate the length and details! #newsubscriber
Maria Ganal: Beautiful work, great instructional video
Dawn Derosa: Hi there. Just wanted to let you know I am a new stylist. I watch your videos all the time and have learned so much. I worked for 1 year in a salon to gain experience and wanted to apply for an apprenticeship program at an upscale salon (that I've always wanted to work at). When I did my technical interview and met with the owners they told me I was a little too advanced for the program and offered me a job! I'm happier than I have ever been. Thanks for taking me to the next level!
anyaj smith MUA: this is great, often as a stylist there is pressure to be quick and I always feel it is better to take the time to do a great job as you have just done here , she looks amazing
Lily Espinoza: Bellísimo trabajo,muy limpio!
Lauren Swartz: i love your thoroughness! don't slow down the videos! thank you so much
Free Salon Education: This is the best compliment we could get! Thank you for watching and please become a member of our website and share this with all your friends thank you!
Sam Cee: I need to recommend this page to my hairstylist so she might learn something. i've been wanting this haircut for now 3-4 years.. and i keep getting a mushroom look/cut. and every time i go to get it cut it gets worse and worse. you guys are great!
I_am_Nikolina: I'm no hair stylist but i'm cutting the hair for the whole family..myself included. Will try this on my mom today :)) Thank you!
Trish Mill: Super cute hair cut . You always do such an awesome job!!
Erika Lanyi: At 15:32 when you start working on the first section on the top what do you use as a guide? How do you determine the length for the stationary guide? BTW I love this haircut! Do you have Paul Mitchell background? The way you are sectioning just reminds me the way I learned it at school. Thanks :)
Claira Grace: I looked at about 22 other video's before I got to yours. I like yours best looks more professional and I would do everything except the last part I would probably cut too much. I loved it. Thank you Grace Namaste a Perfect cut for her head.
Keeii Aann: I appreciate the simplicity in yr teaching and the time that you do it
Casaundra Reed: YOU DID AN AWESOME JOB!!!! I love the full length video, because I'm going to cut my hair myself and I need the extra tips. I used to cut my hair when I was younger with no problem, but it's been so long and I'm actually nervous this time around (GETTING OLDER)!!, and it's not too many stylist around that take this kind of care in they're work. So with that being said I think I'll do fine with your help :-) :-) :-) NO MATTER WHAT, KEEP FULL LENGTH VIDEO :-)
Tina Sprague: OMG..by far you have the best haircutting tutorial on u-tube! your videos are thorough and informative, thanks so much for the great education:)
Jocelyn F: WONDERFULLY SKILLED!!! I love it.
paula19762007: Awesome hair cut and great tuturiol as well!
Sarahgrands18: Beautifully done.
Aunt b: I would drive all the way from ky to get a haircut from you. ❤️ you are very talented and it shows in your work.
Eibmozluver: I can't believe how amazing this hair cut is! I just had my hair cut by two different people, still isn't right. You need to come to Florida. :)
Erica Green: Great cut and tutorial. The speed was perfect... Like u said its easy to follow.
Kelley Sussman: love this haircut , now I need to let my hair grow back in had an undercut and hated it .
lachase1: Looks great! Pretty color too!
Mandi Fitzgerald: Thankyou great tutorial love the cut beautiful...x
Kathy Dunn: I found your video to be AWESOME! I loved the step by step commentary & I could EASILY follow your direction. LOVE the finished product. You are very TALENTED so keep up the Awesome mahi ( Maori for work, job) :) :) :)
Debora Burns: fantastic balance of precision! and Texture well demonstrated, great education, and the instruction is very professional.