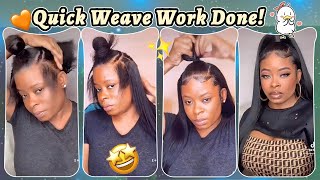
How To: Half Up Half Down Quick Weave Bob | Step By Step
- Posted on 11 May, 2022
- Bob Hairstyles
- By Anonymous
We are back with another hair tutorial I hope you guys enjoy this half up half down quick weave!
It’s super easy and super inexpensive☺️
If you have any questions comment down below and I will answer them!
-
let’s stay connected!!!!
⬇️
IG - Cennedy Elexis
•
Thank you so much for watching
•
FQA
age-24
Camera- cannon EOS M200
Instagram - cennedy Elexis
located - Chicago
For today's video, i'm just bringing you this look here and it's super cute and was super easy to create before we dive into this video. Do me a favor and make sure to subscribe to my channel and then also give this video a like? Well, let's just go ahead and get started. I'M just gon na go ahead and part my hair right across from ear to ear. So with a lot of like half of half downs, i know a lot of people like part their hair differently. But for me, i'm literally just gon na be parting from ear to ear and i'm gon na be starting like right in front of my ear here. So i'm just going in and just creating a part. So now i'm just going in and just making sure that this top section is out of the way and i'm just going to be braiding mine. You know don't be perfect at all, but we are just going to be putting a stocking cap on and i'm just going to, basically just pin it down in the front, and now we can finally move on to the actual like stopping stocking cap of the video. The stocking cap portion of the video - i totally forgot to mention you want to make sure that you're leaving out two sections of hair one on this side. One on this side - and this is gon na - be the hair that just basically is going to cover the tracks. So i'm just gon na be twisting this or braiding it or whatever, and just bringing it forward with the rest of the hair. And by no means is this part supposed to look perfect. This part is just basically about like separating the hair and just sectioning off, and once you have the hair sectioned off now, we can finally focus on creating that low bun in the back or if you know how to braid, you could even like braid it in The back, but you just want the back section - to be completely molded down, so i'm just going in with this even styling gel, so i'm just creating that ponytail in the back, and you just want to make sure this is the sleek as possible. So i'm just twisting this or braiding it in the back and then what i'm going to do is just basically like pin it up so that it's really really flat. So that way, when i put on the wig cap, everything is nice and flat. So once you have the back of the hair pinned up now, i'm gon na be going in with my freeze spray, and this just got to be free spray and i'm just gon na be spraying the back of my hair - and this is just going to be Like the first layer of protection for this hairstyle, and now i'm just going to be going in with my blow dryer and just blow drying this on a warm setting. Okay, so once you get done blow drying, they got to be sprayed. Now you want to go in with your protective shield, so this part can be messy, but you just want to go in with a very generous amount of this and just literally place it on the back of your hair, and the whole purpose of this step is Just to protect the hair from glue, this is just basically going to create a shield so that the glue don't get stuck to your hair. Once you glue in the trash and honestly one thing i don't play about is getting glue in my hair, so, as you can see, i use like almost this whole bottle of this protective shield, but i'm just not about getting glue in my hair. So i'm just going in and just applying a little bit more, especially like right here on the edges. You want to make sure that you hit those because the glue can get stuck there, sometimes too. But honestly, if you use this, oh i just literally like spilled. It okay! So now i'm gon na be going in with my wig cap and i got like three different wig caps. It just depends so this is just like the thinner wig caps, but i also just got like a um spandex wig cap, which is like a little thicker, so i'm pretty sure i'm just gon na be using this one, so i'm just putting on the wig cap As normal and i'm just pulling it down in the front, and you should be able to feel around for where you parted your hair and now i'm just gon na be going in with the white eyeliner to basically just trace alongside that part, so that i know Like where to stop gluing my tracks in so this part, don't have to be perfect at all, but i'm just going in with the white eyeliner and i'm just tracing around, where i put my part at just so that i know where to stop gluing my tracks. At once, i start gluing my tracks in and just because i really want to protect my hair, i'm just going in with one more layer. It'S got to be free spray on the back of this wig cap, okay, so now we can finally move on to the hair. So this is the hair that i got from the beauty supply store. This is just from the brand organics and i just got the inches 14, 16 and 18. for today's video. I'M just gon na be working with these two shorter bundles and i'm actually just gon na be saving this one, because i feel, like it'll, be pointless to use this long bundle if i'm gon na be cutting it anyway. So i'm gon na save this for a different video, but for today's video i'm going to be working with these two once you have it all unraveled, you can start to basically sorry i'm a mess, but what you want to do is just basically take one side Of the track and just measure it from the white line to the white line, and what you want to do is just go in and cut this. So after that section, i'm just going to go up like a little bit higher and you don't want to go up like too high, like you literally want to do it like inch by inch, and you really want the you want the hairs to be like close Together, so i'm not going up like super high, but i'm just going up like a little bit closer now and now i'm going to be cutting more hair. So i'm just going to start by gluing this and naturally with this wet the hair kind of like flips. In this way, so i'm gon na be gluing it this way, and so i'm just going in with my glue one time i bit this and i literally like exploded in my face. So don't do that just try to use your nails as i glue i'm just going to basically like kind of like drag the hair up so that the glue gets all on the wefts here. So i'm just going to start by squeezing this and i'm literally just gluing, this entire part of the hair here and i'm not using too much glue. But i'm using enough to where the glue will actually like stick to the hair and i'm just pressing this against the wig cap and as i'm pressing it. I'M kind of like pushing it down here. And this is just going to be the first track that we used, so i'm just taking my blow dryer. Now we are ready for our second piece of hair, which we already cut and measured. So i'm just going straight in and gluing this one now. Let me turn around just for reference so that you guys can see where i'm placing it at okay. So now i'm just going to continue cutting these tracks, just measuring them section by section i'm just going to speed through these clips, because it's going to get really repetitive, but just make sure that you're adding enough glue and just make sure that you are placing the Tracks pretty close together, you don't want them to be too spaced out, because then it's going to be like a bunch of gaps in the hair, so try to place them as close as possible. So i'm gon na speed through these clips and i'll. Let you guys watch it as i get higher up and as the tracks and parts get smaller, i'm going to start to basically shape my tracks in like a u-shape. If that makes sense. So, instead of just going from like ear to ear here, i'm going to start to shape them in a. U. So i'm just going to start here and still using the white eyeliner as reference here and i'm going to shape it up here and what this is just going to do is basically um. I'M trying to figure out how to wear it. It'S just basically going to make this section of the hair kind of like float a little bit better, so that when we do the top section, you don't need to see tracks you're going to see like hair. Instead, y'all see what i'm talking about kind of hard to explain, so y'all will see what i mean, but i just wanted to hop on and say that, because i'm about to start to shape these a little bit differently as i'm gluing them. Let me just go ahead and start to glue these in a u-shape and i'm going to proceed and i'll be back okay. So far, so good everything is flowing nicely. So what i was trying to explain earlier about gluing the tracks in the u-shape is, as you start to go up, you want to start to glue them in a u-shape, because what that's going to do is just like allow the hair to fall forward versus these Sections of the hair when the hair is just like randomly glued from ear to ear. As you go up, you want the hair to start to like flip forward, and it's just going to cover the tracks at the bottom and just make the hairstyle look a little bit more polished. I guess i don't know what i'm trying to say, but you follow me if you follow me. Hopefully you follow me. I don't know why that's so hard for me to explain. Okay, so i'm just taking like two tiny sections and i'm just gon na start to glue them straight across at the top here, and this is just going to be how we finish this off okay. So now we are finally moving on to the actual ponytail portion of the video. So you just want to start off by basically removing this part of the stocking cap, and you can just go right in with your scissors and start to cut right along where that white line was, and i'm just going in and cutting around the wig cap. Just making sure that there's like no excess cap in some tracks, like it might come off like as you can see, i was cutting around here and, like a part of the track, fell off, but that's mine, because, oh not this protective shield, all over my ear. Um but yeah you just want to cut around the perimeter and even if you cut off some tracks, that's fine because it's still going to stick to the head if you used enough glue. So this is what the back section is looking like. I'Ve removed all of the caps okay, so once you under the braid, you just want to take this section and just flat iron, it straight back, and it's just going to make this hairstyle look even more natural, because now it's going to be your natural hair kind Of like covering the tracks, and now we can go in and start to work with the top of the hair and before we do this, i'm just going to go in and just flat iron, this real, quick, okay. So now we can go in and start to create the ponytail and you don't even have to flutter on your hair. That was just optional. I just prefer to flat iron mine when i do styles like this, so now we can finally go in and start like. Styling, this top part in a stylus i'm going to be going in with my edge boosters edge control. As always, this is my go-to. This product honestly never fails me, and it's just really going to give me that sleek look and then i'm also going to be using this even styling gel and i'm just going to be using these too i'm going to go in with a little bit more product. So this is the even styling gel it's just basically like an edge control in a tube, but i'm just gon na be taking a little bit more of this. I'M just gon na be putting this all in like the front section here, and this is what's really going to just mold this and make it look like really neat and don't make the ponytail too tight. But you just want to make it like tight enough and i'm placing mine right in the back here. Okay, so i have my ponytail and now i'm just going to move on to my edges and then i'll come back to the ponytail and i'm just going in with my edge control and i'm just going to do the same thing. I always like to do my edges with the comb, but i'm just swooping them in like a c shape direction, and eventually this is just going to start to go back in with the rest of my hair. So i'm just going in and just braiding this ponytail and now i'm just going to go in and wrap it. So now i'm just taking my bundle and i'm just separating this section from the piece of the bundle, and this is going to be the piece that i used to wrap around the bun to secure it. Now i'm going to go in and start to wrap the actual hair around the bun okay. So as i'm wrapping this last piece around, i'm gon na be using this to secure the end of the ponytail. So i'm just taking this last piece of hair and i'm just going to lift the ponytail and wrap this around the entire base. So so far so good. I do want the top of this ponytail to just be like a little bit thicker. So i am just going to add, like half of one more bundle just to make the like ponytail part a little bit more full. So i'm just going to speed through these clips - and you guys can just watch me so i'm just raising the ponytail and wrapping the end of this piece of the bundle around the base. Okay, so this should be thick enough, so i'm gon na go ahead and just cut the bundle here right on the weft and now i'm just going to wrap the last piece around and as i wrap it around, i'm just going to pull and just take the End of the track and start to use this to secure the entire ponytail okay, so the ponytail is nice and full, and now i just want to basically create like um like a band around the ponytail. So i'm just gon na be going in with my braid. In here i'm just taking a very small amount and i'm gon na start at the end. Here i'm just going to spray it so that it stays and i'm just wrapping this around the base of my ponytail and with this i'm just spraying it as i go, and this is just going to make this hold a little bit better. And it's also just going to secure it even more okay, so once you have that wrapped around you just want to comb it out and just make sure that it's even all around, so we are almost done. One thing about me: i'm gon na cut my hair, though so i could leave it like this. I feel like it's really cute like this, but something in me is just wanting to cut this like right below my shoulder, so i'm gon na go in and cut this, so the last thing that you want to do is just finish. This look up for the finishing spray and i'm going to be using this one by olive oil and this one actually says wig spray, but i'm pretty sure they changed the name of it, because when i used it a while ago, i just said finishing spray, but I just really like it, because what it does is just gives the hair like a sheen to it and it just gets rid of like any residue. So we are officially done now. I'M just going to go ahead and do my makeup and then i'll be back on to show you guys the completed look. So here we are with the completed look. I love the way it came out. Thank you so much for sticking around. If you stay tuned to the video - and that's all i have for today's video, thank you so much for watching and i will see you in the next one.
Comments
Anasia Amere: I’m obsessed❤️ my new fav youtuber! Something about your soft spoken chill vibe got me on top the bomb tutorials! Keep it up boo
Samuel Yeboah: Your hairstyle is looking great Very pretty in the video Wow,this is really sumptuous video Everything on point Congratulations
Brianna Jackson: I can’t wait until I get this good at doing my own hair
Anneth Dikgang Meyer: Love ur hair do’s baby. I do them all the time, South Africa
Real Advantage Productions: How to half up half down, Cennedy Elexis. I like it! You did a good job with this one. I"m looking at you. I watching. I like what I see. Great video! I have just sub1scribed to your channel. So congrats, you just gained another one. Keep doing what you do
Jhon Wain: ERES Ídolo NÚMERO 1. KIYOHARAA.Uno necesita a alguien como tú para montar el mejor espectáculo del día. fotos, maquetas, videosu, música, teatro y acción. PARA_PÚBLICO. .
Shawnquan Walker: did you recurl it ? so pretty btw
Jennifer: Thank you!
Ali Pearl Hair: Loveee the video! Could you please check the email?
IamSol: Where did you purchase the protective shield stuff ?