Natural Sew In Weave With Leave Out
- Posted on 13 January, 2022
- Bob Hairstyles
- By Anonymous
Hey love here is my new video on how to do a natural sew in weave with a leave out on the top .
My Client brought in her own hair
Hair From Amazon
Brazilian straight Hair 3 Bundle 16" 18" 20"
(PRODUCTS USED)
*Coconut Oil https://amzn.to/3Fr6bF5
*Weaving Net https://amzn.to/3npOLlV
*Hair cutting scissors shears https://amzn.to/3GcD89w
*Weaving thread https://amzn.to/3q9Km8I
*Weaving needles https://amzn.to/332ZYlp
*Parting comb rattail comb https://amzn.to/3tbgJ8J
*Butterflies Clamps Hair clips https://amzn.to/3n9rZ1P
*Hair Polisher heat protector straightening spray https://amzn.to/3zFEJSy
*Hot comb https://amzn.to/3F841tF
*Hair Polisher heat protector straightening spray https://amzn.to/3zFEJSy
Check out My Amazon Front Store For Hair styling and Wig making Essentials Products
https://www.amazon.com/shop/carolinefa...
~~~~~~~~~~~~~~~~~~~~~~~~~~~~~~~~~~~~~~~~~~~~~
(MY VIDEO FILMING EQUIPMENTS)
Camera Canon EOS 80D https://amzn.to/3GcK1Yq
Sigma Lense 18-35 mm https://amzn.to/3qbl5em
SanDisk SD Card 64GB https://amzn.to/3HNrXnZ
Tripod https://amzn.to/3n9MFXw
Ring Light https://amzn.to/3HIyNLs
My 15 years old Son (Isaac) do all Videos Recordings for me
Check out my full Beauty Room Tour Video https://youtu.be/kGzi0ogh1lc
Check out my previous video
Easy New Swiss lace Invisible Lace frontal Wig https://youtu.be/l_ieOdv2dAU
~~~~~~~~~~~~~~~~~~~~~~~~~~~~~~~~~~~~~~~~~~~~~
(KEEP UP WITH ME)
*Instagram: @fabbulousc
*Facebook: @fabbulous
( BUSINESS INQUIRIES ONLY )
*BOOK ME* For Clients Custom Made Wigs or My Pre Used Wigs Sale
@fabbulousc // DM me on Instagram Inbox me on Facebook or Email me
*If you are in the Delaware, Philadelphia, New Jersey or Maryland Area
*Book me || Am taking APPOINTMENTS ONLY *
*BOOK ME for Sew In Weaves, Wigs installation , ponytails, Quick weaves, Bridal hairstyles, Bridesmaids hairstyles, and MakeUp Appointments
~~~~~~~~~~~~~~~~~~~~~~~~~~~~~~~~~~~~~~~~~~~~
My Name is Caroline , I'm a Mother to a 15 years old teenager son name Isaac , i am a License Cosmetologist, a MakeUp Artists and a
License Practical Nurse. I am located in Delaware
DIRECT LINK TO SUBSCRIBE TO MY YOUTUBE CHANNEL ....... ITS FREE https://bit.ly/1FabbulousC
LIKE | COMMENT | SHARE - Thanks
*THANK YOU FOR WATCHING AND SUBSCRIBING TO MY YOUTUBE CHANNEL *
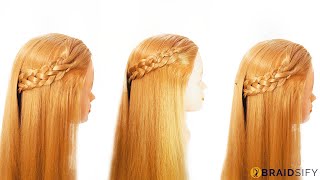
Hello, my loves welcome back to the channel, so today we are going to be doing a natural sew in on this beauty right here. This is miss watching my beautiful clients. We are going to be doing a natural sew in width or leave out on the top. As you guys can see, her hair is very thick and full, especially in the back and then her edges are a little bit um fragile and thin. So we're going to be doing a leave out that will have her hair out on the top and then pour out her edges around the sides, so this sewing can look as natural as possible now, starting off with my any braid. I call this my ending braid. Okay, um, it's a section that i cut off right around the leaf out. This is my secure, ending braid. This is the last braid i'm going to put the last track on once the sew in is complete, so you can see the section of this leave-out braid is very thin. You i always keep it thin so that the top of the sewing is not bulky. Next, i'm going to just suction off some part of her edges, leaving her edges out, because i do not want to pull on her edges. They already look a little bit fragile, so i don't want to pull our edges, so i'm leaving her edges out for this sew in next um braid. I am using some braiding hair to add and i'm going to start with her program meters braid. This is the braid that goes around her entire hairline and goes around her ear and then comes back around near her nip area, and then i go ahead and do another braid from the other side of her head. That goes around her ear. Again comes back to the back side for anyone who has really thick hair. This is how i do the braiding, so i do not have a bulky braid in the middle of the person's head. Once i have my ending braid in my perimeter, braid, those three cornrows braids are the most significant braids to my natural sewing. After that i just go ahead and cornrow the rest of the hair going straight back and i just connect the ends of each braid. As a zigzag pattern, so i get to the middle of the person's head and, as you guys can see, her hair is really thick and full in the back and in the middle of her head. So this is the braiding pattern that i use for all my girls that has really thick and full natural hair. This part on just eliminates any bulkiness or any knots under the person sew in this method of braiding just eliminates any bulkiness. Also in the middle of the person's head, this just gave me a secure and a very flat sew in that. When i do do the person sewing it's nice and it's flat and it's secure. Now all i'm going to do is take my threaded needle and sew down the rest of the two end brace, and this would be my braiding partner and next i'm just using a little bit of natural coconut oil. I just put some on my hair and then i use my finger and i smeared it out in between um each braid on her scalp. This just helps eliminate any dryness underneath her weaving net, as you guys can see, i'm about to apply the weave in there. But we want to keep the client's scalp, nice and moist under the weaving net, because trust me, the living that can get a little bit. Itchy with the scalp, especially if the person's scalp is really really dry so right now, i'm just taking my throwing needle and i'm sewing around her parameters braid to attach the weaving net after sewing down the weaving net to her um braiding partner. I take a pair of scissors and i cut off the extra um nets. You can see i'm going around her leave out and cutting out the extra net got to be careful with this part because you can cut off the person's hair. If you are not careful and now on the start of the show um, she did bring in three bundles of hair and she got the hair from amazon. Like i said in my videos, i work with any hair my clients bring in whatever hair they can afford. That'S what i work with, i will ask for the links for this hair, so i can put in the description box if you guys want to check it out, but i work with any hair my client spring, and they just want to get their hair done. So, whatever hair they can afford whatever hair it brings me, that's what i work with all right, so the first step i'm going to do for this sew in is take a single track, and i will use my thread and needle and attach the um single track To the perimeters braid, i do not attach this track on top of the braid, but i attached this track underneath the braid and i attached it to the weaving net. Besides the braid my reason for doing this particular technique and it's the first step i do when it comes to starting the sewing install is because, if my client do decide that they work out or they want to get rid of the head on their shoulders or On the back, they can be able to pour their sew ends up in a nice little ponytail or a nice little bun if they choose to without the hair being out and being nappy around the sew in, as you guys can see, this technique just helps eliminate Your natural hair, showing in the back and you can have a nice little pull up just like this. If you decide to do a ponytail or a bun, maybe you work out, or maybe you want to just get the hair off your shoulder. So this is the reason why i do this particular technique of attaching the one track underneath the braids in the back after applying the first track, it's time to move on, to applying the rest of the track. Now for the rest of the track, i do double the tracks, so i start from the nip area and i attach um the track to the weaving net going from one end of her one end of the side of her ear to the other side of her Other ear: that's how i will apply the tracks in the back and i usually do about three to four tracks in the back and then i'll move on to the side for the size part of the soy i just make like a u shape. I would start from one side of her ear on the top of my ankle braid and i would just move it around to the other side of her ear and attach it to the other anchor braid. And that's how i do this part, which is the middle part of the sew-in, and now that we at the top of the sew in we are getting closer to our ending part um. I just continue to use the same method with the double tracks and attach it to the top of her head and now for the closing piece. As you guys can see, i am using just a single track and remember my ending brace that i braided in the beginning. I am going to attach the single track to my ending braid, and this is why i call it my ending braid, because it's my last braid and it's the last stitch that makes the sew in complete okay. So once i put that last stitch in you can see how perfect that closing is on the top of her head all right. So after the sewing is complete, it's time for us to style this hair. She just wanted something nice and natural. Looking and the hair was already nice and straight so i'm just i'm making it more sleek. So before i put the flat iron on it, i am using a little bit of heat protector. I spray on the hair. I also use my hot comb to like press out the um tracks, the beginning of the tracks before flat ironing. This helps to eliminate the thickness and the bulkiness that the rubber band that's attached to the bundles sometimes forms um on the tracks. So i used my hot comb and removed that, and then i just use my flat iron and flat iron, the rest of the hair. So all right, so we are at the top of um flat ironing her hair. We are almost done with this install i'm just using my flat iron and i am just making the top part really nice and sleek after i'm done with the top part, i'm going to open up the leave out and then i'm going to first hot comb. The leave out before i flat iron it and you can see how nice and sleek this amazon hair is girl. Okay, i love the texture of the hair, it wasn't too silky, but it wasn't coarse. Either it had a nice little texture that matches her natural hair. Really nicely and right now that we, on top to her natural hair, i'm just making sure the parting is nice and centered, because she did ask for a middle part, making sure that the parting is right in the middle um. And then, after that, i'm just going to take my wax stick and apply it to her natural hair and then i'm going in with the hot comb and hot comb her natural hair. First, before i go in with my flat iron to flat iron, her hair and after flat ironing her natural hair girl, do you see the perfect match between her hair and the weave? Do you see that blend? I was so amazed at how easily blended her hair matches this weave and i actually love the texture of the weave because it wasn't too coarse, but it wasn't silky at all and her hair was the perfect match and both of them just blend in so well. Together that the results were just flawless - and this is it for this natural store sew in video, look at that blend. Okay, her natural hair in the weave here was the perfect combination, i'm just using a little bit of wax and edge control to sleep down her edges and you guys look at her finished results. Okay, her hair blends so well with the weave, and it was like a nice combination, so that is it. I hope you guys enjoyed this video if you haven't subscribed. I don't know what you're waiting for okay, there's more videos like this coming. Thank you for watching
Comments
Kiara Jackson: Looks so natural and blends well great job
Vicky Barnett: This is by FAR the best weave install leave out I've ever seen!! Absolutely brilliant
Penelope Palace: You slay this per usual. Love her it’s so natural
Alexandria: Looks pretty. I’m getting my first sew in on Wednesday. How long does the process typically take ?
Her Royal Hair Bundles: Oh wow your foundation is super neat. Great job for leaving out the baby hairs and maintaining tension on her edges specially with relaxed hair
BrenoGamer pro: Pena que não tem tradução, mas amoo assistir esses vídeos parabéns
Lovey Gordon: So professional super neat and natural I love it
Kiara Moss: Really pretty! Good job!
Malanie Jones: This looks really natural ! I been thinking about getting a sew in for the first time. I think ima do it. Good job girl !
one love: Waww I love it you did great job
Rachel Bundles: Looks great !
Gorgeous Energy🥰💗: This looks nice !
Shesfinery Official: Beautifully done sis
Mary Baskerville: You always do a good job.
Miss Lisa: Can you make a tutorial of this braid pattern please?
keisha Sanita: Now that’s a detail job well done
Rica G: I love it. You did a great job. What is that product you used to lay her natural hair down. It was yellow. I didn't see it in the description.
Njeri Pic album: How long will the style last? I'd like to try it soon.
Nicole Tobar: Love it it looks nice....okay Amazon hair come thru
Precious Queateh: Great job darling ❤️
Ashani Parlin: How do u make the leave out stay down whenever I go out it blows all over the place? Hair spray n wax?
Dandre Erasmus: As a Caucasian hairdresser I'm stunned. Awesome video!
Lenise Damus: Very nice
Angel Sams: Very secure braiding
Real Estate Answers: Great video. What state are you in?
zevito beauté et couture:
Aja Thomas: I like it
Christopher Chacha: Good! Good! Gooooodddd
Abigail Aberdeen: What's the name of the weave?
Edner Joseph: Like it
Tamara Hite: Omg where are you I need this done bad
Montayeé Audrey Wreh: Lib
Getrop guerrier: Lib