How To Cut Round Layers Haircut - Long Layered Bob Haircut Step By Step
- Posted on 13 July, 2020
- Bob Hairstyles
- By Anonymous
How to cut round layers haircut
Long layered bob haircut Step by step
Layered Bob Hairstyles
*Giving is hold forever*
*********************************
Thanks for Watching!!
Please like, comment and share!
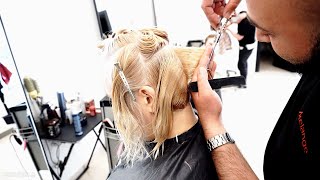
Hey everyone welcome to another hair. Brain live, i'm michael pizzalitis from slave hair education, and this is the beautiful elena. You should be our model for tonight. We'Ve got some exciting haircuts to show you it's just beautiful, simple round layers all right. So let me dive in and show you how we're going to start. We'Ve taken actually a few sectioning here. So if you see there's one section which cuts it into a pi section, so we have four sections across what i've done. Is i've then subdivided and taken a horizontal section in the back and what i'm going to do first, is i'm going to start to create my length in the back, so this is actually going to be the longest point of the haircut, because everything after the back Is going to end up shorter in the front because it's a round shape, so what we're going to be doing is we're going to be working from this long length in the back to shorter layers in the front, so this length that we're doing in the back Is actually the length that the client is going to see at the end of the haircut? So what i'll do is, as i finish this bit, i'm going to show you when i bring the hair forward, we're going to see where the length of this haircut is going to be placed. So what we're going to do is when you bring the hair forward. You can see that this is the length that's going to be our haircut, because everything from the front is going to come, shorter and softer and layered. So the length that you cut in your first section in the back is the length that you're going to see in the front when you finish so once i'm happy with the length that i have. I can then move on to my next section, guys. Let us know where you're tuning in from let us know if you can hear what i'm saying with this mask on. Let us know what time it is. What the weather's like how you're doing today are you having breakfast lunch or dinner beautiful? So, as always, if you have any questions, technical questions about this haircut or any haircut for that matter, feel free to ask us so we're just moving on to our second section in the back and again we're just taking a nice horizontal section from the back and We'Re creating our outline, so this is just the outline in the back we're going to then do the outline in the front and then we're going to do the layering afterwards. So if you're just tuning in we're doing the same thing, we did on the first section we're just bringing the hair down and we're cutting in a nice clean line. If you want, you can always chop into it afterwards. If you want a softer finish, but i always like to make the outline blunt first so that i can see my balance better because sometimes when you're pointing into it, you don't really get to see the balance so well. So i find a neat little trick is to actually cut it quite blunt at first and then afterwards you can soften the hair cut out by using your pointing techniques as well. All right, don't forget to let us know where you're tuning in from we always love to hear where you guys are watching from. So that's the second section done and now we're going to move on to our third section. So this is just the same repetition. We'Re just cutting the back the outline length in the back and then we're going to be doing the front as well. Okay, the front is going to be shorter, because this is a round look, so that means that the back is longer and the front is shorter. Already have some people from texas and they say hello to her brain and slate here: education from liverpool, florida, austin, hong kong, texas, again italy, nice texas, is the winner. You guys are the melbourne. What james, beautiful hello james! So james is our uk director. He runs the london academy we have now london from james, essex, finland, new york, beautiful beautiful. I love it. The whole world is watching guys thank you for taking your time out, while you're having breakfast or lunch or most of them in texas, at least that i know it's lunch, oh beautiful guys very nice. Well, thank you for taking your time out to watch with us from around the world. We really appreciate it. We'Ve been doing live videos every month for the last two years with hairbrained. We love it so much. You know we thank you guys so much for tuning. In let us know where you're tuning in from right now texas is the winner. I will have some more interesting crying uk. Does anyone want to take me to hawaii? I wouldn't mind that beautiful, so we just keep cutting the back. So it's a repetition. Now we've got our basic length in so we're just coming back in and working it in so any extra hair. That'S sticking out the bottom now is being cut into the length that we're creating. So what i like to do is before i do my layering. I really like to get the base lining, so the baseline allows me to understand how much i can layer the hair. I don't like to layer the hair straight away and then do the outline, because i don't know if the outline is going to end up being weak or strong. So by doing all the outline first, i have a better idea of what i'm doing afterwards. So i can see the weight and i can decide myself whether i need to layer it more or less. But if i haven't got my outline in, i don't know whether i need to layer more or less beautiful. So what we're doing is we're just connecting the hair in now to the outline that we've done already, so, if you're just tuning in don't worry, this is actually what we did on every section working all the way up to the top of the head. So we just took horizontal sections across the head and cut in our baseline now we're gon na soften this we're going to actually create layering, but for now we're just working it as if it's a one length, nice and square in the back. What we did was we took horizontal sections across the head. We brought all the hair down and we cut it into. The outline last thing to do before you move on is always have a little check of your balance. If you feel like, if it's a little millimeter longer on one side, you can just refine it, and then you move on because this, as we said, is going to be the length of the haircut. So the length that we see within the haircut is what we see from the back all right. So it's just a nice one-man technique in the back and now we're going to come across and do the front all right, so you're dizzy or not yeah, you're, okay, good good! We like a little merry-go-round. So what i've done here is i've just separated the hair from the back and the front and divide it in the middle, but what i'm going to do now is i'm going to start to take diagonal sections now. The reason why i want to take diagonal sections is because i want this softness to come from the front and connect to the back. So i'm looking for something which curves around from the front and comes to the back, so i'm taking sections that are going to mirror my cutting line. So i'm just moving the hair away. I'Ve taken a nice piece out. I can see where it curves to, and i've already got my guideline from the back, so this hair that we've already cut in the back is my guideline for the front. Now it's very important, i comb the head down so that it's ready for me. So the way i like to cut hair is i like to always make the hair ready for me. I prepare the hair for when i'm going to cut it now that it's clean and i can see, i can even see my outline. I don't even need to cut it, but i can visualize where i want the front to be. I can visualize what i'm going to cut because all the hairs down i'm going to have an outline across the whole thing. So i'm going to start by bringing the hair down connecting the back in and my fingers are going to start curving towards an enemy's face. So we're gon na end up having shorter in the front, and this is why we call it a round line at this point. So right now, it's just around one length after i do the one length i'm gon na then layer it and that's. What'S going to become a round layer so right now i don't focus on the layering, i'm just focusing on creating my beautiful round line. So now we can see from the length in the back how we've connected around line to the length of the front. Now the safest thing to do here is to do the second side, one section straight away. Now the reason for this is balance is very hard to achieve. So, by doing your first section on both sides, you have an equal density of hair and it's much easier to then check your balance and make sure they blend. So i'm just clipping the hair away again. So now i have two sections same density on either side. One side is done and the second side has not been started yet okay, so i have a guideline from the front and from the back, so my guideline from the back is what i've already cut so from what i've already cut in the back. I have a guideline. My guideline from the front is a piece of the hair that i've already cut on the other side. So if i move that hair over what i do is i have a guideline from the front and from the back now i need to connect them okay. So what i'm going to be doing? Is i'm going to be pulling the hair down again? First of all, onto the shoulders going quite straight across when i first connected and then starting to immediately round my fingers up towards the front. What i'm doing is i'm keeping a visual eye on where i'm going, because i really want this to connect on both sides. So i'm looking visually at how it's going to connect and i'm looking at my guideline, so you see there's my guideline and i just make sure it connects on the other side. So, by using the back and the front as a guideline, i can see where everything is going. So let me just do a little check beautiful. So i have a question for you yeah i love questions. Would you use a small teeth or the right teeth and why? Okay, i would use the small teeth when i want more accuracy and i want more tension all right. I will use the wider t when i want to lose the tension and perhaps less accuracy, finer hair. So if it's very fine hair, that's very straight, then there's no problem in using the white teeth of the cone. If you have someone, let's say with very curly hair you're, probably better off, to use a finer teeth, so you have more tension. So always when you're creating lines it's going to be different depending on what tension you use all right. So for me, it's all about control and tension, so i feel like here i have best control when i use the finer teeth and that's what i want to see so just now connecting it to what i've already cut in and just giving it a double check. Again, because a very nice comment from alison elia, excellent teaching and clear explanation very refreshing for an educator. Thank you so much very kind. Thank you! So much yeah we try and make it as simple as possible. I think i think haircutting should be simple. You know. I think i think it's very visual. What you see is what you get, and that way i'm always checking and i'm always looking, and so i think that's the best way to work is to visually check as you go. So thank you very much for that comment. It means a lot guys, don't forget to like and share if you are enjoying this, give us a thumbs up if you're enjoying it please, you know, let us know where you're tuning in from we love hearing where you guys are around the world and what you're Up to beautiful, so you can see what i'm doing is i'm just focusing on one side now. The reason why i'm only focusing on one side is because i've already created the balance, so i've already cut both sides created the balance and now what i'm allowing myself to do is just simply focus on connecting. So what i'm doing is i'm bringing each hair from the back to the front and i'm connecting it in each time as i go, so i'm going to do this all the way until i get to the center of the back and there's no hair left to Cut so, as you see, the sections are starting to become lower, so we started in the front and now we're ending up just in the back, because the hair is less and less to cut each time. Okay, beautiful we've got even more people tuning in from uk new york, also through shattering love. The approach and humility cheers. Thank you guys. Thank you. So much have norma from jamaica. That'S the most. I can say sorry guys. I didn't even know what you said yeah. I don't know what i said either, but i hope it was something. So what we're going to do is we're going to work through the second side now, so what we've done is we've got the back length which we created. So let me do a quick recap for you. We first cut the back in a nice one length in the back area. We had only the back section, so we had a section that was only the back. We brought everything down and we created a line technique in the back. What we then did was we took diagonal sections opened up the front by cutting it from longer in the back, and we ended up shorter in the front. So this is what creates the roundness. So, even though it was square in the back as soon as we curved it up, it became round. We did one section on the other side for balance and then because we had the balance, we brought everything down and connected it in so i've done one side. Even though i've done one section on the other side, i still haven't finished yet so what i'm going to do is i'm going to take again these curved sections which go from the front to the back and then we comb the hair down. So again, it's all about it's all about uh, making sure that the hair is nicely combed. The hair has to be ready for you before your fingers go in if you're, trying to detangle hair as you're trying to cut it you're never going to get something. That'S that precise, to be honest, so a really good tip is always comb the hair and prepare the hair for you, so that you're ready to cut straight away. So again, this is very repetition. This is just repetition: we're just taking curved sections around the head. Cloning to the natural fall, putting in a clip for safety, finding the point where the hair connects and it needs to be cut in and just combing it forwards finding where the hair is and connecting it in. So it's very easy because we did that first guideline. If you are liking this guys, please give us a thumbs up. Let us know where you're tuning in from, but also you know if you have any questions about what i'm doing, if something doesn't make sense, if it does, if you want to ask anything about this haircut or any haircut for that matter, you know, please feel free To let us know, i think you leave them without questions, since all the comments i get is like beautiful technique from iman mahana nicely said, he's a brilliant educator from julie button and expressing where to teach us. Thank you guys, and you can even hear me with a mask on. I love it. Imagine if you take it off, so this is what we love doing as well. It'S nice to cut here again, it's nice to be around people again and it's nice to still be connected. You know one thing that we really loved was still doing hair brain lives when we were in quarantine. You know it kept us connected with the community and just a big thank you to hair brain for always having us and allowing us to connect with everyone. You know. So, if you're not following hair brand already guys, please please you have to there's loads of live videos every day and loads of great educators from around the world. So what i'm doing is i'm just going to take one center section here? So if you just pop your head down a little bit, so it's just one center section right now, which sits to the back of the crown. So it's just one section in the middle and this is what we're going to use to start deciding our layering. So here we have one guideline now. The guideline is the length of the front, so remember guys we cut the front already, so we brought all the hair down and we cut the front. So what i want to do now is, i want to layer it, but i don't want to cut the front. So what i'm going to do is i'm going to take a little bit of hair out and i'm going to start to think about that hair that i'm going to cut all right. So this hair i'm going to start cutting it from the front, i'm going to work my way back now, because this is going to be a round layer. What it means is: technically, it's going to be shorter in the front and it's going to go towards longer. In the back, so it's shorter in the front and it goes towards the longer in the back. So what we're doing now is we're going to start thinking about where this is going to end up. So if i put my comb here and i start cutting across i've got to think how short is the layering going to be in the back? Do i want it shorter? Maybe it should be a little bit shorter than that. So maybe my angle has to be a bit flatter, so if my angle is a bit flatter, how much do i end up cutting off okay? That looks like a nice amount of levering, so what we're doing is we're deciding how much we're going to cut off before we even get there. So i'm lifting the hair up again, i'm seeing where it's going to be cut. I'M seeing that i'm happy with that, and i go straight in and i start to cutting the layering, so you can see the way we're doing. The layering is very precise. It'S with a lot of thought. It'S very methodical, we're using our comb as a guide to see where we're going to end up in the layering at the end of this beautiful so again, just moving the hair out the way taking another section in and always thinking about, not just what i'm cutting. But i'm thinking about where i'm going, so it's not what i'm cutting it's where i'm going. So i have to think at the end of this. Where am i going to end up, and is that where i want to be so, you can see that even though it's a very basic haircut, there is a lot of thought that goes in to it. So i'm not cutting and guesstimating. I'M cutting to make sure that i end up exactly where i want to be okay, so once we've done this center section, this is great, but now what we have to do is we have to connect it on the sides all right. So what i'm going to do again is i'm going to take the back away so right now we're just focusing on the front and not the back, and what i'm going to do. Is i'm going to take this guideline and i'm going to first of all move it to one side, so i've just done my outline in the back, my outline in the front one section in the middle, rounded and now what i want to do is start connecting It to the sides, so i'm taking just a nice curved section around the head from the top very slightly diagonal towards the back and now again, i'm very lucky because i have guidelines. So if we bring this around so once i lift all the hair up once i lift all the hair up, i can see the guideline from the front that i've already cut and i can see the hair in the back that i want to cut now before I cut this i'm going to have to make sure i'm not going to cut the front outline, so i take a little bit of hair from the front and i lift it up. Can you see that that's actually below my fingers? That means that the front is not going to be cut and i'm safe, so i can connect it so just picking up - and you know we call it the pinch-tested slate, you just pick it up and you pinch it and make sure you're not cutting, because your Fingers are above, therefore, what you've done is you've done the center, but you've also blended it in to the rest of the haircut, so you've gone from the middle in the front and you've connected now to the sides. So we worked through one bit in the middle. We got the layer in the middle, then we came from the front and we've connected it across and we're going to keep doing this all across one side until there's no hair left. Personally, i like to stand in the front of the client when i do this and then we're going to pull the hair. So let's pull the hair up again and then let's have a look. We have the guideline in the center and then we have the length that we're supposed to cut off now. One thing you can check if you want to make sure you're doing this right is, if you want to know how much am i supposed to elevate. So what i mean is, am i supposed to pull this all down, or am i supposed to pull this one back? What am i supposed to do? Well, actually, what you've cut in the center is telling you how much to pull it backwards or forwards. So if i pull it very forwards, come here george, can you see how this is a really messy line? There'S no cleanness in the line, because i've really brought the hair down. Now, if you look when i bring the hair back again, it's a very messy line. So what happens is only when you pull the hair at the right point, the same point that you cut it. Is it clean so hair that you cut is only clean when you cross check at the same elevation and the same over direction. So once you have a clean cut, it means you're at the same elevation and the same over direction as your initial guideline now. I hope that makes sense guys because it's a big one and it really changed the way i worked. So let us know if that makes sense, give us a thumbs up, give us a help help and then obviously, if it doesn't, let us know and i'll try and go over that one again, because we're still going to do the other side as well. I'Ve got one question. Sorry, if face frame too short, how can connect to the back? It looks too much layer from front. It looks too back. I think that was the question yeah you can layer this as much as you want you can you can layer unless you can layer it more? You can do the front more or less so remember when we, when we started this haircut, what we did was we cut the length in the back, so we started the length in the back, so we started by doing the outline in the back. We then came and created the length in the front. Now the length in the front could have been anything. It could be very short or it can be long where you point your fingers is where you decide. So if your fingers are pointing very up, it's going to be short if they're, pointing more straight or if they're pulling down it's triangular, so you decide how much you want in the front and then again with the layers. So when we pull the layers up, if your fingers are pointing higher you're going to have more layers or not so many layers, so you're going to have more heaviness, if you point your fingers more straight, like i did you're going to have a lot more layering. So it all depends on you, but by having control of your technique, you can decide what you want to create. So really, you are the master of this haircut and you decide what you think is right or wrong when you do it, but by understanding that how you create the length in the back, how you create the length in the back and the front and then how You do the layering to decide how short or long you want it to be. You really have control of this haircut and you can decide what's best for you, so i hope that answers your question. Thank you very much for asking good one more, that's relevant with that. What if she puts the hair on one side yeah, so if she parts her hair on one side, you can either do the front and you can decide to make it more disconnected. So, in other words, one side longer than the other, but to be honest, i normally try and do this more balanced in the middle. The reason is: people move their hair around a lot. You know, and it's very nice to think that oh i'm going to be very technical and it's going to be great. But in reality, when the wind blows - and she finds one long piece because the partings move the milliliter she's - probably going to think you missed the hair when you cut it. So that was my experience, my experiences. You know a lot of people that it's nice, that you want to cut so technically, but at the same time, if they find one long piece, because her parting's changed in the wind, she's kind of going to say you don't know what you're doing and that's and That'S what i found it's better to do something a little bit more balanced and yes, it might not be by the millimeter perfectly balanced, but at least when the wind blows it's all going to connect. So i hope that answers your question. It'S my personal opinion um. You know, obviously there is a technical way to do it as well, where you connect things and i'll, try and explain to you that in a second now cool so just connected at the last section on this side and what i'll do is i'll. Just show you what we do if we do a side parting. Sorry, i've got one more until you show the side parting if you want uh. So what happens here? You have a side parting. You pull the hair down with your fingers over the face you find where the parting matches, so, where the length is the same on both sides, you can actually cut a little bit. So you have a guideline. You do the same thing. You connect the back that you've already created to the lens in the front, but because it's a side, parting one side will be longer than the other, so the front will be disconnected, so the front will be disconnected and the back will be connected. So the front will be disconnected. The back will be connected because one side's longer because it travels further around to get to the face. What you want to do now is you want to decide your layering so from the back, you can actually take a little piece and if you want you can even cut it. So now you have a guideline in the front because you've done the outline. It'S longer a guideline in the front, because you've done this side and it's shorter. What you can do now is you can take vertical sections and first connect the short side and then connect the long side. So basically the back is a stationary guide and then the front is different, so this side will be shorter and you connect it around and this side will be longer and you connect it around and then the back is the same way that i'm going to show You now, i hope that answers your question cool, so moving on now, what we're going to be doing is we're going to be starting by connecting the backing as well. So after i take these clips out, i'm going to do a little bit of a recap for you, so let us know where you're tuning in from, if you are enjoying this, please like and share. Thank you for the questions. I think you had one more from you, george, didn't you yes, how to practice caesar relief, i haven't mastered. Yet what do you mean? I don't know i was asking you. Maybe if you explain to us mean by relief, i'm not sure what you mean. Magdalena. Sorry, magdalena, i don't really understand what you mean by scissor relief. If anyone else knows what that means, please let us know cool so just a little recap on michael pizzeria's from slater education. This is the beautiful eleni she's, letting us cut her hair today. So what we've done is we've just simply started in the back. We'Ve done an outline in the back everything one length brought it to the back covered in. We then brought the hair in the front and we cut an outline in the front which was shorter. So we went from longer into shorter into the front, so that's what makes it round. We then came from the top and we connected the top by cutting first the length in the front, and we worked our way towards the back. What we actually do is we constantly check as we go. I then took curved sections around the head and i started to connect from the top all the way to the bottom right. So what we had was we had a guideline from the middle and we were just simply bringing it up and connecting it across like that all right, so we did the same on both sides. So now we actually have layering in the front, but not in the back, and what i'm going to do now is i'm going to show you how we connect the layering in the back. So what we do is we have a guideline from the top. I'Ve already cut hair and then, if we pick this hair up, we can see that the back hasn't been cut. Yet it's still one length. So what i'm going to be doing is i'm going to be taking a triangular section, all the way from the top of the head from the crown to the bottom? Okay, so all the way from the top to the bottom. How did you watch it? A client came in and got to the consultation. Oh, shame, don't worry, don't worry, there's a replay, there's replay in the end. I think yes, so once we finish this, it will be posted on a hair. Brain'S timeline you'll be able to go back and watch this whenever you want. We also will post the live videos on our website. So if you go to that's slavehair.com hair dot com, you will find our website and then there you see a couple of the live videos. We'Ve done so, i think we've got six up, but we've got another 30 to upload, so we upload every week so guys. At this point, i want to explain what i'm doing i've taken a triangular section in the back. We have the guideline from the front and we have what we haven't cut in the back. So what i'm doing is i'm going to lift the head up? I'M going to find the point where we haven't cut from and i'm going to connect the short point to short point. So i never cut holes because what happens is now that i've connected a short point to a short point. If i decide i can just let this hair go and it blends, but if i want more layering i can just keep going lower and every time i elevate lower, i find another corner to connect short point to short point. I can stop or i can keep going so it's really up to me when i want to stop layering the back. I can keep going, but that's enough, so i'm laying it about down to the occipital bone. So this gives a really nice bit of layering that connects from the top to the bottom. Now, what i'm going to do now is i'm going to start connecting from the side. So again we have this triangle: i'm going to take another triangle, this time working my way towards the front of the face. Don'T forget, let us know where you're tuning in from guys, we love to hear it if you are enjoying this. Please share please like please comment. We really appreciate the support guys if you're not following us already, please check out slate hair, education's facebook page. We do all kinds of crazy stuff around the world, some crazy haircuts and some classic ones. So what i'm doing now is i'm over directing the hair more central in the back and i'm just connecting the guidelines so because i'm standing here, i can see my guideline from underneath. What i'm trying not to do, though, is elevate too low if i elevate lower than this point, i'm going to create a hole in the haircut, so what i'm looking to do is i'm looking to actually cut from above that point. Okay, let me know if this is making sense guys. Let me know if you want to recap, so i'm just taking again a triangular section, so it's pretty much pivoting around the head at this point. So if you see there's the crown area and i'm just pivoting around each time, i'm going to pivot round each time, what i'm doing is i'm pulling the hair up and i'm elevating more each time. So, each time i'm pulling the hair higher up higher up each time, i'm finding the point of connection and i'm connecting the hair across, and this is going to create a nice bit of layering on the sides as well. We'Ve got gemalimuri saying i was taught short point to short point over 20 years ago and it never let me down exactly if you do not cut short points. You are cutting holes in your haircut that you will never get rid of. Oh, my god. It'S so true, it's so true. It'S such a big thing, short pointer short point is by far the safest way to cut hair, and you can actually decide when you're going to be finished with it or not. If you just cut holes in the hair, you'll be chasing them to connect them. So thank you for that comment. It really did change my way of cutting as well. Really is such an important thing to learn when you're in school, all right beautiful. So what we're doing now is we're taking again these lovely triangular sections. We are again using a little bit more elevation and i'm again i'm gon na try and move. So you can see we're pushing the hair more towards the back, not completely, but more towards the back, starting with the short point elevating up to the top and connecting it in from the center. What effect does when you pivoting so an effect when you're pivoting is when you want to create something, that's triangular or round so imagine when you're peeling an orange you kind of peel it with these pivoting sections, don't you you kind of pivot it round. So, when you're using pivot, what you're doing is, if you pivot right and you pull everything to the back, what you're doing is you're creating a triangular shape, something shorter in the back longer in the front. That'S why you pivot or you're pivoting and you're, not pulling it to the back you're pulling it forwards like i am now and every time you pull forward you're, creating a rounded shape. So when you pivot it's either, because you want to pull things back to create length from the front or you're creating pivot, because you want to work around the head and push the head forwards and create something round. So i hope that answers your question. If it does give us a thumbs up, give us a comment: send us blow us a kiss. I don't know anything and i've got one one more alexandros lopez. Could you explain the short point to sharpen again, please yeah sure, sorry i'll do it now, when i'm doing this bit sorry, my shoelaces have come undone. If i fall on my face right, it's because of that, so what happens is when you pull the hair up? Can you see here is a short point, and here is a short point. What i can do is i can connect these two an example of not cutting short point. To short point would be. I want to connect to this bit here and, if i go in like this, i've just created a massive hole in the haircut now in order to connect it to the next bit, i'm going to cut shorter and shorter and shorter. So, basically, what you're going to do is you're going to end up with a big hole and you're never going to be able to connect it until you eat the front. So what you do is: instead, if you grab more hair, if you look, here's a short point, here's a short point now i can connect it. Where is if i just do that, i'm going to create a hole. Does that make sense short points? A short point is: is the best way to cut you can never go wrong. You can always stop what you're doing and you know not just what you're cutting, but you know where you're going as well, which is even more important because it's nice to focus on this bit that i'm cutting. That, i think, is really important. But it's kind of irrelevant if it ends up too short or too long. So it's really about looking at the full picture and from that deciding i hope that makes sense both of them. They said. Thank you very much lovely explanation, and that makes sense amazing. That'S what we want to hear guys. Thank you so much for tuning in guys. We really appreciate it, don't forget to like and share so what we're going to do now is we're going to actually be doing my secret. This is my secret. It'S a big secret! It'S not the pin code to my bank account, but it's definitely a good secret. So when you want to cut the front you want to where it could really sit off the face, you take a little triangle section. So from the parting you take a section which is would be your sweepy fringe, let's say or your. I don't know your sweepy bangs, whatever it is in america and then you have this little triangle area. So it's a triangle pointed in the front. It'S longer in the back, lift the hair up so that you keep the back in the back of the comb and the front in the front of the comb, and you pull it over. You pull it over the other side, and then you whack. All of that off, okay, so by doing this, what we're doing is we're creating the front shorter and the back's longer so the back's longer the front shorter and have you ever heard short hair pushes long hair? Well, this is what makes this head just sweep off the face like we're seeing now, so it's a great great great technique to use no one's asking for my bankrolls good good good when you do that on the other side, you're gon na change positions, i stay In the same position, so i pull your hair up, do it slower, slower sorry, so i curve my put the comb in towards the face the teeth of the converse towards the face. I turn the comb around. I put my fingers underneath and i go across the face. It'S almost like you're going. How do i put it against the triangle? So you have the triangle with the point and wherever the point is you're coming straight out, so it's one side and the other side and what this does is it just creates shortness in the front and a really soft sweepiness in the fringe. Now, what we're going to be doing is we're going to be doing something now, what i call an overlay so for me, layers is something where you come up, but what i'm going to do now is i'm going to go way over the padding, so i'm going Over the parting area and anything that i find i'll just dust it, what this does is it really flattens the top layer? So if you ever done a layer and it kind of looks a bit mushroomy, that is because of the weight at the top of the head, you either have a corner at the top or you need to do a little bit more of an over layer. So again, an over layer is just when you come from the parting and you go over the parting beautiful and that creates that nice little bit of softness cool. So that's it. Basically, what i'm going to do is i'm going to dry it off and then we'll give you a lovely little recap straight after that. It'S not going to be long as well put in a little bit of this leave-in conditioner, which has a little bit of volumizing in it and we're going to give it just a really s kind of a naturalist blow dry, a bit wavy you, okay, your new Hair is almost complete, so what we're going to be doing is i'm just going to give it a very quick blast, get all this loose hair off and then we'll start sectioning it and just giving a bit of a twist dry. So what i'm going to do now is i'm just going to pull all the hair back. I'M going to take a rather large section in the back here when i'm blow drying, because what i'm going to do is i'm going to be subdividing this into smaller sections and i'm just going to clip the hair away. So it's not bothering me, i'm going to use a round brush. Take your large section, i'm going to twist it around the brush and i'm going to start to twist the hair as well. Okay, i'm just repeating the same thing as i'm working around. So this is just creating a very, very soft bend in the hair with a very natural band. So let me know: if you guys do this in your salon. Do you do something different? Do you do the same? Is everyone back to work now? How are you guys finding going back to work you've got to support it, she's using the same technique to do dry waves into the hair, easy and fun? It'S so easy. It'S so quick i'll! Tell you a secret! I don't really like to blow dry, so this is a really easy way of doing it. That is super duper, quick, really, quick. In a silent environment, you can rock dry the hair a lot and it's easy. That was a secret that was a secret. What kevin murphy did you use, so i used um just a little bit of the body mass, so i'll show you now so i just used a bit of the body mass really easy leaving conditioner and it was super easy to work with. So what i like to do now is just find the parting separate, the hair and just start to work through the back area. First um, so one side's done one more to go, only two more sections and we're done so again. How you do this? Is you just go from the rooftop? You just turn the brush and you go down again and you turn the brush and you go down. So it's really quick. It'S really easy. It'S really fun. It just gives a really natural finish, so i'm um going to grab one more hairspray just to get some do-over. So this is like a dry texturizing spray just to give it a little bit more okay and then we start to shake out the hair beautiful. So we start to see the movement in there. The legs coming through beautiful, very easy technique, very simple that looks great and then a little bit of spray as well cool, so stand up for me and let's do a little recap as well great. So this was just a really easy and simple round layer technique all right, so i'm michael pizzelli's, this is the beautiful eleni. She'S been our amazing model for tonight. If you've made it this far, thank you so much. We really appreciate it. What i'll do is i'll give you a little recap: we started in the back and we created our light technique in the back, so we had the back separated and we created the back. Only. We then came from the front and we've brought down the front and we connected from the shoulders all the way to the top, so we brought all the hair from the front down and connected that's what gives this open, rounded feeling to it as well? Okay, after that, what we did was we started. We lifted the hair up and we had the front as a guideline. We decided how short we wanted our layers in the back and we connected the front to the back, so that was just in a center section. So it's just from one center section. We then took the hair up and connected it from the center to the sides, one side and same on the second side. We then brought a nice little triangle section from the top and we had the length on the top. Already as a guideline and we connected from short point to short point taking out the corners every time we went, we then pivoted from the top. So from the crown we pivoted and we walked our fingers around cutting out the corner throughout this part of the haircut. So we kind of did the top. You did the bottom and now what we did was we removed the weight from the middle of the hair color same on one side, pivoting around same on the other. We then took a little bit of hair from one side, cut it a little bit from the other side of the front and cut it. This just shortens the front which gives the hair an encouragement to sit more off the face and uh, and that was it really looks great within it. So i'll, let you guys have another look at it, but thank you so much again for tuning in. Why don't you take your mask off and let people see it in all of its glory? Okay, thank you. So much as always, guys, it's been amazing to be with you we'll see you next month for our monthly hair brain live on the 11th of august. I believe, but thanks so much and good night from us, see you soon bye,


Comments
strong woman: I absolutely love this cut so very much. Thank you!
Maria Soto: I love the way you teach; I want to continue learning! Thanks for sharing!
Paula Mc: Beautiful and very well illustrated. Thank you
Martin Adams: Brilliant teaching & tips ! Especially short point to short point approach . Also avoiding creating holes. Angles for cutting so clearly explained. Many thanks ✅
I should be sleeping: It’s midnight in Nashville and I wanted to follow up with you and let you know what my experience with your cut was like for me today at work. It was lovely...truly lovely I’m so GRATEFUL for you to explain this . My client had longer and very thick hair but it looked STELLAR ... we LOVED it. ThankYou again!
Rita Avila: Love love love!! One of the best tutorials ever!!
Julie Warner: Minnesota watching you, great guidance on this haircut. Thank You!
Damnedone: Watching from California...I appreciate your technique immensely!! I wish I could get your hands on my hair ♀️
Adam Balogh: You guys are so perfect with the techniques and design elements.
Suse Gz: Greetings from CA USA. I love how you explain everything. I’m not a hairdresser but in Quarantine everyone is :b
Nathalie la: Love this!
kimmy0868: Painfully slow process, although a very nice cut. Good for students.
Shantelle Fernandes: Hello from Dubai, UAE! Came cross your video as I'm looking for a haircut that would suit fine and thinning hair. What would you recommend, especially with thinning in the front of the crown and forehead area? This was explained so well. Thank you and take care.
Carol Steinfeld: Lovely. Sadly, I don't think I can do this to my own hair.
Joegi Tan: Thank you for this wonderful techniques! God bless !! From Philippine
Colette Clifford: Are you dropping the ends to save you length
Linda Ntina: Very nice!!
Sandra W: I'd like to share this with my hairdresser because nobody really listens when you tell them you like laters or a shag.
KhunnineJamieMelbourne Chom: Beautiful haircut from Melbourne Australia
December January: KY USA .... I prefer soft V in back point cut ... hair pulled forward on each side, cut at forward angle.
Valerie Neil: Fabulous teacher
rique: How to have a curly hair like that..that's what I want to know instead
Jacqueline C: Nice layers. Bad blow dry.
LightsCamera Tamara: Glad vids can be made without face covered again. Harder to understand
Diane Perez: I'm gonna cut my own hair
susan gunn: Adjust your camera so we can SEE how much hair you're removing? Camera work SUCKS
denise strawford: its wierd to see a person cut the ways his hands are ,,,
HARRY. KEVIN GEORGE: You have to tell the photographer. Take close shots Photographer too far
Chelsea Vuchinich: Who is the stylist?
Mister Jaroslav: Nope. It is not a round layer haircut.
Kimberly GILPIN: Unites states ky South Central 2 hrs till breakfast, doing fantastic explaining your cut on your patron,
cano cano: Cali
lauderprincess: Louisiana
Cindy Durham: I'm watching from Economy, IN
Helen Pitari: Brisbane Australia
Tina Wrinn: Arizona
Caren Sun: Who is he???
JoAnn Villotti - CDOT: Colorado
Cindy Stimson: NC
Brenda Tews: Would be clearer without mask. There is no reason for him to be wearing a mask, if she is wearing a mask. I am using closed-caption to understand his words. From Idaho...
Tina Osburn: Hello from Austin Texas
D M.: Utah ! Hablas hasta la madre ..... Talk to Much !! Que ABURRIDO !!!! BORED !!!!
Kimberly Serrano: Dixon, California
Catherine Mac: I wish you’d take off the stupid masks. So unnecessary ♀️