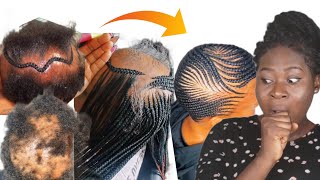
Detailed Parting Tutorial | How To Get Perfect Parts | Medium Knotless Braids
- Posted on 10 January, 2022
- Braids Hairstyles
- By Anonymous
Don't forget to follow me on my socials:
Instagram Hair Page: @derastyles_
Instagram: @odera.Ani
TikTok: @oderaani
Business Inquiries: [email protected]
DERASTYLES OILS:
Not only do I do hair, but I also sell oils. I’ve talked to so many of my clients about their natural hair and the issues they face and one major issue is that they cannot retain length. That’s where I come in. After doing extensive research, I’ve come up with an oils that grow and strengthen your hair. Let me help you grow your hair! Place your order here: https://derastyles.myshopify.com/
Hair Used:
42in Outré X-Pression Pre-Stretched Braiding Hair
https://www.amazon.com/dp/B07Y8VSL9Y/r...
Products Used:
Shine N Jam Conditioning Extra Hold With Honey,16 Ounce https://www.amazon.com/dp/B071L1SJLP/r...
Shine-N-Jam Silk Edges With Olive Oil 8 Ounce Jar https://www.amazon.com/dp/B00BIPJQO2/r...
Style Factor Edge Booster Extra Strength Moisture Rich Pomade | Thick Coarse Hair (Ruby) https://www.amazon.com/dp/B084JN5BXL/r...
Hey guys welcome back to my channel if you're new here go ahead and click that subscribe button. If you're returning welcome back today we're going to be doing medium, knotless braids, i'm going to teach y'all how i part for my from ibm, knotless braids and how you can get clean, clean parts. Just like me. So, first off, i'm gon na start by parting ear to ear um. This way i have this is like the baseline for everything. Once you get the ear to ear parting, everything else should honestly be straight. So when i do this, i focus on making this part literally like clean. I get, i make sure the line is straight. I make sure everything's clean until i move on to the next step. After that, i'm focusing on the bottom section of the hair i like to gel up the edges and the flyaway just to make sure that when i'm dividing this into two, i can see where i'm dividing honestly um, based on the size of the um, your client's Head you're going to divide it into either two parts or three parts, but no more than that um since we're doing medium, knotless braids, i already know the size. It'S it's just ingrained in my memory. I know the size of my medium knotless braids and that only required me to part it into two parts. After you divide this into two parts, we then move on to the front of the head. So, first and foremost, i'm gon na divide the hair into two. It'S not on camera, because i forgot to change the angle, but i'm gon na first start by making a middle part straight down the head, and i am using shine and jam gel. I use the same gel in every video, i'm using the shiny gem gel just to um part these sections, so i have my two parts at the bottom and then a straight line down the middle. My next focus is getting the parts for the front of the head um. The first thing i do is i i like eyeball, how the rows are going to be, and it really helps like when i actually start making the lines just to know where the line needs to be and honestly you can base it off the size of the Other two parts: they're pretty equal, so you know how thick you need to make it um, i'm using a shiny jam gel to clean up the parts and basically i'm i'm parting, five sections. When i do my medium knotless braids. That means there's five sections in the front when i say five sections i mean like not counting the the area below the ear, but in the area above the ear. There'S five sections total. When i do my small knotless braids, there's six sections - and i do my large knot and sprays, there's four sections and you can choose whether to braid or twist the sections um her hair was very thick and i knew like when i was. If i were to twist this section, it would just untwist, so i twisted the back two and then once i got to you know the thicker section of her head. I started doing the braids that it would stay. I would like to get in total. There are seven sections, five sections above the ear and two sections below the ear. I'M now gon na put this hair away, so i can start braiding and honestly, this keeps everything so neat um. I don't have to worry about other hair getting caught into the hair. That i'm using right now and it allows me to clearly see like i box, you'll, see as i'm doing now. I make boxes and create my boxes for each row before i actually start braiding and i'm able to see like her whole head and the layout a lot better. If i don't, if i end up not liking these parts later on, i can always adjust, but at least i have a layout so that i can honestly you move so here i start doing the ladder method in the second row and basically the edges of the Boxes in the row, above i make sure, are in the middle of the two braids below this way. The braid falls in between the other two braids and makes for a fuller head clean, clean parts. This is where i slow down exactly how i section each part and i'm actually going to show you how i do the base of a knotless braid. So you know why not um so right now, i'm taking out the braid and then i'm going to show you guys how i part it gon na get some gel just to slick down that part. Just so it's easier to get my sections and then i use the rat tooth comb and i make my part first of where i think it's going to be. Then i add gel and i go over that part again. I, like my parts to be clean. It'S like geometry to me, literally like and making parts it's like therapeutic. If, i'm being honest so look like look at me, i'm focused it takes me literally this long to do every single part, yeah um, this the perfectionist in me, i swear so after i do that. I just twist off that section and it's good to go. That'S what i like after i do the twist i use my clip just to separate the sections and make sure like no hair gets caught in the neighboring section. I add more gel because with coarser hair with 4c hair, with type 4 hair in general, you're going to need a lot more gel just so that it looks slick and that the braid looks clean. So i add more gel and then i comb it through like. But be careful when combing clients hair, i know personally, i've had my hair ripped out, which is why i like you, can see like once, there's like a tug for real i'll, stop and then i'll see where it loosens up but um, add gel and then comb. It through thoroughly because as you're braiding, you don't need it to get stuck because then it's going to mess with the um, the neatness of your braid. After that i part each this section into three parts and that will be for my three braids. I start braiding um. I take it under honestly, i'm not the best at describing how to actually braid, but i will get a more detailed video just dedicated to braiding. So i can just break that down for you, but i braid twice to secure the base and then i add hair and then once i add hair, i braid again add hair braid, again, add hair and after i've added three pieces, i basically hit like all the Legs of the braid so, like all the sections should be even at this point, that's when i switch to an under braid and i just start braiding um, i add hair to like i get to the thickness that i want it to so right now. The base is too thin, so i add maybe one or two more strands and then once it's thick enough, i will just continue braiding and only add hair to keep up with the consistent thickness um, not to make it bigger um. And then you just you, just continue braiding agile as you go along. If you feel like the hair is um coarse and it's not it's not blending well with the braiding hair. Add gel comb brady after that i basically finished off the head and do all the parts. I honestly like watching my time lapse. Videos! It'S like what is that thing like how asmrs are y'all know. The word y'all know the word, but i like watching my um time lapses and just look at those parts. Look at the parts. Look at the parts gorgeous gorgeous girls, love clean, clean parts, but thank you guys so much for watching. Here'S the finished product, you're gon na see all the parts go ahead and like comment and subscribe and share this video with all your peoples and your friends.
![Top 5 Best Ombre Braiding Hair [ 2022 Buyer'S Guide ]](https://static.hairurl.com/p/2022/08-28/544910449cbf102aae4c74c85a1f7702.jpg)
Comments
K E L L Y: For anyone trying to recreate this, I tried counting the number of braids on each row and this what I got: 2 section on the bottom(ear to ear part); 5 sections on the top Row 1(starting from the nape of the neck)- 4 braids Row 2- 5 braids Row 3- 8 braids Row 4- 9 braids Row 5- 10 braids Row 6- 11 braids Row 7- 8 braids (top of the head middle part 4 braids on each side)
Irocc4life: Thank You Girl! I just did some Knotless Box Braids with beads ON MYSELF and I used your parting tutorial. MY HAIR CAME OUT FIRE! I made sure to link your video in my description.
Sanae LaVette: This parting Method is is so bombbbb. Definitely going to try this the next time I do my own box braids. ☺️ I love how slick her hair is too! Wonderful work
Bonnie minus clyde: Thank you this video was perfect very detailed straight to the point and very easy to understand I used this method and it definitely works
Irocc4life: Thank you so much!!!!! Girl!!! I’m going to try the knotless beads look on myself and I’m going to use this parting technique
CandlelitRose: Thank you, thank you, thank you! I'm braiding my daughter's hair for school for the first time and this is so helpful. God bless you!
simply unknown.: Oh wow, I am definitely going to try this method. I passed this video a few days ago and I decided to watch it, good thing that I did because I struggle with parting my hair and it takes a while. This one is very helpful, thank you.
JM89: Just tried this method today and it helped me out sooo much I got finished in a few hours
Monet Sabree: The easiest parting video I've ever seen! Thank you!!!
Rebecca Sauveur: Thank You!!!! Now I'm confident enough to try this on myself !
Folawumi Serah: One of the best video I ever watched on braids. Thank you,it so detailed
Jamie Marie: Thank you so much for this tutorial!
Yonna Cashé: this was so helpful ! Thank you girl
Ms. Rhonda: I love it. I can't wait to practice more and perfect it
Jasmine PT: Damn girl! You did that! Between the parts and the braids. That’s clean!
ApplesauceToABoss: This paying method seems like a very easy posting method if you're braiding your hair yourself. Very simple to follow. Thank you!
Tamarra Goodwin: Watched your tutorial 3 times trying your method today
Beautifully Dej: So neat! you’re very talented
Tamisha Hill: Great job, thank you❤️
Brianna’s Journal: Amazing work & awesome tutorial
OutstandnBeauti: I finally found the perfect sectioning video‼️‼️ My braiding life just got easier! ✨
Bria Chanel: Very helpful thank you x
SHATICE SHATICE: Yasssss great job! Love it!
Fola Shade: This is beautiful ❤️
J Russ: You’re so good at explaining what you’re doing and showing the visual to match. I had to subscribe!
Jessica Barnes: just came from your tiktok and watched you faux loc tutorial and now this one. Gonna try doing my hair like this for the first time this weekend. Wish me luck lol
NicoleB Jones: Follow your tutorial last night hopefully all is well but I definitely see this working
Deevine_Es: You slayed!! Thanks so much for this!! Subn for sure!!
Shamia Worsley: Great video! Super helpful, thxxx sm❤️
Tarajii Jade: This parting method is Everything!! Explaining the SECTIONS for Smls,Meds,Lrg❤️ Helped A lot. Thank You Sis!
Vivian Avant: This video is a life saver! You are so bomb!
Whitley Henry: What would you do different if her hair was thin to keep the style looking full at the end?
Quickels Pickles: gorgeous! roughly how many braids are these?
DaMinkMobsta Cam: You are absolutely amazing !
aqeelah !!: such a nice tutorial
RiRi: How long did this take?
Bella Johnson: How much do u charge? Would love to know what everyone in the chat charge for knotless or box braids
Dominique Crawford: How often do you add hair after the three on the foundation?
R Blair: I have to try this. How did does it usually take with pre parting
Mykayla: Amazing work!
Irocc4life: I love this…. Will be trying!
Kier: So satisfying!!
MERCY DAVID: Please How do you make the braids same length ? (Front and nape area)
Shaide Bradford: Love this I've been trying to learn how to do my nieces hair thank you so much but I do have to ask and ik I sounds stupid lol where is the best place to get the extra hair and what is the best kind
Ebonique Knighton: Can you show how to get these clean parts on yourself? I struggle getting them straight on myself
BEAUTY BY MENYE’: How many packs of hair to get for this look??
Vonyetta Williams: I loooooooved this video ❤️
Asalaam Alaikum: The best!!!! Thank you
Alicia W: Where did you get the wrist gel holder ?
Shaamya Dishner: Thank you!
Satra Lafleur: How many packs of hair did you use?
Misskaylared: Thank you !
RahDesirez Street: Flawless
Samora Yesus: Amazing go girl
MsCutess: perfection
Bria Chanel: How many packs of hair did u use ?
Jonie Scott: Clean parts forreal
94Marrietta: How many packs of hair was used?
Aziya Williams: can you do smedium?
Chrisanthia Williams: I see your watching queen of the south Love the tutorial
Infamousyaya T: How many packs ?
Bria Chanel: How many pieces of hair do u recommend to add to small and medium knotless braids
Mimi: What type of gel u use?
Dee Nunn: Those parts are crispy
Feinyx L’Shae: YOU ARE SO BOMB!!!!!!!!!!!!
CeeCee Tracey: Be nice to see it from the front
shavooprice1: Thank you!!!! #newsubscriber
Aliyah Taylor: How many braids are there and cute
Yanna: The show in the living room was keeping me interested LOL
Jasmine Higgs: Yessss hunny
Kassidy Nicholeee:
Ashley Pace: The braid was always an under braid u just changed the position of your hands
Carol Owens: how to contact with you as a client
ThatGirlNiya: What y’all be using ? I don’t like shine n jam .
Latania Blake: What blonde color is that?
angeline: Game changer
Ndengala Forcha: What color brown is that
Ky Precious: cute asf
Taneisha Gittens: Rcg