How To Do Straight Back Feed In Braids
- Posted on 13 March, 2022
- Braids Hairstyles
- By Anonymous
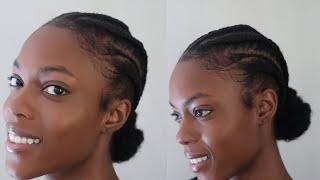
How to do Straight Back Braids
In today's video, I am going to share with you How to do Straight Back Braids.
Straight Back Feed-in Braids on 4C Hair can sometimes be challenging but with just a few steps you can achieve a sleek look that your clients would love.
I hope this video helps someone and if you have any tips you can share with me, please do so in the comments.
DO you need a PRICING GUIDE for your styles. Check out my new ebook!
https://niquelynn.com/shop/the-braider...
FREE FROM BRAIDER TO BOSS DOWNLOAD
https://niquelynn.ck.page/dadcc79273
SHOP ALL OF MY FAVORITE PRODUCTS
https://www.amazon.com/shop/niquelynn
Tech Equipment:
Ring Light:
Keep up with me on social media!
Instagram: Nique_Lynn https://www.instagram.com/nique_lynn/
❤ JOIN OUR NEW FACEBOOK GROUP:
Hair Hustle Hope Collective
https://www.facebook.com/groups/HairH...
Facebook Page: Braids by Nique Lynn
https://www.facebook.com/BraidsbyNiqu...
Business Inquiries and Partnership Opportunities please email: [email protected]
⚠ DISCLAIMER: Some links in this post are affiliated. You are not required to use these links but your support helps my channel grow and is always greatly appreciated!!! Thank you!
#feedinbraids #braidstyles
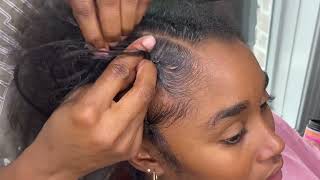
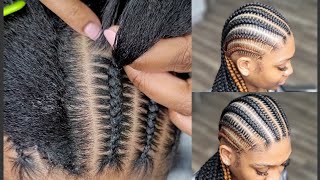
Hey guys and welcome back to my channel if you're new, i'm nick glenn - and this is the place where braiders turn to learn braided hairstyles develop tenacious hustle and flourish in hope. In my last video, we went over tips for braiding 4c hair and we received a request from our girl, crazy saturdays, requesting a step-by-step tutorial. So that's exactly what we're going to do today. So, let's jump right into it anytime, you are doing straight back braids. I highly suggest you, starting in the middle, don't be afraid to stand in front of your client to truly make sure that you're in the middle of their head. Once you establish that, then you can go in back of your client to make sure that everything lines up and when you're working on your middle part, you can literally line it up right at the middle of their neck. So you want to use the front of them to start it off, and you want to end up in the back using the middle of the neck as a guide. Now i'm going to part her hair from ear to ear, so essentially i'm just parting it in half. Once i part the hair in half, i should have four equal sections since she's getting six braids. All i have to do now is create three sections on each side, so i'm going to start here in the top left corner of her hair and i'm going to part out three vertical lines. Once i part out the first section, i like to go ahead and just do a very loose braid. The reason why i do this is because i am just getting the hair out of the way and it's allowing me to still have a clean canvas that i can see everything that i'm doing so for anybody who might just be catching the video and they're not Sure what we're doing please understand that this is not the final braid. This is just a rough draft. Okay and now i'm just going to repeat the same steps that we just did just two more times so now that the front is set up with your draft braids. It is time to line up the back, and in order to do that, all you have to do is take the end of the part that is in the front section and then direct that part down to the nape. Now i know that some people are going to watch this and feel that this is an unnecessary step, but for some of us or for some of those who are just learning or just want to take the guesswork out of getting symmetrical braids. This is a tried and proven method for anyone who has watched my channel for a long time. You know that i am a fan of pre-partying, so even though i could still accomplish this style without doing these steps, it just gives me a peace of mind that once i get to the nape, i'm not going to be running out of hair or my braids Are not going to look crooked because i started off on the side and then you know i miscalculated somewhere. So i just like to take this extra time. It doesn't take that much time to do this if 30 minutes, but i just like to take that time. So that i could have everything set up and then, when i'm ready to commit to the actual style, all of my parting is no longer even a thought. All i have to do is begin. My braids do this also allows for me to adjust anything fix. Anything. There'S nothing worse than getting to the end of your style and feeling like. Oh, my goodness, i wish i could have done this over or i wish i would have moved this here or i wish i would have moved that there so again. Another benefit of this step is just to be able to see exactly where your braids are going to fall and clean up anything that you want to clean up now. The other thing i wanted to let you know - and i got this tip from the braiders - only network on instagram when i used to pre-part, i used to use a lot of product during my pre-part and listening to her videos and listening to her instagram suggestions and Things like that, one of the things they spoke about was not using product during your pre-part because in in a sense, you're actually wasting your product. So now for my pre parts, i just part it out with no product and then when it's time for me to start my braids, then i use my product. So i found that really helpful and i hope that you guys will find that helpful too. Just like in my last tutorial, i will be using the neat braid conditioning, shine and gel. This gel works great on 4c textures to clean up my part, i'm going to use my gray barber comb. I'Ve gotten questions in the past about what's my favorite parting comb, and i have to say that it is definitely this one, but you do have to be careful because it can be a little bit sharp. As i continue to part. I really would like to know what are your thoughts so far. Do you feel like this is an effective method? Is this something that you're willing to try? Do you feel like it's unnecessary? Let me know in the comments. So last but not least, let's go ahead and talk a little bit about stitch braiding. So when i go ahead to start my stitch braid, i do separate that piece out in the front there and then i'm going to braid a few times i like to braid anywhere between three and four times before i begin to pull in my sections. You can see that i'm just going to use my pinky finger and pull in a section and braid, and then i'm going to alternate side by side essentially doing the same thing. So one thing that is important is the amount of hair that you add. You do not need to add oversized pieces in order for your stitch, braids to form you can add very thin pieces that will help you keep your amount of control as you work your way down the braid another quick tip when you're doing your stitch braids is To just make sure that you use your product on both sides before you start the braid, and then you could always use your product as well as you are continuing to braid so guys. I really hope that you found this tutorial helpful. I hope that i answered the question by showing a little bit more of a step by step and getting into some of those deeper details of the parting. Remember that braiding is something that is truly experimental and you can do things and try different ways and try different methods to see what actually works for you and then you take what you learn and then you make it your own. So guys again, i hope this video was helpful to you if you are looking for more tips and tutorials for all things, hair hustle hope you can join me in the hair, hustle hope, collective facebook group, and you can also follow me on my instagram, where i Drop content almost daily so guys again enjoy. I will let you just finish watching the rest of this video. Please leave any questions, comments, requests or anything like that in the comments, and i will talk to you in the next video, as always, god bless so um. Oh so uh foreign, so um do so so foreign, hey, you, foreign, do so. Foreign, hey,

Comments
Renea W.: Very helpful tutorial!!! Information was clear, concise, calmly explained, and you kept it simple! (I really liked that you kept the speed of the video, the voiceover, and that the video stayed focused on the clients head without random add-ins) thank you queen, amazing tutorial!
Lady Kay: This was SUPER helpful! Thank you for putting this video together! I’ve done front backs, but there was always a guessing element when I do the parts.
Coco Chanel: This was definitely helpful. It’s nothing worse than running out of hair at the neck, crooked braids, off sized braids. Thank you. Will be using this method on my own hair.
Janet Harley: Great tutorial love preparting it's so much faster
Adore Yaas: Love this method thank you!
TheArtInHair: Excellent parting tips! I will be trying this !
I Got Something 2 Say: I needed this!!! My son now wants braids, but my straight backs are never symmetrical. The way you split it up, makes sooooo much sense. Thank you!!!! Do you braid little boy or men hair? I would love to see some styles with step by step parting, please.
Isabel Carter: My 11 year old daughter wants this style. Thanks for the great video. Can I ask what products do you use?
Bend To Fly: I'm new here this video is so helpful I'm 23 yrs old n I'm in the process of learning how to braid, thanks a lot
Manniilocs: This is so helpful!
Yapanah Ahchar: I noticed that when I braid at the nape area that there’s always a hump forming. How can I avoid that? That is my major issue
Ashleigh A: Where did you get your arm band for the product? So smart! Thank you love your videos!!
Carla Campbell: Beautiful and very neat.
Imani Jenkins: How big should the pieces be as you add hair and how often? What’s your rule of thumb to get them to look like how you did them?
Dr Lase Red Ice: I've got to yry this method, my parting needs improvement. can you use the method for designer braids?
Annette: Do you use neatbraid when you do the individual braids on 4c hair?
Susana Awuni: I will like to know how you feed in the braids
Jesca Nabukenya: I love yo wrk en explanations
shanty_braids: Aye I'm new I like who you do your tutorial dem I would like to it cornrows in one up