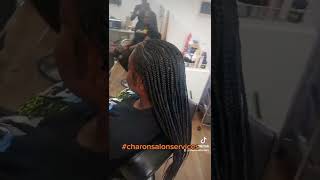
How To: Knotless Braids On Type 4 Hair
- Posted on 19 July, 2019
- Braids Hairstyles
- By Anonymous
I've been loving the knotless box braid trend lately and decided to give it a shot on my fine type 4 hair. How do you guys think I did?
Blow Dry Brush: https://hairdelacreme.com/collections/...
Beautycanbraid Tutorial: https://youtu.be/c91f9Cl_ae0
Hair Used: https://amzn.to/2K4lZ6b
Total Hours: 10
Total Braids: 91
Total Packs: 7
-------------------
Shop My Hair Line:
-------------------
Instagram: @shophairdelacreme
Facebook: shophairdelacreme
-------------------
Products I Currently Use:
-------------------
Scalp Massaging Shampoo Brush:
https://hairdelacreme.com/products/sca...
-------------------
STAY CONNECTED WITH ME :
-------------------
Instagram: @shophairdelacreme / @hairdelacreme
Snapchat: @hairdelacreme
Twitter: @hairdelacreme
Facebook: hairdelacreme
Tumblr: http://hairdelacreme.tumblr.com/
For business and sponsorship opportunities please contact my BUSINESS EMAIL - [email protected]
#hairdelacreme #knotlessbraids
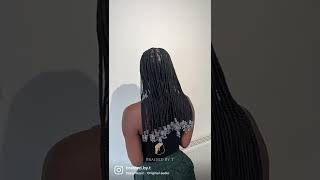
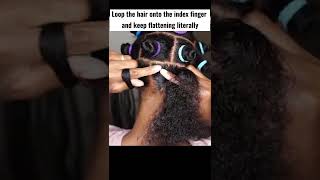
Not less braids have been the trend lately and I decided to take a stab at it on my type for here and I'm gon na show you guys exactly how I did it, so I'm gon na start off with freshly washed hair, and I actually want my Hair just a little bit for this hairspray, my some oyster eyes, my hair, I'm gon na, be using the hair butter from your here as well as my Cantu shea butter, even conditioner. I put these two together and they're, just like the perfect combination to keep my hair moisturized to this entire hair style. I almost want to oil, my scalp, but that's after my braids are done. Then I'm gon na order, my scalp but yep, I'm gon na go ahead and moisturize my entire head, the hair that I'm gon na be using, I purchased from my new supply store. I couldn't pass up this deal guys, like you, get six packs in here for the price of what I'm gon na show. You $ 8.99 go ahead and get this thing right here. It'S by spectra, I've never heard of them before, but I think the two packs just to be on the safe side, and this is what the hair looks like so like it said on it. It had six packs in here or six bundles up here. I like it because it doesn't itch my head is 25 inches long and to complete this entire look. I only used a pack of that plus 1 and then I separated the hair on my dread holder and it using shiny Jam to help slip. My hair down. So, as I'm parting, my hair, I'm just gon na, explain to you because I'm just going really fast with my clips, but I use seven total bundles to complete this entire look. So I'm glad I picked up an extra pack of here, I always say to buy more here, so you never run out. I'D rather have more than less I'm using trimmers to park right here. That'S the best way for me to park. My own hair make sure that it's straight, especially when you're doing it here instead like this we're party, is a must using two mirrors can help out so the technique in the back that I'm using is the feedin method. So you're gon na see me braid my hair, I'm gon na take a piece of that synthetic. I'M gon na put one side in my hand and one side in my mouth. I'M gon na break down just a little bit release the other side and braid it in there. That'S just the way I do the seated method. I actually found Beauty can't braid or something like that forgot. What our channel is, but I will link it below she. Actually used this technique on what her client sounds like. Let me give it a shot so I'll show you guys that technique of doing the feeding methods where these braids, because you phrase it technically feeding brains but there with box braids. So that's what I'm doing, I'm putting one side in my hand, other side of my mouth, I'm gon na break down just a little bit, then I'm gon na release the other side. The key to this hairstyle is basically starting off, really small and then gradually making a braids a little bit larger just so that it looks more realistic because you're starting off with your actual root of your hair, also to make it a little bit easier. I would definitely suggest prepartum your hair that way you can get to each section without having to part and then do it this right here, I'm just showing you guys. This is a little one. Pack did I have eleven braids here, so one pack of here at gave me about two rows in total I'll. Let you know how many braids I have in total. I actually had 91 braids in total. I have 51 in the back and I have 40 in the front, so I'm just going to continue doing this process. This process actually took me two days cuz. I got really tired, actually started braiding, my hair around five. I just stopped a couple of times had a phone conversation and had family over. So if you see people moving in the mirror, I had family over. So the back took me, let's say without the distractions, about five hours to do, and then the front is when I did fish the next day that took me about four or five hours to do. I think it's cause. My braids are a little bit smaller because I was looking up on YouTube. Everyone did this hairstyle like seven hours, I'm like it's it'd, be ten hours anyway, so in the front, I'm just showing you guys how much hair I use. So I make sure that I start up with a little bit of here, because the front is the one, the part that everyone sees the most. So I want to make sure that that is as neat as possible, so I'm gon na start off with a little bit of hair and then I'm gradually gon na get a thicker like this. But this time I'm not gon na. Do the feeted method for the front? I want to show you guys the different methods. So basically we do. Is I'm gon na braid my hair and make sure when you're braiding your natural hair, just braid, it's hot that way it sticks to the root because, when you break it loose and kind of doesn't look right. We'Re gon na take my small piece of hair and I'm gon na put it in between two braids or two sections of hair. As you can see here, I'm gon na braid until one section does not have synthetic hair and then I'm gon na use that section to add the next piece of synthetic hair again just make sure that your pieces are gradually getting thicker for each braid. I had four pieces. I had two like really thin pieces and that I had to thicker pieces to complete the size of these braids and then, if you're here it gets a little bit of rough so that it gets nice and sleek when you're actually braiding it. You can put some of that edge control on your natural hair and then just break down, and it's just like a seamless finish not to create that triangle. Look that you saw in the begin of the video. Basically, all you're doing is parting here here at a slant, and you have to keep parting your hair to slant. I started on the left side parting at a slant, and then I did the right side parting at a slant until both sides met up, and then I'm gon na alternate part in each side and explain it so the left side, first, that I'm gon na go Ahead and do the right side, the left side, the right side until I finally have like just a little piece of hair on the top. Another thing I just spoiled is flamer. If you guys are looking at my background. Please excuse that my husband and I just closed on our first home and we are in the process of getting our window treatments which are highly expensive, so we just put some sheets in the back, so just ignore that if that's really distracting you anyway, another tip Is to use the end of your rat tail comb, you can use the plastic one or you can use the metal one to get nice clean parts. So now that my parts are all set now I can function, and I know how many braids I want to do and I'm just going to go ahead and continue to braid my hair and I'm gon na. Give you guys one more example of how I did the second method, which is not really a feat in like the first technique, but you're still feeding in the braids, so you're gon na add that edge control that jamchi it here. You'Re gon na braise, our natural hair, it's hot! You can break that as much as you want, but don't pray too much, because that defeats the purpose of adding the hair unless you have really thick hair. But I have fine natural hair. So I just did a little bit down you're gon na take a piece of synthetic hair, make sure it's a small piece, you're gon na braid it into your hair and then the section that does not have the synthetic hair, you're gon na go ahead and you're Gon na add it now pay attention to that little piece. That little piece now has double the synthetic hair. So now I'm going to have to keep braiding until I can get the thickness, so those two pieces are thin right there and then that third piece is a little bit different. That has double synthetic hair. So when I'm braiding it, I want to make sure those two pieces aren't facing the same section. So I can add my next piece of hair. So you see I'm doing right here now, I'm adding my next piece of hair. The reason why you want to keep paying attention to the thickness of each strand is to get the evenness of your braid, and that's just the method that I did. I kept feeling to see if each strand of hair had enough thickness in it. If not, then I'll add more synthetic care to those sections so that one's a little bit thin. So I'm going to go ahead and I'm gon na add more synthetic hair to it and then I'm pretty good to you to break down. Eventually, one section is gon na be a little bit thicker, but once you start braiding it a little bit down, then you can go ahead and try to divide it evenly so that you have a nice even braid. So I just keep feeling when it feels a little thin on one side. I'M gon na add more extensions, but, as you can see, look at how naturally they getting and the sections are all either it takes a lot of practice guys. But I'm telling you it's really easy to do. I think the hardest part is basically at a party, but you can always get somebody to help you out with the party and then here I'm just going to show you how natural it looks. I can flip the braids up and down there's no tension on my scalp whatsoever. It just looks like I braid it my natural hair. I actually like the way my triangular parts. Look. It just gives a different vibe everyone that does it does horizontal parts. I decided to do slanted parts just to give it just a different look to it and it's so light on my head guys, like I've done box braids before you've probably subscribed to my channel because you stole my box Bay tutorial but guys. I love this method. So much it's like no tension on my hair whatsoever. It looks super natural, it's just! Oh it's so beautiful. I just want to do it thicker next time, and here I'm just showing you how long the 25 inches was on me. The braids are not even but hey, I don't care it's my first time trying it I'm five seven and it came up to my butt, but I'm showing you guys again just the closer view on just how light and natural it looks. I think I did a pretty darn good job with my party on my hair, especially with the back again. If parting is a struggle for you, guys just use another mirror or ask for help, my boxes are not even because, obviously I can't see the even boxes, but I'm just showing you guys how I can just toss it up in a ponytail like. Oh, my gosh. Okay, you guys don't understand how much I'm in love with this, I'm actually gon na, keep it in for probably a month and what, as always what I like to show you guys. The reason why it took me so long to upload this video is I like to wait to show you guys what it looks like about a week or two after so I'm gon na show you guys what the braids look like after having it in for a Week, I'm sorry I'm just really just showing off like how Bob I did this. This is my first time trying this guy's and I'm just like dang. I did a good job but anyway. So this is how it looks after a week. You can see that the parts are getting a little bit thicker, because obviously my hair is growing. I'M if you guys don't know I, as of tomorrow, would be five months pregnant. So these prenatal vitamins has had my hair growing really fast, so the parts are getting a little bit rough because my hair is growing, but it still looks really good, as you can see like the braids are not as tight as it was before. Cuz my natural hair is growing in, but I'm gon na try to keep these in for a month. I think I love the way it looks. If you guys have any questions you can leave them below and if there's echoing going on. As I said, I just closed in my house so wish those trying to get furniture in here so be on the lookout for my house, hunting, video and my house tour and I'll see you guys on next video bye, guys
Comments
GigglesnGaggie: These are beautiful! You did a really professional job putting these in yourself. Congratulations on your pregnancy!
Kd D: This looks really really great...I love your parting style...it lays really nicely together and very natural looking....makes me want to try to do on my own hair without the extra hair added....blessings to you and thanks for sharing
Erica Stovall-Beebe: LOVE the pre-stretched hair bundle pack. its all i use when i do my braids. Your hair always looks so nice!!!!
SuthernGyrl99: Congratulations on your new home and little one. I’m obsessed with knotless braids and you did a fantastic job with yours!
Alyse Pierce: Definitely one of my fave tutorials of this style! So clear and they came out great. Also, congrats on the soon to be bundle of joy!
123 Hot: I never knew this had a name I've always done my braids like this from the day that I learn how to do braids when I was in my early teens because I never like those notes in people's head . I t look like someone stole my style LOL seriously
Kierra Malone: Congratulations on the new baby and your new home. Your hair looks awesome.
Samantha Graham: Can you give an update on how long they last? I want to try them
HairByMason: Yesssss! And your natural hair come through drip!
Tiara S.: How long did they last?
MsJadoreGlamour: Everyone is talking about knotless braids that’s how I’ve always done my braids i didn’t know they were a thing! Looks good hun!
Dawn4j: People been lying on how long they take to Do their own hair but eh... Thx for being honest! It turned out beautiful. Good job
CC@Gemini: Thank you for the tutorial and the results are awesome. Are you going to do a home tour. Can you talk about the buying process my hubby and I are interested in FL home ownership.
Brittney Davis: Nice!
Natasha Meeks: Good job ,
ms. D: Gorgeous. But too much work lmao. I’ll just stick with the regulars
Ashley Welch: ❤
Shop: Bring back Memoji :|
Brianna Johnson: I get anxiety just considering doing this hairstyle