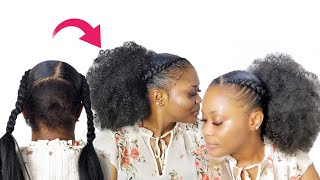
Detailed Feed-In Stitch Braid Cornrows
- Posted on 02 November, 2020
- Braids Hairstyles
- By Anonymous
#feederbraids #feedinbraids #stitchbraids
Social Media
* Facebook : londoncurlstyles
* Instagram: @thelondontayy
* Business only email : [email protected]
Location: US -Columbia, SC
Link to hair Queen B Braiding Hair Pre Stretched 50" Color 1B (6 packs) https://www.amazon.com/dp/B08BXBD4W2/r...
I used 3 packs of hair
It took me 3.5 hours
****Most used products ::
Lotta body mousse Https://amzn.to/3gXFI5Y
Shine n jam : https://amzn.to/304oKw9
Braiding rack : https://amzn.to/30G50PR
❤️RELATED VIDEOS
Small lemonade braids
Tribal braids
1/2 up 1/2 down feed in braids with sewin
——————-
Music by Jaylon Ashaun - Finer Things - https://thmatc.co/?l=BC74AB2C
Keywords
feed in braids,feed in braids for beginners,feed in braids to the back,feed in braids tutorial,stitch braids,stitch braids for beginners,stitch braids on natural hair,stitch braids with comb,stitch feed in braids,how to do feed in braids,feed in braids for visual learners,stitch braids with no rubber bands
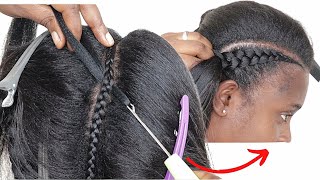
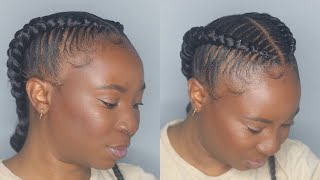
Welcome back to my channel in this video, i'm going to show you guys in detail how to do stitch, cornrows or stitch feed in braids. Okay, this is how they turned out. They turned up super super bomb, so if you guys are interested and what is how they turned out, they turned up super super bomb. So if you guys are interested in watching then go ahead and continue watching and learning and let's just go ahead and get into the video okay, so my client is fully natural. She officially cut all her relaxed ends off, i think last year, but she's always had pretty full and thick hair. If you guys don't recognize her, she was the person in my um lemonade, braids video and if you guys haven't seen that i will link that below. In the description box, but yes, so she always had a lot of hair always had pretty high, dense hair. So with styles, i do on her smaller braids work better because you know the fewer the braids, the more bulkier her hair will look and it just looked more sleek and streamlined and neat when she has smaller braids okay. So yes, so i'm doing 10 stitch braids on her head and yes guys. So what i like to do is i like to start off, of course, on freshly, you know washed hair blow dried straight whatever, whatever, when this cornrows definitely blow dried straight works, the best honestly, the straighter, the better. However, you don't have to flat iron, your hair. Anything when it comes to me, i can work on blowed out hair. So yes, so i like to part the hair down the middle um. That way, i can split the hair from left to right and try to get even amount of braids on both sides. So, like i said i knew i was going to do at least 10 now, if i end up making like 11 or 12 braids, i wasn't going to charge her anymore or anything like that because, like i said, sometimes clients have super thick hair and you just Have to do more, more braids, okay, so yeah. That is you guys decision if you want to charge more for the additional one or two braids that you end up having to add okay, i personally don't, but i end up doing 10 braids, which is that's what she wanted, so it worked out perfectly for today. So, like i said, she's part her. I part her hair down the middle um and i'm working on the left side right now and i'm just literally pre-parting i'm trying to figure out how i want the braids, how thick i want them to be, and how close you know, just i'm just trying to Figure out how i want the braids to look okay, so um, i recommend definitely parting pre-parting doing this like rough giraffe parting first and then i recommend, for you guys to just loosely braid the hair out the way i'm flat twisting it. You can flat twist or you can braid, but braid will be a little bit more secure and you'll. Be able to. You know see things a little better but to me flat twisting just kind of work for me, because it's quicker and i don't have to sit here and just be braiding - the hair yeah anybody got time for that. So this style took me three and a half hours to do yes, so i don't know you guys probably can do it quicker, but i like to take my time um, especially with stitch braids. I don't do them all the time i barely do them honestly. However, i do know how to do them, and you know you don't do a style. You know often it tends to take you longer. Um tend to take me longer, but you know the more. You know how to do a style. The quicker you'll become, but i don't do these often so these take me, you know three and a half four hours for freaking, tin, braids, okay, so yeah so like i said i am just pre-parting and flat twisting the hair out the way and i'm just literally Going to do that on both sides, you guys and whenever i am done with the full head, i'm just going to literally tie with the rubber band and start to get everything started: okay, y'all! So i'm done with the flat twisting you see. I got two duck clips, just keeping everything down and then i tied her hair rubber bands, so i'm using the queen bee pre-stretched braiding hair in the color 1b. It is in the length 50 inches. Okay, 50 inches usually sits like above their booty area. Once you hit 60 inches to start being waist length, but yes so um, so i got everything prepared so how i prep the hair is, i literally just do super small pieces of hair all the same length. I pretty much like to do all the same length until i'll get to the bottom of her head. Then i like to make the pieces a little thicker, just to kind of have more thickness at the bottom of her hair, like where above the neck, where i hit that area so yeah. I didn't show like the pieces that i did but, like i said, they're super small pieces and then i just have bigger pieces to add at the back. The product i'm using is the shine and jam. This is going to get your parting super super super sleek and precise okay, because it lays down natural hair so so well to the point where you'll be able to see exactly what needs to be added or taken away in the parting space. Okay, so i i'm starting off with the on the left side and i'm starting off with the first braid, so i'm taking the flat twist out, i'm taking the flat twist out of that braid in the next braid. So that way, i have i'm able to part. You know more precisely and with my combs i like to use a comb that is pointy because yeah, it's just way more precise, like a rat tail comb, some of the rat tail combs have like flat points, and it just doesn't be as precise as i would Like it to be so yeah, so i like to use that that way, i'm able to literally see what needs to be added and taken away, as you guys can see now, if you have that flat twist on the second twist still in you'll, be snagging the Hair, everything will be, you know, just be pulling and tugging, and you don't want that. You don't want breakage when you're trying to do a protective style on someone. So yes, i like to just take both twists out and then before i start on the first braid i'll. Just you know retwist or clip it out the way, the other row of braids that i'm not starting on yet so with that comb, as you guys can see it's, i showed i'm going to show it again, but i showed you guys that it's like a space Missing, i literally broke off a piece of the comb, the teeth on the comb. So that way i have more space and i have a clear view of how to part the hair, okay, so yeah. So i suggest using duct clips on the sides of the hair that way no hair gets snagged into and while you're trying to braid, because that's just more of a hassle more of a hassle that you don't want to deal with. Okay. So yes, so um! So me getting started, i'm parting out a section where i want a little bit of baby hair, not much just a little bit this time and yeah, i'm just putting the shine and gem at the front and, like i said on the sides and i'm about to Start to braid, so i like to part in half, so you guys can see. I literally am parting that row in half and with doing this, you're able to get a more precise stitch. Okay, so i split it in half and then i split a little section at the front to start the feeding braid. Okay, now her hair is super super full, like i stated so, i'm not even going to add a lot of braiding hair throughout the braids, because i want the braids to look natural. I want them to be thinner. I don't want them to be thick on top of her head. I want them to lay pretty flat, so i'm using a lot of her own hair. So the only thing i really am focused on is making the braids long and that's where the braiding hair is going to come into effect. Okay, i literally only used two little bundles of that pack that i two or three bundles of the pack, that i showed you guys out of that one jumbo. You know pack that it's included. That includes, like a lot of you, know, bundles into one pack like i said, her hair is already full and i wanted it to look natural, so i'm literally only adding small small pieces of hair throughout her head and i'm not even adding it every single time. Okay, i'm really going to only add once i get to the back and the bottom of her braids to add length and a little bit thickness in the back. Okay, like i stated, i want her braids to look extremely extremely natural, and i got that look so if you guys are looking for that same type of look just follow my directions. Okay, so i'm showing you guys, i'm literally braiding in super slow motion like this is real time. I take my freaking time with those stitch braids, you rushing it you're gon na mess up. Okay, and if you do mess up, i suggest you guys take it out, because you know you want it to be clean. You want to be proud of your work so splitting that in half splitting the side from left to right in half like that, it allows you to take your time and not get pieces mixed up when you're stitching. So when you're stitching from the left and using that comb and you're about to grab that hair into the into the braid, it allows the stitch to be very, very neat. Because when you have the left side, that's separate. And then, when you move to the right side, that's separate that hair is separate as well, so it allows clean lines when you separate the hair from the left to right. Okay, now one thing i can say that i struggled with with the stitch braids was i used to not have a good grip okay, so so what i like to do is i like to always make sure my grip is good when i am braiding before i Even add hair, because even if you stitch, you know stitch the braids, you guys, if your grip is poor, it's not going to it's not going to look right. It'S not going to look flat or neat it's going to bubble up. The hair is not going to look, you know tight, the grip is everything so, as you guys can see a lot of times, i'm literally braiding, and then i'm pulling the hair and getting a better grip and then i'm going with the braid again and then i'm Pulling the hair and getting a better grip and a lot of times, i'm not even adding hair, but i'm still pulling the hair back in to get a more secure grip. After i'm, adding the stitch to the braid okay, pulling the hair and getting the grip better. Every single time you add a stitch will allow the hair to be tight and allow this the stitch to look more precise, because you're gripping and you're actually showing the parting space. Okay, so go from left to right when it comes to the stitch. Okay, go from left to right, if you feel like, maybe the shiny gem turned greasy on you or you feel like the hair is not as tight as it used it was, then you can add more shine and jam. Now i don't recommend just keep, adding shine and jam because you thinking that adding more product will make it lay flatter. It'S really the grip. The grip makes the difference: okay, not adding more product, not trying to get those parts more sleek, no, no baby! It'S the grip, so don't try to just add so much product and your hair be slippery. How are you going to grip if the hair is super slippery? You know what i'm saying add how much you need to add and leave it be. Don'T keep just adding the shiny gem to the part, and you can add shine and jam after that to the hair. You know to kind of just smooth out the cornrow, but to the parting space on the roots. Do not keep adding hair because it will be slippery and you won't be able to grip it the way you want trust when i say okay um, so you guys can see right there, i'm just adding to the hair not to the part, and you guys will Be able to see a way better view guys, so don't you be nervous, don't you guys be like? Oh, my god, i'm not able to see that second one, the second braid you'll be able to see. Um me mess up you'll, be able to see what to do when you mess up you'll be able to see a super super clear, um picture, but i had to kind of rotate hair to my side like to me, because that's how i'm gripping now, if you Guys, grip better on your knees. Do that? Okay, because some parts of right hand like the back of heads, i usually get on my knees, guys and start gripping, because it just it's better. That way for me to grip the hair find what works for you when it comes to gripping the hair guys. This is going to be um a more of a talkative video, because i really want to try to help. You guys learn this method. It is very, very difficult to learn this method um. It took me a while because you just have to get the parting right just you know this the stitching right and everything. Now, when it comes to the stitching, a lot of people do like use their nails, and things like that um to me, the comb just gives me more control. Once i'm able to you know, use the comb and kind of make that part. I'M able to put the comb down and grab that little space that i just made the part and add that to my cornrow and then it gives me more and then i'm then i'm going to grip it before grip it tight before i go to the other Side of the head, which will be the right side, and i will do the same thing once i get to the right side. I will use a comb, make a little part and then put the comb down and then grip that part that i'm about to add at that. You know the stitch that i made and then i'm going to grip that keep make sure it's tight before i continue. Braiding, so the key is to whenever you're, making the part grip that part tight and make sure you have a tight grip before you move on to the next side. Okay, because, if you don't it will slip or it will not be neat or you will see bubbles in the hair and it won't lay flat. I'M trying to tell you guys what i know now: you'll notice that the side braids are are a little bit more difficult to do. Only because you're at an angle when you get towards the top you'll realize that it's a lot easier to grip and a lot easier to kind of like whenever you were before you're about to do the stitch. When i part that in half you have that left side and that right side to work with you'll realize that you're able to kind of put your palm on you know in the middle of the head, in the middle of the braid and you'll, be able to Keep the left and the right side of the stitch part separate, and that will be able to give you more of a clear view of you, adding hair and you gripping as well. I can grip better from the top, but that's just me. I don't know if everyone is the same way. I didn't braid her hair all the way to the to the bottom until it was the end. Now, when i was editing this video, you guys it was a lot of stuff that was deleted. I actually filmed like the whole half of her head. However, it was deleted you guys and i'm so sorry. I was so upset that i deleted it. I deleted it by accident you guys trying to edit and trying to clear space on my phone but yeah so, but you got that's why i'm making a detail and still long and i'm actually doing it in real time to still give you guys a clear understanding Of how you do these braids? Okay, it's literally the same concept throughout the whole head: okay, um yeah! So that's! Basically, what i'm trying to tell you guys um how you'll be able to see how i end the braids when i am done with the stitch braids um, i do like to put some type of foam lotion or mousse on the hair. This helps lay the flyaways that may be on sitting on top of the cornrow that you were not able to add into the cornrow. While you were braiding, so put a good amount of mousse on there guys and um, and then i like to do the edges. While the mousse is just sitting i'll, do the edges i'll use the even edge control purple top? That'S one of my favorite edge controls to use it works on all textures and it gets it pretty pretty smooth. So i use that even edge control for the edges and then after i do the edges, the foam is drying up, but it's not completely dry. I like to tie some wrap strips on top of the head, and that is going to tie that is going to to flatten out the edges and have that you know dry up pretty well and dry flat and that is going to help the hair dry flat. The flyaways kind of mold flat as well now, when i'm done without when i when i tie everything down with the wrap strips, then i like to braid the hair down on the ends all the way down to the end of the braid. And then, when i do that, i like to spray some got to be glue hairspray and that is going to kind of make the braids a little firm. So that way, they they hold well under any type of humidity and any type of you know water that may possibly hit the braids or something like that so yeah. So after i spray everything down, i like to untie her hair and everything's dry. I then will dip it in hot water different ends in hot water, and that is just to seal everything to make sure the ends don't unravel. Then, once i seal everything to add moisture back to the hair, i like to do oil sheen, but you guys are going to see all of this, but i want to go ahead and explain this beforehand so right here i do mess up. You guys are going to see me mess up and take everything out, um but yeah. So i mess up and i i just restarted - um yeah. So i'm adding little little tiny pieces of the braiding hair at the beginning. Um. It ends up not working out. For me, i think i should have added hair a little bit later, maybe like the fourth or the fifth turn, because adding the hair at the beginning gave it a little knot at the front that i did not want so yeah. It didn't work out for me. So i end up taking everything out, but right here is a good view of you guys can see like the left side from the right side. You see how i kind of make the stitch, and i grip it really tight before i move on to the left side. That is something that you want to make sure that you continue doing but see i'm separating it. I have the right side from the left side and then i'm adding a little piece but, like i said what i end up messing up at i know why i took it out is because i end up adding braiding hair a little too quick um and it Just didn't give me that flat. Look that i really wanted so yeah, but you guys can see under it. I'M doing a stitch right there, i'm going to do the stitch and then i'm going to grip the hair, i'm going to put the comb down and i'm going to re-grip see i just re-grip right there, you guys before i moved on to the next stitch. I tried to do it with my thumb. I think it worked on that time yeah. So it worked on that time, which is cool, but i really recommend using the comb and the reason why i didn't use a comb is because the comb was on the left side and i didn't feel like grabbing it um. You know to do the right stitch because it just would have made everything like. I would have to do like a pretzel to try to get the comb again. You know so yeah but yeah. I think i'm about to start braiding and i realized like i need to start over because it just didn't end up working out for me, but yeah, i'm continuing on y'all, but i'm letting you know. I end up messing up and it just didn't look right. So yeah i grab the stitch grip it and then i proceed when it comes to braiding the cornrow using a comb at this time grabbing it putting the comb down gripping it again. I just re-grip right there guys before i move on move the right side, hair out the way yep i was like uh i messed up. I don't think i like the way the braid had. Look, you guys can't see, but i think it just it just didn't flow right. I messed up at the very front. It just didn't flow right. So i end up starting back over, but i'm going to use those stitch, those stitches to kind of just go as a guide, as i continue to start over, i'm not going to like kind of just take everything out, i'm going to leave those stitches in there. So i'm starting over again with her hair by itself. Okay, start on the right side and, as you guys can see, um yeah i'm adding a little bit of hair right there, but i'm not going. I don't think i'm going to continue keep adding hair over and over yep, so i'm going to keep on braiding go to the right side. Go under then grab that piece, okay, so the method i use on this side. You know how sometimes when people are feeding in hair they'll grab, you know the hair and they'll just bring all the hair in at one time that messed me up at the beginning. So what helped me, as you guys can see, was i end up splitting the hair, so i know grabbing a piece of hair, but then i only included the bottom piece of the hair. I added the top piece later on, as you guys can see what i did with my thumb. I kind of like lay the piece and let the piece kind of do its thing on the side until i added it back and that helped the transition a lot easier for me at the very beginning of the hair. Now, as i keep going, i don't you know, grab the piece of the hair leave, one half of the hair out and then braid the other half and then add the other hair. Later i end up not doing that because it just you know you just got to find out what works for you. You guys um splitting the hair in half at the beginning works for me. It helps the transition easier at the front because the hair is thin on the edges, but as i am braiding through the cornrows, the other method works for me just kind of grabbing all the hair together that works for me, but yeah, i'm just see how. Now, i'm adding all the hair together using the comb, adding that extra grip doing a little bit of shine and jam and proceeding to go to the right side use my nail because it was easier at the time and then going to the left side. I'M going to use my comb make sure you know you're moving the hair out the way, so that way no hair is getting caught in yeah. I end up using my my pinky again, my nail again but um for the most part. Like i said i like to use a comb guys, it's way more precise, especially if you don't have any nails to work with, but you see i just keep going back and forth. Sometimes i use a comb. Sometimes i use a nail whichever it feels convenient at that moment to use, and you want to make sure that everything is neat. You want to make sure that you're applying that shiny jam to the hair on the ends and you're combing it through to make sure you have a more streamlined look but yeah i'm doing the same method, guys the entire time, the entire time y'all stitching gripping the Hair moving to the other side, stitching, adding the hair gripping the hair and then braiding going to the other side. If the hair is thinner, you'll be adding hair right before you stitch, no you'll be adding hair after you stitch because you'll stitch. It then you'll have that precise part of where you want to go next, then you add the hair, and then you go to the other side yeah stitch in first then adding the hair is easier. In my opinion, if you add the hair and then try to stitch, you may lose grip so stitching first, adding the hair second and then proceeding to the other side gives you a more streamlined finish. You kind of have an idea of what direction to go. Yeah. I'M glad i kind of figured that out. I just thought about that. Yeah definitely stitching first works. I hope you guys are looking through this video and i hope you guys are understanding what i'm saying and i hope my words are helping, because once you find that momentum and realize the routine of you stitching it'll be a lot easier. You guys - and all of this is definitely practice - i'm not the best at it. I think i'm pretty good at it, but i'm not the best so yeah and then, when you get towards the bottom, you're not really going to see any stitches. So you don't have to do the stitch when you get towards like the bottom bottom of the head, but yeah guys. I hope you guys enjoyed this video um. The video will continue playing you're, going to see how in the braids and etc so yeah. If you guys enjoyed this video and it was informative, make sure you give me a thumbs up make sure you subscribe and share this video, and i will talk to you guys in my next video bye, guys, love y'all, searching for fashion, make a cup of milk. Don'T hear me crying from your bed, i can't give you the world, but i can't give you much me.
Comments
London Tayy: 0:54 preparting 4:14 hair used 5:00 start braids
Love Tee: Wow...you did an amazing job I’m trying this out on my client this week, I can’t wait!
Amia Renee: Cornrows are so neat! You did an amazing job
Melanin Barbz: This was so detailed love it
Niko Lion: It’s beautiful and
Kelsey: Looks beautiful. How many braids is that?
Mz PrettyPussyCat: Fire per usual
London Tayy: Sorry for the typo at the beginning lol