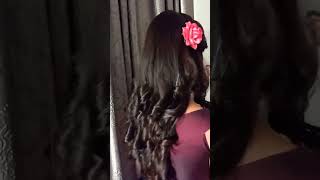
Diy Hair Garlands: Flower & Ribbon "Clip In" Extensions
- Posted on 14 July, 2017
- Braids Hairstyles
- By Anonymous
Here's how to find me:
Website: www.ladollyvita333.com
Instagram: https://instagram.com/ladollyvita333/
Facebook: https://www.facebook.com/ladollyvita33...
Pinterest: http://www.pinterest.com/ladollyvita33...
Snapchat: ladollyvitanyc
My Braidtionary Video:
https://www.youtube.com/watch?v=H2ifoT...
How to Tease Your Hair Safely: https://youtu.be/qaalBKqFBLs
Have a request? Send me an email with pictures of what it is you like: [email protected]
I try to fulfill requests on the third Friday of every month!
Music is Royalty free: "Labor Life," "Sponge Dance" and "Deep in the Woods" from Epidemic Music
Hi everyone, today's video is a DIY and in it I'm going to show you how I made flower and ribbon clip in extensions, and I'm also going to present a few simple ideas on how you can incorporate them into your hair. I think these could be great for jazzing up any kind of style, including costume or cosplay, looks for this project. You'Ll need extension Clips. These came from a local Beauty store in my neighborhood, but they aren't hard to find online. You may also need some sewing needles and some sort of clear beading nylon, although I think fishing line could probably work really well too, but I do have some silver embroidery thread as well, which works out. Okay, especially if you don't mind it, showing through your hair a little at the end, other necessities include a measuring tape, scissors and I'm using scotch tape in the place of a bead clamp. Since I don't have one - and this is optional, but I do have beads on hand I'll be using the little glass pearls and those green mirrored teardrop ones. And last but not least, I've got an assortment of both false flowers and ribbon. I'M going to start with the flower garlands and in particular my orange roses. Little side note but orange spray roses are my favorite real flowers. So it's pretty happy when I found their fabric counterparts in my art store. You can see that I'm simply pulling them off the stem and opening up the clip so that everything will be easy and accessible. When I truly begin, depending on the flowers you select, you may have to deconstruct them according to whatever shape they are, and here I'm trimming back excess stem. When I was ready, I cut a piece of the nylon thread and tied it around the flat end of the clip I'm assuming most of you are familiar with these, especially if you own a set of hair extensions. You kind of just want to open it so that you can knock the nylon around the front half I laid my clip and thread down measure two inches and placed a piece of tape on that spot. To hold it, my roses had nothing in their centers, so I strung on a pearl and made a knot under it. I didn't need a sewing needle for any of this, because my materials had big enough openings and I could just slide things on pretty quickly. Next was my first rose and I chose to position it onto the project facing upwards. Although placement is a personal preference and I'm sure you could do this. However, he liked after one more pearl, which was mostly to dress up the ends a little. I made another knot and the flower was secured and that's really all there was to this garland after each tier was completed. I measured two inches marked the spot with scotch, and then it was a pearl, not flower, facing upwards pearl and not again. Even the last flower on the string was the same. I just double and triple knotted it to make sure it was tight with my small white flowers. I had to remove the entire center because there wasn't room for me to pass anything through the plastic, and this left me with an unseemly hole in the middle. In this version I had to use a sewing needle, and so what I did was a knot, then a stitch coming from under the flower up, at which point I placed on a reflective, green bead, to mask the hole, then another stitch moving the needle down and Through and then another knot, I place the flowers on this garland two inches apart as well. The last example I have are my little off-white layered, petal flowers, and I chose to use the silver thread so that you can see how it might work with a string that was colored. This was super fall since I didn't use beads and it was a not flower knot and again I spaced them out about two inches now for the hair ideas, starting with the silver thread garland, I decided to clip this onto the smaller side of my part, and I simply flipped my hair over to cover it truth be told this isn't super practical since it's likely to swing in my face all day, but I wanted to see what it could look like. Next look involves making a u-shape parting at the top of my head and then everything else was secured into a normal ponytail. I clipped the flower extension at the back of my divide and then flicked that hair over it was combined into the ponytail with another small elastic, and then I just arranged my hair around the flowers. Moving on to my orange roses, I parted some hair of my left and clipped in the flowers I flicked my ear over to cover the top of it, and then I began to make a side French braid. It started at the part near my face and it's a pretty standard technique, but if you need it, a link, migration, air evideo. In the description when I arrived at the point of my head, where the roses began, I added the garland into one of the strands and just kept with my normal French braid pattern. Occasionally I paused to straighten one of them out or to push some hair out of their way, but it was actually pretty easy to work around them. The small white flowers with the green beaded centers were much smaller, so with them. I chose a lace, braid headband pattern. I separated the hair horizontally just above my left, ear and clipped in the garland. The section below the flowers will be the start of my and also the means with which I'll cover the clip, and then it was a typical lace, with hair being added from along my forehead to that top strand, I tried to move each of the additional pieces. I gathered around the flowers and this took a little more time because they were smaller and had this tendency to get caught up in the strands more often, but still it was pretty doable. Okay, so now onto the ribbon extensions, I bought this amazing trim from the fashion district in New York City and I've been trying to find a way to wear this in my hair for a while, so I was excited to finally find a project that allowed me The chance, obviously, I started by measuring out the length I wanted before cutting and just like with the flowers I'm going to snap open the clip so that I can sew it around the front. I ended up making one blue-gray extension and I also made one from a yellow ribbon too, in addition to the embroidered ones. I had thinner plain ribbons, and so I thought I'd show you guys how you can use stuff like this to make hair streamers, especially since I know many of you, love or cosplay Disney characters that sport accessories similar to these, I began by doubling them up so That each clip would eventually yield four ends and, with my needle and thread ready on hand, I sort of spread the ribbon right at the bend. Because, if I didn't do this, the ends would lay on top of each other as opposed to side by side, which is what we want. I kind of laid them together so that the colors interchanged like green, yellow, green, yellow and then, of course, I attached the extension clip to the back of the ribbons with a couple of additional stitches. I was feeling inspired, so I ended up making three of these streamers for the hair part of this. I kind of did the same thing as I did with the silver string white flowers. I clipped my ribbon onto the smaller side if my part flipped my hair over, but unlike last time, I pinned a section along my face backwards, thus creating a peekaboo effect with the accessory. I did the same with the yellow ribbon, but on the other side just so you could see what the different colors could look like, but while in the middle of filming I had another idea and I wanted to share - and that is a headband. I used another imported ribbon for this and I sewed a clip on to either end so that I could attach it to the both the left and right side of my head and then I just pulled some of my hair from along my face over each of The clips to cover them just another idea for securing ribbon onto the head in a shape - that's flattering to most women and but onto the French braid. This is a little eccentric, but I thought some of you guys might enjoy this idea. I made a u-shaped parting at the top of my head and clipped in my blue gray ribbon, so that it would hang sideways on my left once it was in. I brushed all my hair back and began to braid. I started at my forehead and worked as I normally would adding hair in until I reached the start of the ribbon at the crown once I got there, I flipped it up and over and out of the way and added hair into that strand on the left. Folded it back into the braid and then let the ribbon flop back down the next time. I pulled a section into the Strand on that side. It was laid over the ribbon and it's in this way that I created the weave effect. It'S just a lifting up with the ribbon every other strand and it's actually really easy. I also found that it didn't take any extra time to do. I continued the pattern down my length, but since it was sort of hot that day, I willed the braid at my neck up and pin the ends under the last style idea involves the streamers and I'm doing something. Incredibly simple here, I'm teasing the hair from my crown forward and when I had the shape that I liked I slicked it back clipped in all three of the streamers right at the crown and underneath the hair and pulled away from my face with that done. I twisted those ends into a loose, bun and pinned, and I was finished now. I have to admit that this looks a little young on me personally, but I think you can see how this would work really well on younger. Ladies or anyone sporting, a Renaissance or Disney costume - and I suppose that, depending on the materials chosen and the placement and design of the hair, these could be a touch more bohemian or warrior woman like anyway. I hope you guys enjoyed my video today. If you did, please leave me a thumbs up or a comment, and until next time have fun and keep breeding right.
Comments
Lyn R: I liked the small white flowers, also the idea of using the extension clips to attach a headband. That was brilliance, I think we all have the issue if headbands creeping upwards from the nap of the neck which I find uncomfortable. I would never have thought to use the extension clips for hair accessories. I found your site through Torrinpage. So thanks for sharing.
Little Hamster: I am SO in love with this idea. I can't wait to try it out! Thank you for sharing your great DIYs!
savannahissavvy: I absolutely adore the flower looks! Great work as always!
Kristi Gibson-Cormier: I absolutely love all these !! I'll have to the dollar store and get onto making them as you do..
Yilvinamera: Very creative. :) The braids with the flowers look very pretty. <3 And I also like the idea with the hair ribbon that you put on the top of your head. :) It looks pretty too. :) One or two ribbons are a little too wide in my opinion but your ideas are still very creative. Thanks for the tutorial! :) <3
torrinpaige: DIY! DIY! DIY! So, yeah, you know I LOVE your DIY vids. Lol. I cannot wait to make myself some flower garlands. I'm so excited!!!
Olga Ross: This is so creative and beautiful! Thank you:)
Nadia Paola: Me encantan todos tus vídeos y todos los peinados son hermosos. Saludos desde México
communistpasta: This is just in time for a beach trip, and I am def going to be rocking flowers in my hair
missartist123: I love the flowers so much!
FLAGENHAW: These are so cute thank you
Maria Vibo: Beutiful as always!!!
AJ Boff: So pretty.