The Best Box Braid Wig Ever - Wequeen Hair
- Posted on 28 February, 2022
- Braids Hairstyles
- By Anonymous
Are you looking for a new way to style your hair? Look no further than the amazing Box Braid Wig by WeQueen Hair. All the detail on this hair is listed below.
*******************Link with me********************************
Like my Facebook page: https://www.facebook.com Missbreyoutube
Follow me on my new Instagram: itsme_brebre
Twitter: Divaluv4beauty
Email: [email protected]
Code:BRE28
Direct Link: https://www.wequeen.com/products/weque...
Color: 1b
Lace :13*5 Box Braided Swiss Lace Front
Prepluck & Bleached Knot Already
Lenght: 20 Inches
Website: https://bit.ly/3IqjOGR
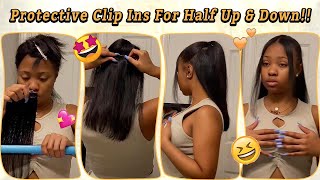
Hey guys welcome back to my channel, my name is miss bree. Today is going to be a tutorial on a unit that i received from wii queen. If you want to see how i achieve this look continue to watch and i will see you in my next video bye-bye, so the lace front that i'm reviewing today came from a company called the queen. It came in this nice nicely packaged box. So as soon as you open the box, this beautiful box, braided wig, is of course in there, and this is how it looks. This is the construction the inside of it is constructed very well um. It has two combs on the side and one in the back. I do not use the comb, so i am going to cut those out. It also has an elastic band sewn into it. So if you do not want to wear this as a glued down wig or you want to wear it as a glueless wig, you can use this band as well. So there are several ways you can wear this. I received a box of hair jewelry, so i wasn't expecting this, but it's a really good gesture. Along with the hair jewelry, i received a wig cap, a bag with the company name on it, and also you can use this to store the hair and instructions on how to take care of the wig. I'M going to go ahead and get started for the remaining of the video. It'S going to be a voice over if there's something that i failed to mention in this video that you need answered, please leave it in the comment section below. Please don't forget to rate comment and subscribe to my channel, and i will see you in my next one all right: bye, i'm cutting the um ear tabs or around the ear area so that i can get a really good and custom fit next. I'M just repositioning a wig just to ensure that i'm going to have it in the exact place that i want it. I know it looks like i'm taking up quite a bit of time, but you want to do this to ensure that you're placing it down in the right spot before gluing this wig. Now i'm going into my homey down adhesive by erica j, and i usually use between one to three layers for this tutorial, i'm going to be using two layers, but for times sake, i'm just you're going to see that i applied one, but in actionality it's two Layers so i just smooth it out and just wait for it to dry, clear and then i do another layer now that the glue is tacky and it's clear i'm now going to position my wig in place, i'm not going to um press down on it right. This second, because i want to be able to adjust it, if need be, so as you can see, i'm just slightly pressing it to how i want it positioned, but then um in a few seconds, you're going to see that i'm going to then start pressing. The wig into the actual glue and setting it now i'm going to take a razor and i'm going to start cutting the lace after i finish, cutting the lace i'm going to then take a head scarf tie it down for about 10 to 15 minutes. Therefore, the lace can melt into the skin and then i'm going to then style it from there. Okay, so now, 10 or 15 minutes actually an hour half past, and now i'm just now taking off um the head scarf. So now um i'm going to go in with a razor and i'm going to trim up my baby hairs um, i'm not a fan of the long baby hairs that go down to the eyebrows, so i typically cut mine short and guys, don't judge me. I am struggling with the baby hairs, but trust me i'm going to get there it's going to take a minute, but i will get there for a second time, i'm going to tie my hair with the elastic band, and this is just going to give it time For the setting lotion to dry and my baby hairs to stay into place, now i'm going to do two different styles, i'm going to do a half up, so i'm going to do a bun in the middle which i love. I love this look, it's just so simple but cute and then for the second look, i'm just going to have it all down and then i'm going to use some of the hair jewelry that was provided in the package i received from we queen so yeah, giving A look here: okay, guys, here's the completed look! So if you want beautiful box braids without spending hours in the chair, this is the way to go. This literally took me 30 to 45 minutes to complete this look and it is flawless. I love this wig. It looks natural, so if you are interested, i will have all the details in the description box below. Please leave a comment like this video and if you have any more questions hit me up, see you in my next one bye,

Comments
Barby B: Super cute