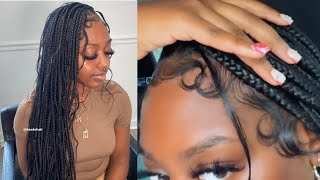
How To Rope Braid For Beginners
- Posted on 30 July, 2020
- Braids Hairstyles
- By Anonymous
Download my FREE haircare guide: https://glamfam-insider.ck.page/a63e6f...
*To donate to the channel: https://www.paypal.me/getglamfam
Cashapp: $LinwoodDarkis
Need a mannequin for practice? Here's a link: https://amzn.to/32Vmzy3
Follow us on IG: @GetGlamFam
Here is a link to some of my favorite products: https://www.amazon.com/shop/whoseesthi...
Hey Glamfam! In this tutorial, I show you how to do rope braids/ rope twists for beginners! I have several other braiding tutorials, so if this one proves helpful to you, then feel free to check out some of the others!
How to French Braid for beginners: https://youtu.be/qwEVQU3ffYM
How to Dutch braid for beginners: https://youtu.be/A7u3FXsMfgA
How to Fishtail Braid for beginners: https://youtu.be/OZGim0iGmC8
How to do feed in braid for visual learners: https://youtu.be/vc94h6tnrSM
I sincerely hope that this video proves helpful to you! I appreciate you for watching, and if you have any video requests, don't hesitate to leave them in the comment section below! You know I love you boo! Take care, God bless, and Stay glam!
Linwood
FTC Notice: This description box may contain affiliate links. What this means is, if you click them and make a purchase, we may earn a small commission of your sale. This in no way impacts your price, or our recommendation, as we only do honest reviews. We know you work hard for your money and we definitely don't want you wasting it on garbage. However, the income we earn from this allows us to continue to afford to make free content like this. As always thank you for your support!
The purpose of this channel is to educate people on how to simplify proper hair care, and teach them how to do hair and styling techniques.Linwood is a licensed cosmetologist and cosmetology instructor, and he teaches high school aged students on a daily basis.
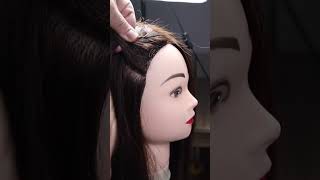
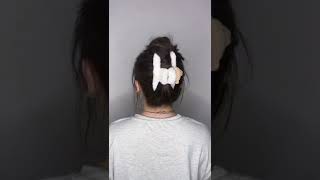
Hey glam fam linwood here and today i'm going to be showing you how to do a rope twist to the scalp like this. A lot of people refer to it as flat twisting, but this is going to be slightly different flat. Twisting is more so for your coily or kinky textures, because it lays more flat to the head and the curl pattern itself holds it together for a rope twist. You'Ve got to go through a little bit more of a different action in order to get it to look just like that rope. So we're going to go through the basics of it and then how to do it to the scalp and then from there. We will move forward with our tutorial if that interests you stay tuned. If you already know how to do a standard twist, like this i'll put a time stamp in the video to where you can jump straight to the rope twist to the scalp okay, so we're going to first begin by taking this section of hair. Now, as i stated before, if you already know how to do a rope twist, then you can go ahead and skip forward i'll, put a time stamp in the video to the area that you need, but we're going to begin by evenly separating the strand into two And then from there, i'm going to use the face as a reference here just to make it easier. But you can do it in the opposite direction as well, but i'm going to twist this strand towards the face and then pass it over and away from the face just like. So then, from here you're twisting towards the face, taking it back and away from the face, so what you can also do is you can also take and twist both strands at the same time towards the face and then cross over. So whatever is easiest for you, there is totally fine, but this is literally the steps that you're going through there. So let me lower you down just a bit because it'll be a little different down at the bottoms, so we're going to just continue that process twisting towards the face and then away towards in that way. Just like that and get y'all down to my thankfully freshly vacuumed carpet twisting towards and then away just like this now, when you get down to the bottom, it becomes a little bit more difficult to get it to stay in place and hold together so usually from There, what i like to do is i like to begin to roll it between my fingers like so, and that way i can still keep that same shape in there now, if you have twisted this correctly, if you have twisted this correctly, then basically, what you'll see? Let me see if i can zoom in a little closer there, so if you've twisted it correctly to do that, then you'll notice that that hair will not want to come loose when you finish with it. So i can let it go and it doesn't come unraveled. So you can see here how it doesn't want to come unraveled, even though the the thickness went dry down drastically on those ends. The whole twist of the hole still holds up really well without any degree of rubber band or anything like that on the hair. So if you let go and it releases all the way up, usually that means that you need a little bit more work on your twisting, but it should hold pretty well without a rubber band. Now, of course, if you plan on wearing it anywhere secure the end with a rubber band and you'll be good to go, so let's go ahead now, we've got this down and we'll hop over to the other side. Okay, so on the large panel of the hair. Here, we're going to do is begin with a triangle section and then from there we're going to take that and split it into two pieces, just like so. Okay from there we're going to do the same thing, i'm twisting this hair towards the face just like we did earlier and then pulling it up and away from the face. The only difference is now we're going to slide across the bottom and we're going to add to the bottom strand just like that, then from there we just twist it towards the face and then slide it back and away from the face sliding across adding to that Bottom strand, i'm going to smooth it out really nicely and then from there. We just want to twist again and pull it back in a way now. The reason why i twist it because it gives it much more of a rope shape here, instead of just giving it a loose twist, this is going to help things, look a lot more tight and snug, and just makes it have a much more professional look to It so that's something for you to keep in mind there when you're doing this. Now i find it's easier if you just go ahead and scoop across and add it to the underneath strand, but you can go ahead and add to the top and the bottom at the same time, if you feel that that would be a bit better for you, Let me scoot her forward just a bit adding here, scoop it out, add in and we're just smoothing with those fingertips twisting towards the face and then pulling up and away from the face, and you can kind of see how that ends up turning out. So i'm just sliding right on across adding to my bottom strand twisting towards the face, and you don't have to get crazy twisting towards the face. You want to twist it all tight and step just a little bit and then pull back and away from the face. Just like that now, the thing i like about this, of course, is that when you are braiding you're managing a lot more pieces once you get your rhythm with this and you're just managing those two pieces, this is honestly a lot easier for a lot of people Than doing something like a french braid or a dutch braid because of the fact that you're holding less hair now when you get back here, that being said, it does tend to get a little thicker in here. So you may find that it helps you out to slow your pace down, some just to make sure you can still keep control over everything. That'S in your hands, but otherwise you should be good to go. So i'm just twisting pulling it down when you get behind the ear on a live client. You want to always tilt your head forward like so it stretches out that skin in the neck, so that way we're not causing any type of pulling and things, and they look down later so it still holds snug, but it doesn't end up um pulling that hair Out at the base of the neck, when they look down later because this skin in here on a live person, is really stretchy that way we're not causing any issues with traction, alopecia, otherwise known as baldness due to pulling you don't end up with those bumps in The nape and you can see it's getting a little messy in there, so i'm just going to stop run my fingers through and then go ahead and continue. So we just add into the bottom twist and twist and we're just gon na. Add all that on that one just like so so once i've got that from there. I can just go ahead and go straight into my rope twist. Just like we started with and then we are good to go we're getting a little thinner. So here i'm going to go ahead and start rolling between my fingers just makes it a little easier to manage. If i can get this camera to focus, let's see if i can zoom in on just my hand, focus there we go. Maybe not i'm telling you. Yes, there we go okay and we're just going to go ahead and continue that process here and there you have it. So this is my finalized. Look, as you can see here, and i absolutely love this look on most people's hair. Honestly - and i will say it is a bit easier if the hair has curl pattern or a coil pattern to it, because that curl pattern holds it together. The technique that i'm showing here works best on straight or wavy, hair for curly and coily hair. You don't have to do as much twisting it'll hold together on its own, so i hope this video has been beneficial for you. If it has. Let me know in the comment section down below: please feel free to check out some of my other videos and thank you so much for watching this video. If you'd like to, i also have a free hair care guide that you can download i'll, put the link in the description box down below, and that way you can learn more about how to care for your hair, as well as what it takes to care. For this hair from a cosmetologist's perspective, if that interests, you check it out until next time you guys take care, god bless and stay glam, and you know i love you. Boo, bye,

Comments
GlamFam Hair & Beauty: Hey Glambassadors! *To download my free haircare guide, click here:* https://glamfam-insider.ck.page/a63e6ffbce *To donate to the channel:* http://www.paypal.me/getglamfam Cashapp: $LinwoodDarkis Got video requests? Just let me know! You know I love you boo! Linwood
Robin Hadveck: This was so useful! I’ve watched a lot of tutorials on rope braids and this is the one that made sense—even the scalp rope braid.
JeniWoo: I love these tutorials so much, I'm always sending your cornrows video to people because it's what finally made them click for me
Dana Chan: Awesome video!! So calming and clear instructions. Thank you, I will definitely try this out! I love that you show two different levels of this braid and everything. Great stuff! ❤️
Sayitwith Yochest: You’ve helped so much with managing my children’s hair, and the blow dry video was amazing get compliments whenever I do that now, thank you!
Kim Larae: Thank you for this tutorial. My twist are always so loose. I would love to see this done on type 4B or 4C hair.
Tara johnston: I’d been struggling with these but you explained it so well it clicked, thanks xx
MSJEAN1104: Your tutorials are awesome I love how you go step by step and explain
Jordan Darling: I’ve done this for years to get great natural waves/curls for my hair. Love doing it and sleeping with them wet and then my hair is great the next day.
Evelyn Pajaro: Love it! I can’t wait to try it on my little girl. You’re a great instructor and explain everything so clear and clam. Thanks so much!!
Sierra: I’m definitely going to do this to my hair, it’s so hard to do it with 3 strands so I tend to give up. This also helps because this gives me ideas on how to do my hair for when I go to Florida next year. Thank you so much for for this well explained and detailed video!
amelia espinoza: Thank you for the tutorial, this tutorial was made very detailed and easy to understand and to follow the steps (easy) to make sure the braid comes out beautifully.
Megan: This video helped me so much. I’ve never been able to do anything aside from a basic braid until now. Thank you!
Molly Fleiner-Etheridge: I had been struggling in front of the mirror for almost a full hour before I watched this– Thank you so much! You made it so simple!
Rebecca Geisner: Thank you Linwood for being such a good braiding teacher. I have been braiding for a month and a half now, using the videos, and I’ve become very proficient.
Sara Fieldsend: Thank you, thank you! 2-3 years trying to learn from tutorials and finally came across Glam Fam. Can't believe the two rope braids in my hair right now (no elastic!). Didn't want to let go, thinking it would untwist right away. Spent last week just listening to the tutorials. So happy my first attempt looks wow!! What a great instructor! Can't wait to take it to the scalp (after some practice!!) Thanks again. Thought I'd never learn.
Sayitwith Yochest: You’ve helped so much with managing my children’s hair, and the blow dry video was amazing get compliments whenever I do that now, thank you!
Brandy Nichols: You explained that so simply and so detailed that I actually braided my own hair beautifully the very first try!! Keep up the good work, clearly you are very talented!!!!
Ellen Beedie: Genuinely love your videos! They have been great help and make something that seemed so difficult actually possible and may I even say..pleasant! Please keep on uploading because I appreciate ever piece of advice you have given towards braiding specifically and your styling regarding up do's/curling. Thank again my man♥
Nakia Marion: Your tutorials are super helpful, thank you! I have really long (past my hips), relatively straight hair and I've been trying to get better at braiding my own hair with different styles. I'm getting a little better at French braiding. I was trying to do Dutch braids (unsuccessfully haha) when I found this tutorial so I tried rope braiding for the 1st time & it was much easier for me. It's a little loose & it got a little messy in the back but not too bad for my 1st time.
Jacqueline Hazel: Thanks for sharing this Lynwood, I need to try this on my daughter!♥️♥️
Feronica De Vos: I'm definitely going to do this on my girls, really can't wait to try. Thanks a mill.
Allison Lehr: Thank you for this!!! I couldn’t get the twist right until I heard you explain it!
Caely Pennington: Love this. I've seen this style and never been able to replicate it. Your voice is so calming, like watching Bobb Ross but instead of painting happy trees my daughter gets a cute new hairstyle.
Nicole Vitale: Thank you for the break down. The trick for the ends was a game changer. I always relied on the rubber-band and it would come undone.
Nyalaz Marco: Your tutorials are so amazing and easy to follow.GlamFam
J2 The T T: Very good stuff. Single dad learning to do my daughters hair here. I've watched alot of videos about hair. You're great. Nice relaxing voice and solid tips along the way. I love it!
B K: You have a great knack for explaining the process simply. Thank you.
Arianna Montes: Thank you!!!! I did a rope twist hair style on u daughter not long ago and it came und done right away! Thank you this helps so much, now I know what I did wrong! What to thank you as well because of you I learned how to French braid, Dutch braid and do cornrows ! I can do many hairstyles on my daughter with Thai basic braiding styles
I.Angelene King: Thank you, I have wanted to learn to braid hair for years. Your videos have made learning so easy. I also love your wig videos. God Bless you and you sweet family.
W Wong: Thank you SO MUCH for this video. I have watched so many other videos and was about to give up but then I found your video and I finally am getting it! Many Thanks!!! :D
Violet: First time try and I got it!! Thank you
sarah M: Thank you so much, finally have long hair ( long for me ) shoulder length. This was so easy to understand. Some tutorials are so fast. Thank you again
Gilda: I know this is over a year old, but I just watched and tried it on my hair and it worked! I have been doing this style on my 5 year old daughter with texture and it get too loose towards the bottom. I will try to twist her hair see if it works better for her. Thank you so much for sharing!✨
Michelle Winsborough: Your tutorials are brilliant..so we'll explained and demonstrated..have helped me so much
JC: You made that look so easy! Me sitting here with my Caucasian hair perplexed and just regular braiding while I watch . I’ll keep trying!
Mikki220: This is the only hairstyle I know how to do. It was born out of desperation. My Mom had caribou feathers that curled with water and my dad had astroturf. When Grandma dies and you are 12, you learn this on your short hair. I love to watch you braid and cornrow. I just sit back and think, "Wow. The expertise!"
MsArmywifie: This is the best tutorial I have seen for rope braids! I just subscribed to your channel and look forward to more videos.
Kētta’s Coils: I promise I get my hairstylist life together when I watch y’all’s videos.... lol. Thank you for yet another helpful video, sir.
Joyce Jardim: Hello, thank you so much for sharing. I have long wavy hair and the only thing I could do perfectly was 2 strands braiding. Now I found your videos I can practice more
Nikki Ratcliffe: Thanks so much!! Use my friend as a hair doll and it looks amazing
Natalie Sommerton: This is beautiful, now to try work out how to do it on myself with my fingers that don't seem to know what to do with themselves when I'm trying to do things like this!!
Todd Gibbons: Thank you for these tutorials, I'm a single father of two biracial girls and of course one has thick straight hair and the other has thick curly hair and your videos teaching me how to style their hair.
Rose Bona: This is the first video that’s actually made this braid click for me. I was finally able to do this to my hair. I appreciate the help
Blue Moon: Thank you so much for this!! My guidance counselor put me in cosmetology and I had absolutely no idea how to do anything like that.
Haru Herrera: Your videos have made my braiding in the salon so much cleaner!!
The Sewing Bratt: Just finished Cosmetology school. I'm glad you are posting these tutorials. I'm still new! Thanks so much
Stephanie Lynn: I am so glad to have found this video. I think I can do this and have the same kind of look of French/Dutch braiding and it be easier because it only requires adding hair from one side vs two.
Miquisha K: Thank you for sharing I will definitely try this❤️❤️❤️
K.C. Dunford: Thank you! So helpful. I'm going to go wash my hair and then do it!
Dulces: I do this at night to get wavy curls in the morning, sometimes I switch it up and start with twist until I get to my temple then French braid the rest.
Maria Zapata: Wow :) you make it so easy to do yet when one tries it, its very difficult :) Thanks for showing us :D
R Oki: Such a nice way to do the rope twist !
ProtonCoccus: I love rope braids currently wearing small versions right now
Elizabeth B: Thanks u so much as always, sharing your knowledge with us. The love is very much appreciated! Stay blessed GlamFam!
Donna Sicairos: Oml, my twists are always so loose! I'm actually happy this helped!
gali sand: Your tutorial are amazing. Thanks you!!
Khushi Narang: Loved it will definitely try ✨
Bartho: You are the ONLY reason why I know how to do my baby’s hair! I thank the lawd for you!
Garry D: Amazing hands. That looks really nice. I will try it on my niece.
violet: Great for growing out my fringe thanks
hydar gorilla: instructions are clear & voice soothing. a very helpful tutorial
Angelica Porro: My hair is rather short and I don't plan on growing it out too long anytime soon, but I'd love to do this hairstyle!
kim morgan: I’ll have to try this. I didn’t know there was a Rope Braid. Thank you.
Sara Fieldsend: What an incredible instructor for total beginners. Don't know why I didn't come across these tutorials a couple of years back because I kept giving up. Glad I gave it another try just playing and listening and suddenly I got it. The instructions, for beginners, are perfect. Honestly, other ones I watched stating, "pick up some hair and add it". Well, I can pick up hair from my nape, from my crown, I mean, I can pick up hair from my neighbour's head. Suddenly listening to where to take hair from, then watching. I can't believe I did a rope braid to the scalp. Sure, it's not perfect, but it looked good enough that I want to practice. If it seems like I'm going overboard with how happy I am, every friend I have (and even quite a few strangers) know all about my struggle to learn to French braid my hair. Well, I am so proud of my rope braid, that I'm sure with practice and a wonderful instructor, that French braid isn't that long away. What a wonderful family for sharing time and skill with us.
Seraphina Phoenix: This is THE most comprehensive video on rope braids ever!!
Deborah Young-lee: I’ve been in the hair business for over 40 years. Mainly Caucasian hair. I now have the most gorgeous gr babies that are mixed. So I’ve been loving your tutorials and so have my gr kids!! Love you and your whole family!!
Amadew Walt: I dig you, brother love! Good vibes meditative zen sounds and simple teaching for easy learning. Love love! I'll be watching you!
Samantha Bean: Soo helpful! Thank you!!!!
Echo McClellan: Loved this video!!! Thank you for sharing
LeAnne Thompson: I just found your content and I must say, I enjoy what I have seen. My daughters are mixed. When I go to braid their hair, should I blow dry it so that the hair pattern is not so tight? Or braid it wet?
KRN: Nice tutorial! Very helpful.
Katy Gaming Roblox: Hello glamfam, I'm new to ur channel and I just subscribe and I'm gonna like the video. Very soon I'm getting getting a mannequin one. My mom just bought it too. And this video helped me by learning how to do a rope braid. And ur family is beautiful. Love from UK
Sophieslazy: Woooh thank you! I had not idea how to do it! No joke! I managed the first one, but not the second one...I'm not sure trying in front of a mirror would help me, I've always been bad with symmetry '^^
Marissa m: Thank you for this!! For some reason I had such a hard time comprehending this
vamp: Regular twist 0:39 Rope twist 3:25
Sincere Presence: Omg!! You know as many ways to braid as you do to tie a
V Jones: YES!!! I'm always learning something from you!!!❤❤❤❤❤❤❤❤❤❤
Slayer: Thank you ! This taught me. Love
colette bruster: Feel the same , ever since coming across your videos , so far has clicked a little more for me but I know everything takes practice and consistency …
Karina Luis: Trying this to wake up with heatless waves in the morning ☀️
GhandiGroupie: You are an excellent instructor!!
Rosetta Drone: Wow, with your voice you’re like the Bob Ross of hair tutorials. Very calming
mystic vazquez: This guy knows how to braids and give tutorials all these other people don’t thank you
Juliet: Thank you for this video!!! ♥️
Erika McFadden: Wow! I love this!
Mylah Johnson: Hi Linwood!! My daughter's hair is really curly and coily and I want a mannequin head to practice on. Is there a curly one you recommend??
Rexel Chavez: Thank you so much for this
Charlotte Azzaro: You're like the Bob Ross of hairstyling. I'm so relaxed.
chubbywuss: Trying to figure out some cute and easy vacation hair dos, once again you’re here to the rescue!
Julia Dawson: Omg thank you so much I'm subscribing because no one else explained this
J Cook: Love your tutorials you a magical!
Mia Liss: Hi! I don’t know if you could help me but I’m been practicing even just a basic rope braid from a pony and when I twist my hair is does look like a rope it just looks like I twirled my hair. Do you have any suggestions?
Kathleen Harris: I always wondered how to do the rope twists. Sometimes when I do my two strand twists after awhile some start to come undone. Is it better to do it on dry hair?
Victoria: it was hard trying to stay awake, your voice is so relaxing. you would be amazing at asmr ❤
Michelle Smithe: Great tutorial!!!
Sara Walusimbi: My mom did these in my and my sister’ hair when we were little
kerrie j: Love this!
shashikala harrsha varshan: Thank you so much for teach❤❤❤
Mama Freeman: I purchase me a doll head just so I can learn from you Lynwood!