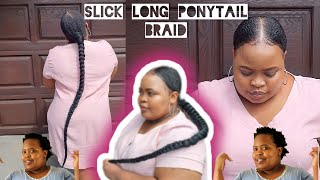
Let'S Make A Braid Wig Together! Middle Part 2- Layered Tribal Feed In Braids Wig |Ammie N
- Posted on 17 February, 2022
- Braids Hairstyles
- By Anonymous
Hey beautiful people,I decided to make a middle part 2 layered feed in braids with an old used full lace wig I have lying around.Hope you learn something from the video.Don't forget to like, let me know what you think, also subscribe and share.
Thanks for watching, I appreciate the support...xoxo
IG- amysglamroom
Facebook- Ammie N
Hi guys hope you guys are all doing well. I wanted to try this middle part tribal feeding, braids on my hair, but i don't know if you guys know, but i have a very short hair, so i decided to use it. Try it with a full lace that i already have this full lace is not new by tweet. I have already used it before, but um yeah. This is how the pattern goes. One big part in the middle. Then i also carve out a section for the back. I decided to use three colors for this style: color 27 color 613 and color 30, and i already blended everything out just as in the video. So next thing i'm going to um line up each braid, or do i see each strand of hair? This is going to be my smallest and the next one is going to be the bigger size, but truth be told at some point i started doubling the big sizes, and sometimes i double the small sizes as well. I'M going to point out two important things to note, while braiding or while doing a feeding braid. First of all, you see how pointed the braids are, if you like, how pointed they are. What i do here is i carve out - or i um section out a part just like i'm doing in the video, and i use a hair gel to keep it together and also keep the flyaways together before i start braiding i'm going to braid without adding any Attachment like two three times, sometimes even four: it depends on how sharp you want it to be. Yes, i also like the beginning part of my braids to be gapped to be spaced out. Um then, from the third one, i'm going to start adding my attachment just like i'm doing now. Feeding braids are pretty much they're easy actually, but you might find some difficulties in the beginning. I'M going to do one in real time and do another one in slow motion, so you guys get how to do it. I'M not going to show how i do the whole head. That'S the whole how i braid the whole full lace, because that's just going to take so much time the video or it's basically repetitive, so i'm just going to show you guys how i do it here and um yeah. I hopefully you get it so this one is in real time now and then i'm going to do another one in slow motion. Hopefully you get it. The second thing i'm going to talk about is the fact that i didn't add attachment all the way down. Why? Because i'm trying to conserve the space at the nape, if you keep adding all the way down, your braids are going to be very big and your their braids are going to compete for space at the nape. I don't know if that made sense. Yes, so um. So that's basically what i wanted to talk about and i'm just doing the same thing and i'll keep doing that. So i'm done with the hair. Now you see how all my braids are on their own at the back and there is no hanging one at the back. If you don't consider the knit area, when you're braiding you're definitely going to have a hanging braid and it doesn't look cute, this wasn't the color i was going for. I was hoping the braids or my my wig was going to be more like the blended attachments, but, as you guys can see, my fullest wig is more of a honey, honey, brown or honey blonde. Something like that. So it really really affected the color a lot right now. What i'm doing is i'm trying on to see how it looks. This step is very important whenever you're making a wig on a full-less, wig or even a front or whatever you have to try it on from time to time to see what it looks like to be sure, you're not making any mistakes. At this point, i also realized that i didn't have the need for those baby hairs, so i'm going to either cut off that lace or i'll ventilate on it and braid on that lace. Um, i'm going to decide later, i'm done with the braiding and i want to add some curls at the tips i wanted to use the ruler spots. I didn't have rulers and i really wanted to be done with the video so i'll, be doing the regular style or like the local style, that the women in the market do whenever you go there to make your hair, so they just use a thread. I triple the thread or even stack it four times. So it's a bit thick. You can use yarn or wood to do this. That one is even better than this one. So i just wrap the thread round. It'S very loosely get to where i want to stop. I didn't go all the way down and i'm going to push it upwards and when i do that, i'm going to tie it up at the tip just so it doesn't unravel i'll. Do the same thing for all others, and i'm just taking like um 10 10 braids to do this when i'm done the next thing, i'm going to dip it in hot water, and i made a mistake. While i was dipping in hot sauce, i'm going to show you guys the mistake i made, hopefully you don't make it too. So the mistake i made here was: i used very hot water. Yes, please don't ever use very hot water. Sizzling hot water is a no-no and that's what i did here. I didn't realize it on time. I'Ve always known this, but for some reason it's keep my mind and i just kept on putting a lot of um hair into the water and just look at how it turned out the the curls look all messed up and for lack of a better word. Let me use the words wrinkled if that makes sense. So now i'm doing the next batch and you're going to see a difference, because now the water has cooled down, so you can see the difference and i'm taking them one by one. Just in case, i noticed any mistake, i can always fix it. I also dab the top and the body with some warm water and my hair is ready, i'll, be using um, some hair mousse to to style - and i didn't add combs to this. I just used my elastic band, i'm going to call this side b and i'm going to call this one side a you guys are going to see the difference when i take them down. So here is the review. This is what the unit looks like side, a and side b. There'S a big difference, guys, that's the end of my video. Hopefully you like it. This is what it looks like while standing up um. Thank you guys for watching, don't forget to subscribe and until next time, peace,
Comments
Etomchi Igwe: Such a detailed video ❤️Well done babe.. I enjoyed it
Catina: You’re so gifted I have my needle braid unit on now
Sweet Moxy: Welcome back Ada!! What’s the name of the gel you used?? The hair turned out really nice.
Beauti FAHT: Wow!!!! Now that's impressive!!!
Brionna Perry: Hello where did you purchase the wig?