Knotless Braids | Peekaboo Braids
- Posted on 02 September, 2022
- Braids Hairstyles
- By Anonymous
Shop my Amazon Storefront: https://www.amazon.com/shop/linae
⭐️EBIN Edge Control:
⭐️Shine N Jam:
⭐️Rat Tail Combs for parting:
⭐️Braiding Hair Rack:
~ Recording & Photo Equipment: ~
⭐️Phone/Camera Tripod
⭐️Studio Lights
~~Connect With Me~~
⭐️Business Inquiries: [email protected]
⭐️TikTok:@LintageBeauty
https://www.tiktok.com/@lintagebeauty
⭐️Instagram: @QueenLinae
https://www.instagram.com/queenlinae/?...
⭐️FTC Disclosure: This video is not sponsored. Affiliate links are included and if you use them, I earn a small commission. Your prices are never altered. Thank you for your support.
#KnotlessBraids #Peekaboo
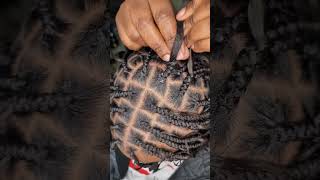
Hey guys welcome back to my Channel today, I'm going to show you guys how I did some knotless braids peekaboo knotless braids on my bonus daughter's hair. She selected the blonde colors the light blonde color, so we put those in the back so they can peek through and get that peekaboo type of vibe with the knotless braids we did medium size braids. So if you want to see exactly how I did these keep on watching so first I'm starting off with Section off her hair resection of the top of the hair in the back of the hair. So we'll have two separate parts, two separate sections I should say and of course I'm trying to get the most neatest part. I can, because the need of the parts are the better. The hairstyle will turn out and look and of course, we are using some shining Jam to put in the parts to help make it more neater and make a more straight part. Now, the back of the hair, I'm sectioned off into two sections, so overall it'll be four different sections of her hair, so the back just make a nice straight part all the way down - and this is going to also help me evenly - make the perfect amount of Blonde braids in the middle, so I can see exactly how many I have I'm putting on each side and right here, I'm just putting the back right side of her hair into a Twist and using the clip so that it can hold it in place. So that part of her hair won't be in my way, and I'm literally just going to be doing rows going all the way up to complete this section of the hair, of course, again use your shine and jam or whatever type of jam you have so that You can make the the parts very precise and very neat, because that is exactly what you're going to need, in addition to doing neat braids, to make the hairstyle come out really really nice and neat and professional. Looking now, I'm making this row just to braids because again we're doing medium, sized plaits or braids, whatever you want to call it and the area, that's in the middle of the hair, we're going to do blonde, because that's how you do your peekaboo, the peekaboo braids, Are just basically in the middle of the hair in the back and on the end of the hair, the inbred close to her ear you'll see that I'll do that, one in a black color foreign. I just wanted to get a little closer put the camera closer. So you can see how I am feeding in the hair in between my fingers. I hope you can see it very precisely. I will zoom in again on another section of the hair later in the video you'll also see me zoom in so you can see how I'm feeding in the hair foreign you that the in braid that's closer to her ear is where I'm doing the black. So you'll see, as I go up in this section, all of the braids, that's towards the her ear on that side will be black and the ones in the middle will be blonde, that pretty blonde color all right and now we are going to the next row. Creating our second row and again, I'm just trying to make a nice neat part and this one. We are going to do yosini part off three different braids, because the section is a little larger and we want the braids to be the same size all through her head foreign. So again we are going to do the blonde braids in the middle of her head and the black braids on the end of her hair closest to her ears. So you see me using the blonde all the way through I'm not mixing the blonde and black together. We'Re doing all straight blonde, I haven't learned how to really tuck in the real hair to seal it, to make only the blonde hair show, but it still turned out really nice and really pretty. If any of you have learned how to do the you know still in the real hair when you're using color hair, please comment down below and tell me how you guys have did I'm going to try it. I know I've seen a few different techniques. Well, honestly, I haven't seen that many techniques, but I'm definitely going to try it because I think it looks super good when you're able to seal in um the real hair when using color hair anyway. So right here, I'm just showing you guys how I did separate the hair, the braid hair on my rack, my hair rack. So I just put blonde on one side and black on the other side, so that it was just easy for me to see easy. For me to grab - and this is how I did it - and here is one section all complete on the other side of her hair - that back right section, I'm going to do the same thing. I did on the left side and just go row by row. Doing even rows even Parts still doing the blonde in the middle of her hair and doing the black on the ends. The end of the hair closest to the ear so you'll continue to see me do that in the back. The blonde again is only going to be in the back, and if you see here I only I did the black I'm sorry, I did the blonde up to a certain point. I did not do the blonde all the way up to the top of the middle of her head, because we just wanted the peekaboo blonde color to just be in that one section in the back middle of her hair. So you don't go all the way up to the middle of the hair with the color. You want to stop at a certain point so on this bottom right side of her hair, I'm gon na do the same thing same thing. On the left side, I'm going to do on the right side, foreign all right. So this is how the back looks fully complete with the blonde hiding in the middle of her hair and then, of course, the black all around the edges and the top middle of her hair. Okay. So right here, I'm just showing you guys that I did section off her hair in the front ended two separate um sides. I did a very even straight middle part, so that I can have two even sides to work with all right. So now we are in the front of her hair and I'm just working on the left side of her hair, the left front side. I already did the right side um. If I hear at this point but we're going row by row and that first row I'm just doing two braids and at this point we're at the top of the hair, so we're only doing black braids for the rest of my hair. All the top will be black braids there'll, be no blonde anywhere else in our heads. That'S the way you guys saw me put it in the back of her hair and we're just feeding in the braids making sure everything's even and the braids are the same size. All the way through you guys, probably don't see me, do it in the video, but I do put my braids side by side so that I can see and measure just to make sure that they're the same Breeze. I can't stand when I see plaits, not with threes or whatever you want to call it and they be two different sizes. One be large, one, be small, won't be skinny. It looks very ugly to me, but now I am at the top of my hair on that last row and I'm just mashing all the parts up with the other side of her hair that I completed just to make sure that middle part. That top part look real, looks real, real good and even in neat and professional, because we professionals over here foreign - I did not show you guys this earlier in the video, but I do use scissors to cut off any excess or flyaways after I complete every braid. I don't wait till I get to the end of the hairstyles to do this. I like to do it as I go through, so that at the end I don't have to go back and go through every little plant and cut off the excess, FlyAway hair. So just wanted to show you guys this you'll see me doing it right here, foreign foreign. I just wanted to slow down a video, so you guys can see how I am placing the hairs to feed it into the Plaid seamlessly kind of hard to explain. So I just rather Slow Down the video, so you guys can see where I'm putting the hair, how I'm putting it um in the plaque area. If you need to rewind, please feel free and we are all done - I'm just moving her plant specs. So we can lay down these baby hairs and make the front look really really super cute. The kind of edge control I'm using is by even ebin even New York, 24-hour Edge Tamer and I'm using the extra Mega hold I'll put a picture on the screen. So you guys can see how it looks. I really like this. It works so good. It lays down the edges all day. Long and honestly, you guys you just can't go wrong when using this Edge tamer, which is edge control, the bottle says Edge Tamer, so yeah, but you can't go wrong with using this. I really like it it's one of my favorite ones, foreign foreign. This is the finished product I like how these turned out she loved them. I love them. The parts came out really really neat. I love the peekaboo blonde in the back. I usually never do nails, I'm sorry do hair with nails, and I have nails right now. So I believe these came out really really well, despite the fact that I have my nails um, if you guys think I did a good job. Please comment down below because I tried my best and I think these look really really good so like And subscribe. You guys, I will see you guys, the next video. Thank you so much for watching bye, guys,


Comments
Tiffany Curt: These look really neat