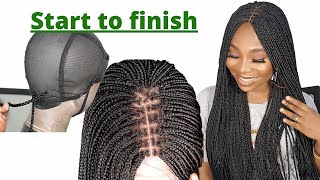
How To : Diy Curly Braids Wig | How To Grip + Darling Hair Review
- Posted on 29 October, 2021
- Braids Hairstyles
- By Anonymous
Hello lovelies! I've got another tasteful platter for yhu guys! I'm serving yhu guys an amazing tutorial of how to make your own curly braided wig using an affordable hair brand.
Hair Used : Darling Empress Collection Curly Braids
Colours : 2 packs of 1/27 (got these for NGN3,600 each from the Darling Nig website)
2 bundles form a pack of colour 33/27 (Got the extra pack @ NGN 4,500 from a store
near me)
♥
♥
This video consists of the following chapters :
0:00 - Intro
1:21 - How to use the curly braids hair extension
5:37 - Another braids gripping method
12:42 - Finishing up the braided wig
13:00 - My first hand review of the darling empress collection curly braids hair
♥
♥
♥
♥
#knotlessbraidswig #knotbraidswig #braidswig #braidedwig #darlingnigeriahair #curlybraids #curlybraidswig #closurewig #affordableslay #cheapbraidswig #slayonabudget #howto #gamechanger #bombbraidedwig #darlingloosebraids
♥
♥
♥
Let's connect, follow me on IG @first_leidy
Hey boo! I've got more videos yhu will love, check them out
VLOG #1| I attended the most beautiful Efik/Igbo Traditional Nigerian wedding https://youtu.be/Q74oL50cN_0
FROM FAILED CRISS CROSS STYLE TO THIS CUTE FULANI BRAIDS https://youtu.be/gDCdw1iGT3w
Never Have I ever Game With a Hint of Story time(s) https://youtu.be/GMH_IiWdc7s
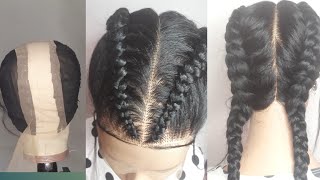
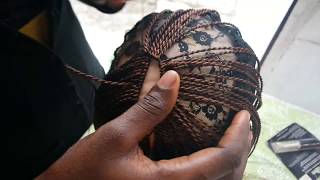
Yes, hello. I welcome welcome if today is your first time here and to the returning viewers and subscribers welcome back so we're going right into the video you'll be needing, of course, your mannequin ad, a wii cap, um a lace closure of your choice. I'M using this four by four or four by five closure that i cut into half. Yes, if you want to do a braided wig on a budget, this is the way to go, and you do not mind just having a very small amount of lace closure. Then this is definitely an option. This is how i actually make all all the braided wigs that i have the air that i will be using is the darling empress collection, curly braids air. Now, while using this egg, you want to be careful, you know when separating it to braid with it, because it can get frizzy. You see those curly ends. They can get frizzy if you do not undo the air carefully. So that was what i was trying to do. I first tried to fluff out the curls before pulling out the air, and i found out that if you pull out the air with too much force, you're definitely going to freeze out the curly ends. So you want to gently separate the air when you, when braiding or when you want to separate the air to braid, see as you can see, it gets tangled up a bit like if you do not take care you're going to spoil this air. So i was trying to be careful when i pull, i fluff it out again before pulling another strand of air or another chunk of air. I'M going to be leaving more information about this air in the comments in the description box and also please do stay tuned at the end of the video for a more detailed review of how i feel about this air, as well as how many packs are used. Everything we're going to be discussing it after this tutorial and also more information will be in the description box. So please do check it out because of how delicate this air is, i would have used if i was braiding with normal air extension. I would have just taken some of the air crocheted it through the recap and used another um chunk of a to braid that through, but because of the nature of this particular air. I just knew that it was not going to be a great idea to take some of this air and crochet it through the recap that is going to damage the air that is going to bring about a lot of frizziness before i use this old curly air. That'S left from my flanny style if you've not seen that i'm going to lick that off right now guys, i could not find a way to explain this part by words of mouth. So please read the message on your screen, while you're braiding with this air or with any a at all, you do want to remember to keep flopping out the s strand through to the end, to reduce tangling and reduce frizziness, more so with this kind of air That i'm using right now you want to make sure that you do not forget to fluff the air through and always keep it separated, if not you're, going to end up with tangled air. So so now i'm on to the second pack of air, i'm done with the first pack, so we're on to the second, you guys. I thought this will be the last keep watching to see how much more i got to use. So i'm showing you again the air that i'm using for the base of this braiding for any braiding, wig or braided wig style, where you have to do single braids, the best crochet hook to use are the smaller sized ones. Please don't use this one again. This is how i cross the braiding air for the first gripping method that i use. I ended up using this gripping method more than the second, so feel free to jump on whichever one that suits you best. However, this is not the same grippy method that i used while braiding the closure part of this wig. Of course you can use the same method for the closure part. That is, if you do know, if you want the knots braids, as you can see, using this method or even the second grippy metal, those would give you knots at the root of your braids. So if you do not mind that, then by all means you can use the same method for the closure, part, okay, but so for the front section there is no defined part. I did not do a center part as per usual. What i wanted was a sort of free three parts type of front section, so that is what i went in for so i just like braiding it from the back towards the front just passing it. However, i like, while making sure that the parts are of similar sizes, so yeah just like magic, i'm almost done with braiding this closure part. Oh now, i'm just trying to create a separate small section that will be used as baby ears when i want to. However, so far, i've not used that i've not actually laid the baby. Here. I just stuck the air underneath the wig cap and threw it on so i did not let braids for the front section. I use the feeding method to do this. Knotless braids - and i hope, with these visuals that i provided you can do your own by yourself, because that's the purpose of this video and yeah keep watching for more details about this wig. By the time i was done, braiding the closure part of this week. I was, i had exhausted all of the breathing air that i got, which meant obviously that i had to go to the closest pizza supply store to get another pack of air which sucked, because i knew obviously i would not. I was not going to use so much of the new pack of it. I was going to get, but i needed it to fill in these past areas on the week. So i ended up getting another pack, you guys i could have gotten away with using just two packs of it for this week, but i did not space out the area enough at the back so yeah we are, i immediately finished making this wig and chewy on. I wore this to attend a wedding, i'm going to insert clips for you all to see how i slayed it again. So, as promised i'm here to give you a lot down of what i feel or how i feel about this darling, curly braids air. So in total i used two full packs of the darling and press of the curly braids air, but it was not enough because i did. I did not envisage that i would run out of air. If i had known two packs are actually more than enough to do this entire week, but i did not spaces well enough at the back, so i ended up buying an extra pack of air which, to be honest, i was not happy about because i did not Use half of the third pack i did not so i could have gotten away with using just two packs if i had planned out or calculated well enough, the spacing of this wig, because it ends up being very voluminous. Like i had to trim, i had to trim some of the curly braids in the end just so it was too much so i i used um two packs of the um ombre color. That'S one one. I don't know how to call it. One color one and color 27 together to form the ombre color. I used two packs of those and then, when i had to run down to the store last minute to get an extra pack of air, i just went to the beauty supply center. I just sighted. The empress collection, curly, brace and oh that's it and i just picked it so i did not check the color was when i started contained braiding with it. I was like this thing doesn't have black in it like. I just noticed the difference in the color, but then again i like it. If you notice, i have some kind of highlights going on so just kind of give the um wig some dimension. I don't know if you notice, can you see like there's elites? There are some highlights of color 3 or something like that going on here and there, so i don't mind it. So i actually like that. I got the other color by accident. All is well that ends well, so this is how it comes. Of course, can you see so i ended up just using two of the extra pack of air to complete my look because i had some spicy. We already saw it in the video previously, so i just i just - and this is three and 27. That is how i achieve this color dimension. If you like, it then just check the description below, and i will definitely put the colors that i used see if the pack actually has maintenance tips that you could follow. Initially, when i started braiding the head and like i must have mentioned, i was applying um. I was applying some earwax just so that the tips does not tangle up, because i saw that the tips were a little bit tangled up when i separated it. So you don't want to forcefully separate you gently separate, as you must have seen me demonstrate in the video you want to gently separate the air so that it will not get frizzy at the curly end side and then yeah you. You really do not need to pick that petrol because of me, because as a typical nigerian girl, black girl typical me, i hardly read the manual of stuff, so it was not until i had already used petroleum gel to some extent that i eventually saw that you're. Not supposed to use any form of petroleum gel for this air, so after i had, i was done, braiding the air. I just trimmed off the fly aways and applied some mousse to the air, especially these curly ends, and that was it through the week on, and that was it basically so yeah. So that's all you need to know about this air and yeah. I would say, though, that these thieves definitely get frizzy, but with the mousse applying the mousse will help you manage it better, and i think i love. I love that i did this in the interview, because that way i can use it for much longer. I can always keep it away after taking it off that way. I can maintain it better and it will last much more longer. So that's it for this video guys if you are yet to subscribe again, please kindly hit the subscribe button right now. Right now, right now, so you see me again on my next video till then stay safe and stay blessed. Bye, uh, you

Comments
TosTos TV: Y’all this wig is about to be my favorite wig Feel free to ask any question that yhu might have and I’ll be happy to answer, also, let me know what yhu think about the wig! Xoxo
LuvlyGift: I love how it turned out I love the colors and the dimensions
marcus gboyega: Nice one, you did well with this wig!
oluwatobi Akonu: I'm definitely gonna get my hands on this one. Thank God I have the essentials na to but the empress hair. For the hair chrochet can I use any hair or it has to be curly
LuvlyGift: Can’t wait for the wedding vlog
Nanda collections & recipes:
CHOCOLATE: Gorg hair style
LuvlyGift: Here