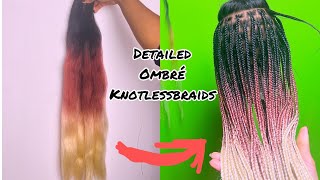
How To: Old Knotless Braids To New Faux/Goddess Locs Tutorial!! (Step By Step) | Makiya Banks
- Posted on 10 May, 2021
- Braids Hairstyles
- By Anonymous
Thank you all for tuning in into today's video! ❤️ Hope you enjoyed my knotless braids to faux/goddess locs tutorial. This style is perfect for someone who is looking for two styles in one set. Comment down below if you would try these!! If you have any questions for me please let me know in the comments below. New videos every week! Please go LIKE , COMMENT & SUBSCRIBE More videos will be coming soon :) Follow me on all of my social media platforms:
Twitter: makiyabankss
Instagram: https://www.instagram.com/makiyabanks/...
Snapchat: makiya_banks
Tik Tok: makiyabanks
Business Inquiries: [email protected]
MATERIALS USED:
Freestress Water Wave 22'' (7 packs)
Touchdown Edge Gro
Edge Brush
Flexi Rods
Crochet Needle
Nail Glue
Thin Comb
Scissors
FAQ :
How old are you? - 20
What is your birthday? - September 21 (Virgo)
What do I film with? - IPhone XR
What do I edit with? - IMovie (MacBook Pro 2019)
sub count: 3.33k subs
#knotlessbraid #knotlessbraidstolocs #goddesslocs #fauxlocs #makiyabanks #longlocs #passiontwist #boxbraids
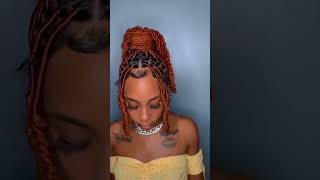
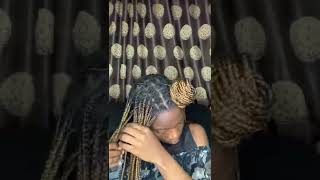
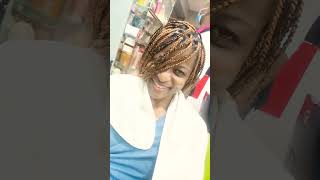
What'S up y'all welcome back to my channel and in today's video i'm going to show you guys how i went from this to this okay to the but yeah yeah i'ma show you guys how to turn your like, not list passion twist all that stuff how to Make them into locks, so i'm going to show you guys. You know, step by step everything i do materials. You guys know the drill. The whole nine, if you are new here, make sure you like comment, subscribe turn on your post notifications, so you can be notified. Whatever video i post and also make sure you follow me on all my social media platforms, it will be in the description box below yeah yeah. Let me just show y'all, like my hair um, you know i could switch it up, give it a switch middle part. Let me stand up, so this is what it's giving i'm gon na show you guys. Let me just show y'all. It looks super cute okay. So what i do uh yeah so yeah, i'm going to go through everything when i do step by step, uh to just show you guys like how you know how to wrap with the braids and also turn into anywheres in general. You know how your curls are straight, how to get them curly to make them look more natural, looking, but yeah imma just show you guys how to make them look more natural, very much from the scalp like they just look very much like the texture and everything. Just gives like like very much islandy vibes like this is the perfect look for the summer, like, for example, like y'all want to wear get some braids y'all can do that, but if y'all want to switch up, the look y'all can do that too. So it's kind of just like two looks in one so yeah, i'm just gon na show you guys, i'm just gon na show you guys the step by step on everything how to do these locks, but yeah make sure you give this video a thumbs up and Subscribe, please, okay, thank you. If you are interested in watching on how to turn my knotless braids into locks, make sure you keep on watching. Hey y'all: hey y'all, okay, so you first want to start up with your braids your twist or whatever you have in so i have seven packs of freetress hair. I end up having six, but i need an extra pack, so i got seven. Then you'll need some edge control scissors, nail glue, uh edge, brush and um crochet. Needle now y'all know the drill. Y'All got ta, stick the crochet needle through the braid or your twist or whatever it is. Then what you want to do is separate the hair. You know from the last locks video separate the hair, get it more frizzy. Now i'm sticking the crochet knee in now, i'm just pulling through the hair from through the braid, so i'm attaching the freetress hair on the crochet needle and just pulling it through making sure both ends of both strands are on each side. Now you want to wrap the row by like three four times and then wrap all the way down, make sure that your um hair is like flat when you're wrapping, not all like bunched up and wrapped like make sure it's flat and spread it out when you're Wrapping cover the whole braid, your girl was definitely struggling because it was tangled, but it's okay, you it get. You get used to it. Okay, now it's just speeding up and i'm just wrapping it all the way down. Um. If you haven't seen my last blocks video, you pretty much know the gist of this step. Now, i'm about to add another strand in and then keep wrapping, because my locs are, i mean my knot. Lips are long, so i have to add, like more hair. In so what i'm doing right here, i just took so i split one piece of freetress hair in half and i only use one half of it, because i literally only had a little bit left to go for wrapping. So i didn't eat the whole thing and waste the whole thing we're not wasting nothing here. We now waste no hair. So i just use half of that strand to finish wrapping the ends now. Y'All know you got to put the nail glue in to seal it and palm roll your locks with your hands, and now what i'm doing is just cutting a little excess hair off um at the end, i'm gon na do it all over again, but i'm just Doing it and this how she'll look at the end, so now i'm just showing y'all again in the front um. So with the front, you want to make sure you retouch up the front. So all i'm doing is adding some edge control and then i'm going to twist the roost on the opposite direction of where my hair is at yeah. I'M gon na show y'all, though so i'm just putting some edge control on brushing it in, and i'm gon na show you the way that you should twist your edges and what this is doing is just making it kind of like refreshed and making it still kind Of tight, so it won't be like looking frizzy at the ends. I mean at the roots. Now i'm just going back and add another freetress strand onto the crochet needle and pulling it through and just repeating the steps. So with your edges, when you want to redo your edges, just make sure you add edge, control, um twist it the upper direction of your face and it's going to look fresh and new in the front and you show them should do it in the front. So so this is half of my hair done, half lock, half not list. Is it giving or no who still says or not, but anyways super cute y'all? I just love a lock like i just love a lock. You can never go on locks like not gon na lie. I was throwing myself a bit, don't be hating so now everything's about to be just sped up, because if y'all need to rewind it or slow it down, y'all can but yeah everything's about to get sped up just retouching on my edges and about to get to Wrapping so yeah just watch this video throughout and i'll come back after we're done all right, y'all, so we're done wrapping and, as you can see, the ends look a mess. Okay. So now i'm just going to take each strand and snip the ends off because it's literally frizzy and like tangled up so we want to get them all, separated and not like to stuck together. Like you see all that frizz and everything we cut all that off. You got ta make it looking. Neat can't have nappy ends so now we're going to take some flexi rods. Um i'd use the orange ones, but um it shouldn't really matter which ones you use, but your ends are still covered the same way. So this is just giving my end some curl, so i won't be straight um. This gives it more of a natural, more organic. Look to your locs makes it all flow and blend together, because if you just leave it like that, it's not giving how much it's gon na give when it's curled at the end. So y'all gon na see it's cute. So i use about like five four five. So yeah five! So now i'm just dipping them in some hot water, because so it can set and curl up quick and make sure y'all do it over a sink and also put a towel down because it gets wet. I burn myself as you can see. Now. I'M taking a towel and just squeezing that excess water off the lots, because it's gon na be dripping when we take it down. I'M not gon na lie, but we're trying to soak up most of the water as we can now. I'M unraveling the ends and, as y'all can see it's about to give off a really cute curl, nothing too perfect, and that's what you want with lots. You don't want nothing too perfect, which i see it is giving flexi rod set. I just really love how i did my ends. Like i mean i love that i have the brown ends. I just feel like they give us a nice little touch very cute and natural. Looking like it looks like it all flows like i just dyed. My tips brown, it's super cute and excuse that one extra long lock, i was gon na cut it, but i'm like i'm gon na leave that one looking unique so i'm gon na just keep it but yeah. I have one extra like long lot, but i'm gon na keep it though, but that is really it for this uh tutorial at this point, i'm just playing with my hair, showing your different styles, showing you how to back up it. It'S gon na give y'all it's giving super cute all right. That'S the end of this video. Thank you guys so much for watching. I hope you enjoyed the video yes comment down below what you guys. Think of the look how i went like i love the like. The brown and combo i just feel, like that's, super cute yeah. Thank you guys so much for watching this video. I hope you guys enjoyed yourselves make sure you like comment, subscribe and turn your post notifications. Please look out for brand new videos and drop anything in the comments on what you want to see from me, because i will do it for sure. Well, that is all for this video i'll talk to you guys in the next one. Oh you
Comments
Tamron Brown: This is such a good idea! The parting’s already done, all you gotta do is wrap them? Yeah, I’m doing this to my braids. ✨
Beautifully Dej: Great tutorial! So smart of you to transform your braids into locs
Ramroxe11: So cute I’m about to do my hair like that thanks for the tutorial
Rhonda: I just got my knotless done and I miss my locs. I may have to try it. Great video! Thanks
Wine With Tuanni: Thanks I love this look
Jessica Clark: You just gave me inspiration to add locs over my braids.
Ayzia Kegler: My small knotless are a month old and I’m tired of them. I’ll be trying this out. Thanks for the tutorial.
Shay Shores: You just saved me, i start school on Monday. Thank you so much for this!!!
l c: So smart!!!! Thank you
MeganE: I have mini knotless and so don’t wanna take them down…I said there just has to be something I can do…and here it is!!!
beaux stanley: yesss i only got 28 braids im about to do this i do not wanna get new braids
entertainment: You did good your so pretty
Nia H: So cute
Tiffany Scott: Did your hair feel tighter at all? That’s one thing I’m nervous about. This is amazing!
JANINE AMEI: I like how you added more to the bottom. Nice video too ♥
tia M: How do you prevent them from unraveling ?
monique sands: Omg are you still at Clemson my daughter is a freshman this year and will like to have her hair done. Please let me know if you actually provide knotless services on campus. Hair looks wonderful by the way
Sabrina Jolee: I am afraid of doing this hairstyle due to retwisting your hair again to make it more neater, when you took it down did it cause to knot up like was it hard to comb out the roots?
Detroit. Symphony: How many braids did you have ?
Rhonda: My knotless are tight. Should I wait until they loosen up?
CHARMEDBOUTIQUE🥰: Ima get my front redone but then I’m trying theese
Sophina Annabella: Can i use the same hair i used to braid?
Edits By Brii: Where did the other piece go ?
LaToya Chenelle: How long did it take
shamari c.: do you think i can do this with regular braids ?
PrettygirlPrecious: How do you take all of this down ?
Rika Taylor: Do you wash your hair(braids)… well scalp before you do the locs over them? Because I’m thinking about doing this
Regina Giles: We have the same birthday
Uchechi Blessing: Was this heavy once you got done?