Bomb Ass Bun Tutorial | Kanekalon Braiding Hair
- Posted on 23 June, 2017
- Braids Hairstyles
- By Anonymous
Hey guys welcome back to my channel.
In this video, I just want to show you guys a simply but pretty hairstyle that you can do in the summer time.
This style was inspired like I mention in the video and all the products that I used you can find in your local beauty supply store.
Recent videos.
EyeBrow Tutorial:
https://www.youtube.com/watch?v=sOatK-...
WetNwild photo focus foundation review:
https://www.youtube.com/watch?v=3EL0vU...
Dermacol foundation review:
https://www.youtube.com/watch?v=lT6pmr...
Get to know me TAG:
https://www.youtube.com/watch?v=aBJhSh...
Get ready with me:
https://www.youtube.com/watch?v=aBJhSh...
Music by:
Song: LFZ - Echoes [NCS Release]
Music provided by NoCopyrightSounds.
Video Link: https://youtu.be/Q_ojhcx-wrk
As always, thank you guys so much for supporting me and I'll see y'all in my next video.
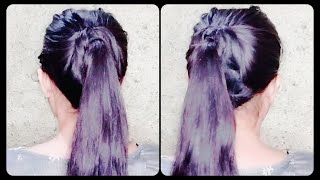
Hey guys, what's up welcome back to my channel, so I know you guys are here for this here detail and I just want to start off this video by saying I got inspired for this yourself from this guerrilla Instagram. Her name is Mayra Mufasa. I think that's how her name is pronounced. This is what her Instagram looks like. Oh please, I couldn't see that I found this picture on Instagram and it was just strolling through Instagram the other day and she just popped up out of nowhere with this haircut, and I was like oh my god, this hairstyle is so bomb. I have to recreate it, so I did almost the same thing that she did. I believe she had two or three braids in the center, but I only wanted one because her hair is very sick in full and my hair is very lighter and I have a lot of breakage like on my sides and stuff. So I didn't want to take up too much of my hair, because then the ponytail would just be like too too flimsy and small, so I did it as um. I did the long braids as well, and I just added these two thingies. You guys know that these are sold in the beauty supply store on my brain. I didn't have the feet on the end like hers, because I wanted to change it up and just make it my own. So, even though it's not mine, but I wanted to add my own little twist and make it like really cute to match on my style. So I also added like a lot of strength around my braids and then I added it around my ponytail. So if you guys want to see how I created this hairstyle just continue to watch, don't forget to give this video a thumbs up subscribe to my channel. If you haven't already and I'll see you next time, bye guys so to start off guys, you already seen that I put this one braids down the center of my head and I'm sorry, I didn't show you guys how I did it, but I'm pretty sure everyone Knows how to put a corner down the center? I did use a little bit of rays and it supported because my hair is really thin. So, yes, the brains about me working with today, is this amour 3x triple tres, Kanekalon braid, and this bird is extremely long. It does come with three bundles in the pack and I get it in the color 1b. So for the two braids, that's in the back of my head guys, I definitely did not do them by myself. I call my mom, so she can help me with that, because my mom is a braider. So if you live in New York and you want your hair to be, braided, definitely leave a message down below or I'm going to create a Instagram page for my mom. So yeah, but I definitely had her help me with those two big braids in the back of my head, because I just couldn't deal to do them by myself and my hair is a lot thinner than some, so I couldn't make it too small. I had to do it like a medium flash large size and that's how I got my two big braids. So after my mom added the braids in my hair, one thing she had to do was use some eco style gel just to sleep down the back of my head, because my hair is very thin, very light back there. So I just had her to lay it down for me and combed it and just to make it as a neat as possible, if you guys have very sick hair or long hair in the back. Of course this won't be an issue for you, but it was an issue for me. So that's how I got it and that's how the braids look. Then. I just went ahead and tied down the back of my head so that the gel could dry and then my hair couldn't lay neatly in the braid. So if you have the same issue as me, just go ahead and tie down the back of your head, and let me just say that this is how I assume that that's how the back of her head was. I don't know if she added that braid that came down the middle in the two plots or how she did the back of her head, but I just did it that way. So for my buns, I'm going to be using this crochet style on definition, braiding hair. I got this on my local beauty supply store as well in the color 1b, and I don't know how they made this hair, but the texture is so soft and nice. It mimics like women of color here so much. I absolutely love it. So my hair is freshly washed. I don't know if I mentioned that before, but my hair is freshly washed blow-dried and straightened. That'S what it looks so soft, but naturally it's not like that without some kind of heat, so I'm just going to go ahead and brush. My hair into place and shout out to my friend Lourdes, that came over and blow-dried and straighten my hair, because I wouldn't have been able to do this without my hair being that straight. So I'm just going to go ahead and wrap my hair in the two buns with elastic band. I prefer to do elastic band just because it holds my hair, a lot tighter than if I had used a scrunchie. So I just go ahead and I'll wrap. My hair with elastic band next, I'm just going to twirl my hair around and then wrap it around the rubber band just to hold it down into place. Then I'm just going to use a little elastic band just to wrap around it to hold it tighter because you don't want your natural hair sticking out through the bun any kind of way, though the braid looks very natural and your hair would probably blend in. But I just wrapped it around just to keep it secure, then. The next thing I'm going to do is just use the Eco style gel just to sleep. My hair down. This is one of my favorite gels to sleep, my hair down, because it doesn't really give me any kind of residues and, of course, the baby hair stuff is definitely optional. Not a lot of people like to do it, but at for me. I think it is really cute. My baby here is about the cutest and they tend to not coorporate most of the time, but I still try to get a little bit out of them, so this is definitely optional. If you don't like it, you don't have to do it. This is how the hair looks guys when it is fresh out of the pack is just this puff at the end, and I just separated it into two pull it apart and then just use two rubber bands to tie back both ends of where I separated the Hair then I just go ahead and place the little puff right on my puff at the top, and I just take a one of the big bobby pins to just push to the rules, a rubber band. And then I just push the bobby pin after the rubber band through my bun at the bottom and that's how I get it to stay secure. It is not going to go anywhere, then just use another bobby pin just to hold down that piece, because you definitely don't want that to be sticking out, then you're just going to hold the hair and just wrap it around and a part of the hair is Going to go underneath that bobby pin that's how it's going to hold it into place, and I just hold it right there and run a bobby pin again through the hair to hold the bun and then just continue to wrap it around and tuck it underneath until You don't have any more loose here left and everything is in a bun and just like how you would do any other bunny guys just get a pin bobby, pin any kind of thing that you prefer to use and just shape and form your bun. How you would like it I'm not trying to make the bun it's perfect because, as you guys see from the picture, I am going to be wrapping it with this gold wire just to add some styling details to it. So I'm not trying to make it perfect, but I just want those pieces that are sticking out just to push in the bun and make it look a lot neater and for the back you guys. You see that there's a lot of hair sticking out back there and I did not see those so my mom walked in the room and saved the day. Thank God. She was eyes. You don't see in the back of your head that you have all this stuff sticking out, so I was like how am I going to see the back of my head and I got no eyes back there. So good thing the woman walked in the room because she saved the day got me looking snatched and everything so just make sure that if you guys have anybody in your house that can help you just to make them. Give you a quick eye of what is going on back there, because we don't want to be walking at the house. Looking crazy girl next step. Is you want to make sure that you dip those braids into hot water? First, my mom trim them up. So all that stuff - that's sticking out all those pieces of hair. She just clip those off with a scissors and then just dipped it in a really really hot water. So make sure you guys be careful when you're doing this part where you want to dip them in hot water, so that the hair in the bridge is least flat and looks really really nice. So that's what she's doing here and then I just tied it down to slay my edges. You know the deal with the edges now for the fun part, with the accessories guys, so I'm going to be using this bow wire thing that I bought from three years ago, when I was getting married, I was going to use it to do some DIY. For my from my wedding, but I never ended up using it, so I don't know that I just got this idea in my head, because I've been seeing a lot of people like wrap accessories around their hair and it just looks so cute. So I thought about doing it, so I had cut the string too short at on the first time, because I just didn't want like one piece of string or two piece of string just wrap around the bun, because the string is so thin. It'S going to get lost in the bun and don't worry how it's like reshaping your bun, because you can always go back and fix that. So I was having a little bit of trouble at first, so make sure that you don't cut your your string or your wire too short, because it's just not going to work. So I ended up just using that short piece and get it in as much as I could. It didn't do a lot just wrapped around about, I think about three times it ended up going around. So I just use that part of the string because I didn't want to end up wasting the string. So this time around guys, I just held the whole bundle of string and I just kept wrapping it and wrapping it and wrapping it to my satisfaction. So that's what I would suggest if you guys get this kind of string or any kind of string, just hold a bundle and wrap it on till you get your desired. Look, I didn't cut the string. I didn't have to pin the string or anything because the string is it would it will just go underneath the hair anyhow, you wrap it. So that's how I got it that size to look so nice and then I just went ahead and did the same thing to the other side. I just held the bundle of string and just wrapped it around until it looked how I wanted it to look. Of course, both sides are not going to be the same, but I wasn't going for that. I just want to vote for them to be wrapped, and then I just tucked it underneath and that's how I got it to wrap around my bun. So, to add a little bit more, some some because you know I'm extra. I just wanted to add these accessories down my cornrows and I just went ahead and add a few of them in the middle cornrow so that it just doesn't look naked by itself. Putting one down there and then I also put a few on the end of the hair. She used beets for her, but I didn't have any beet, so I just substitute with these instead and that's how I just spice mines up and made it my own. Alright guys so after I did that to the end of the braid, I just wasn't satisfied with the finished look, so I went ahead and decided to tie my neighbors are just killing me right now, but, like I was saying, I just went ahead and tie the String in the back of the braid and then I just wrapped the string around the braid all the way down to not the end completely but almost down to the end, and I wasn't showing it I'm sorry, but all I'm doing is just wrapping the string all Around the braid and that's how it looks tell me add on like that, alright guys, so the last thing I did was just made a knot at the end of the string on the hair and just tucked it inside with a pin. So that's how I got it to hold, but it was pretty pretty easy. The string cooperated. So I wasn't too worried about anything and you just want to go ahead and do the same thing to the other side.
Comments
Bdot7399: very cute