Crotchet Braids Step By Step Tutorial How To Latch Hook Hair Weave Technique & Tips Part 3
- Posted on 07 May, 2013
- Braids Hairstyles
- By Anonymous
For Free Giveaways & Weekly Updates, Stay Connected By Email! http://eepurl.com/Am3Kb
Buy My Books, DVDs, and T-Shirts at http://www.howtoblackhairstore.com
My Website: http://www.howtoblackhair.com
Instagram: http://www.instagram.com/BreannaRutter...
Twitter: http://www.twitter.com/BreannaRutter
Facebook: https://www.facebook.com/OfficialBrean...
Google +: https://www.google.com/+BlackWomenHair...
Got Hair Questions? Email Me!
Email for Business Inquiries
Supplies Used:
(3) Packs/Bundles of synthetic braiding hair
http://www.amazon.com/gp/product/B00B0...
Plastic hair beader or/and a Crotchet needle
http://www.amazon.com/gp/product/B004M...
http://www.amazon.com/gp/product/B002G...
Comb
http://www.amazon.com/gp/product/B001T...
Scissors
http://www.amazon.com/gp/product/B00AV...
When braiding on natural hair, you always want to be extremely gentle with your hair.
If you are not careful with your hair, that will reflect in the health of your hair.
Too much rough handling on your tresses will result in split damaged ends and hair loss which in the long run stunt the growth of your hair.
Wearing a protective style like this Latch Hook Crochet Braid Hairstyle is great in retaining length but if you always comb aggressively or handle your hair in a rough manner, many of your hair saving methods will go to waste.
Also, remember that when you do Latch Hook Crochet Braids you can make use whatever lenght of extensions that you want.
The ultimate look of a style is to your discretion.
Part 1 (vid link) http://www.youtube.com/watch?v=ZjWNLvR...
Part 2 (vid link) http://www.youtube.com/watch?v=U0nR2vb...
Part 3 (vid link) http://www.youtube.com/watch?v=2MAe0gK...
Part 4 (vid link) http://www.youtube.com/watch?v=D6Mj48Q...
Part 5 (vid link) http://www.youtube.com/watch?v=tNOr4z-...
Part 6 (vid link) http://www.youtube.com/watch?v=RmHxM7J...
Thanks For Watching!
DISCLAIMER: All suggestions, tips, prizes, techniques and advice given are for informational purposes only and should be used at your discretion and best judgment. I highly recommend conducting strand tests when trying or using new products, hair appliances and product mixes. I am not responsible or liable for adverse or undesirable effects including hair loss, hair breakage or other hair/scalp/skin/body damage as a direct or indirect result of the suggestions, tips, prizes, techniques and/or advice given.
________________________________________
FTC: I am not representing, being paid by, or endorsing any of the product brands in this video & I purchased everything with my own money - UNLESS OTHERWISE STATED in video/blog content. There are links to products that might be helpful based on the content of this video/blog. Each of your purchases via our Amazon affiliation links supports our cause at no additional cost to you.
Music "Easy Lemon" Kevin MacLeod (incompetech.com)
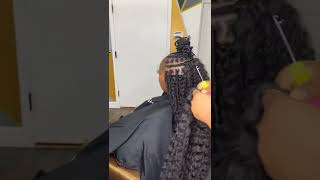
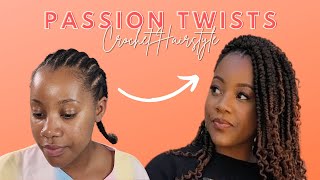
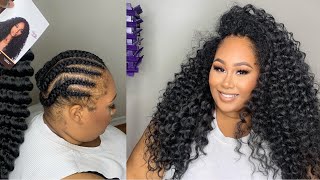
Welcome to step number three of the last crochet hairstyle. I will be showing you in detail step-by-step, how to latch hook. Your hair extensions onto your braids first will show you how to do so with a hair beader. Then I will also show you how to do the same thing with a crochet needle before we begin adding extension hair onto our cornrow braids. I first must show you how to prepare hair your hair. So now your braid pattern is finished. You going to be prepping. Your actual hair extensions, it's best to make sure that you divide your spirals up or your curls up into parts before you crochet them on simply because, if you crochet them on as whole as they are, your hair will looks too thick unrealistic and there is the Chance that you could possibly run out of extensions so to make sure that the hair looks extremely realistic and that it appears more natural. What we will do is break this hair up into parts also, the hair is extremely long, so I would like a shorter length. A little bit above my shoulders, so what I will do is cut this length. If you would like to leave these extensions long as it is, they were actually reach all the way down your back, but if you will, like them shorter a little bit above shoulder or at your shoulder, and I suggest that you cut the extensions in half. So you are going to need scissors to cut them in half, and I have two build clips to hold the cut hair securely around each other. The reason I have to is because I'm want to be demonstrating on two different shades of color. This color here is in the number 33, and this color here is in the number six. When doing the style, you have so much versatility to play with color, because none of your hair will be out and exposed. So you can put on any color extensions that you would like for your look and I would like to use subtle brown colors. So first I will start with my color number six and I'm going to make sure that all the ends match up to one another and then I'm going to cut the hair and half as even as possible. Someone to take my scissors and trim directly in half. So now for each spiral, what I want to do is breaking up either into two or three parts, and I want to eliminate the frizz much as I can so here you can see that the hair has a little bit of frizz on it and that's fine Is a little bit of frizz makes the hairstyle look that more real, so I like to do is kind of break the spirals apart to see where the natural breaks are in the pattern. So once I find that break, I just simply divide the hair into half. As slowly as I can, I want to eliminate too much frizz. So now after I break the section apart, this is about the spiral size that I like to use my crocheting my style. So now I am going to fix this hair just a little bit and I'm going to divide in half once so you just going to find a natural break in the curl pattern and then you just going to pull it apart. So now, once I divided my curled sections into parts, what I like to do is take one of my clips and just secure the hair that I've already prepared so now you're just going to continue on by grabbing another spiral or curly piece of hair. To find that natural break in it, which is about their so you just gently pressing the curls into the separate, and then you just going to pull it apart, and then you going to divide this hair one more time, finding that natural crow break that separates pull It a part and then you're going to connect onto your other bundle section hair here so by breaking his hair up into parts you get. The fullness is that you need, without necessarily adding one huge piece of curl, so by prepping your hair. What I like to do is grab about three long strands like what I have to the color number 33, and then I cut it in half and prep that amount of hair. The reason why you do not want to prep all of your extension hair at once is because, most times you don't actually use all the extension hair so by prepping small sections at a time it ensures that you have enough here for your style. So after I finish prepping this hair next, I will show you how to install it onto your braids, so now that I've shown you how to prep your hair extensions. I will now show you two ways of how you can install your crochet hair or your lateral crochet style, so we first will start by using a hair beader. A hair beader is perfect for doing your entire head, because the plastic of the beader is extremely flexible. For those sensitive areas, so especially when you get along close by your hair line, the plastic beader works perfect because it can maneuver under very delicate hairs versus using a metal crochet hook, which doesn't give much flexibility buth both offer their own pros and cons. Even though I mainly prefer to use a plastic hair beader so right now, I will grab a little piece of hair now also grab the plastic hair beader to show you how to put your hair onto your braids. So here's the plastic beader here and I'm just going to take the clip off one of my sections of hair and I'm going to grab one of my ringlets here. So I am going to put that piece on wrap my hook and just took the hair out of the way just to keep a separate that now I am going to grab my beader and my ringlet of hair here. So now what you want to do is take your extension and just wrap it around your other hand. So whatever your dominant hand is this is the hand that you're going to hold your beader with all your crochet needle so just wrap the hair. Around your other hand, on your index finger, just a hold is secure in place. So now what I do is I take my beader and I pinch the wings of the beater just a little bit so is even easier to slide onto my and I love using this plastic beater, especially when I'm close to my hair. So I do is I take the beader I slightly as close to here to my hairline. So what i do is i take the beader and I slide in here as close to my hairline as I can, while also remaining on my braids, and I am going to slide the beader about there and I am going to make sure that the beader actually Lifts back out of the hair here so now you just want to take the hair, that's wrapped around your finger and just pull it out little bit to expose the end. So what I like to do is just twirl. The very ends a little bit to make sure I can easily slide the hair through the actual eye of the beader. Some discovered grab the wings of the beader and push my hair through just like that, so don’t going to pull one of the actual ringlets out. I want to make sure that he has this fold here so now to hold both of the ends, the bottom the front and with my hand, to take my other hand and just slide it back through the braid very easy and simple. So now you want to make sure that you have your hair with your opening here and then you have your two strands on the other end. Now, if you would like it to be perfectly in length at the bottom, what you can do is create you're. Not now in right now you can imagine how long the hair would be so naturally, when this is left hanging, it covers about the top of my nose at the bottom of my nose. But if you want to add more length, you could separate the two ringlets and just pull one down further little bit making sure the hair doesn't slide out of the braid. And then you can have a new length all the way down. As far as you want, but I'll make sure to keep both of the bottoms even some, I will even it back up here and then I am going to form my knot for my crochet hair. So what you do is you use your two fingers and your thumb helping you as well to open the hair right here now. Just grab hairs on the other side and feed it through that opening. So once I'm done and I'm going to just twist, the hair feed it, though that opening again pull through twist, is this in the near the opening, for you do this about four or five times make sure you get a very sturdy knot when you finish so Here is my fifth time, but the hair to that opening and out to finish off your simply going to pull all the way up in what I to do is take my fingers and slide the knot down even closer to my hair, and then I separate the Two ringlets and expand it and push it even further on the knot and there's your first hair being installed onto your braid. So not going to show you how to add your extensions onto your braids by using a latch hook. So now want to go to my table and am firs grab a small ringlets of hair. If you have a very small I took, you have to grab a very small amount of hair to make sure you can get all the hair on at once. So now I will separate ringlets a little bit. I'M going to move this hair to the side, actually jst grab a different ringlets here, use that amount here and I'm going to move this to the side and then wrap this hair around my finger, and I have to put this latch look through my braid now. You put the latch hook through your braid. You want to make sure that the actual latch part of your latch look is actually open. So this is how it's closed, and this is how to open. You want to make sure this latch is flat and look as often, and then you want to slide it underneath your braid, some to in the latch, is open to slide right here. Snug under my braid once you on your braid, make sure the latch is still open and that you know exactly where it is taking flip it up. You take your strands hair and I like to use my thumb and my index finger to open it. You are going to hook it on to that latch. Then you can actually close the latch here. So you close it over to finish closing on the hook once you finally close it down, then you can pull it through your braid open the hook. Take the latch off, and now you have your ringlet of hair through your braid and were going to the same process to not to open up one side, but the hair group turn, but the hair through turn. The opening at the hair, through you want, is about four or five times the you going to pull all the way and move you're knot. All the way down to your braid and I like to separate the ringlet just to make it tighter on the braid and then you release so now more time to show you how to use your latch hook to put your extensions onto your braids. So now we are going to go back to her hair with a grab, a very small ringlet of hair, very small. If you have a bigger actual latch with, you can use more hair, but mine is pretty small, so I have to use a small amount of hair so now wrapped it around my finger going to make sure my latch is open, something to make sure the latch Is open up off of the hook and then i am going to go up to my braid and i am going to insert it in right directly underneath my braid, the latch is still open so that the hook is exposed. I am going to wrap the hair around the hook. I am going to find a latch and a little close latch on the then of slide to my braid and then now I can take the latch off of the hook. That'S try that one more time, because you want to make sure all of your hairs are wrapped on my finger and my latch is open so that my hook is there ready to hook some hair gon na. Put that underneath my braid make sure the latch is still down wrap all of the hair around the hook close the latch over or through, then I can take the latch off of the hook and do the same process using the latch can be easy for some And that is how I learned how to do the style, but I always now prefer the beader, because it's a lot more flexible in easier for me to do my hair. So it's up to you how you want to use your tools. So now you are going to pull you're, not all the way down to your braid, separate the two pieces of the time anymore and now you're finished. So now I have shown you how to put your extensions on your braids. I will continue to do the same process, but I like to prefer to use the plastic hair beader, so I will continue to use the hair beader to add extensions onto my hair. So now that I showed you two ways of how to put your extensions onto your braids, I went ahead and crocheted my hair about halfway on my the entire back half of my hair done with the hair already installed. I have not cut the hair or did anything I just put the pieces in and left them as is sold. Reason why I got two different shades of brown was because I want to highlight affect towards the front of my face s in the back. I have one pack of 1b, so the entire black package that I had I have installed in my hair and remember - I cut the pack in half, so I had half the length of what I originally started with. So I cut the hair first and then I installed onto my head and for the front I'm going to have a mix between the color number 33 and the color number 6. So if you want very subtle brown tones, I suggest that you stay in that range. But if you want your hair to be really dark, iandn one solid color then choose only one color. So the lighter you go with your extensions, its best to go with a little low light, such as a lighter brown color. If you choose to have like a dark blonde color. So what I'm doing is the same process throughout my head by using my beader to install my extensions onto my brain, and this was the first area. Why show you how to put them on, and I just fill in a little bit to make sure to fill in the gaps so to know that you have enough hair installed on your braids? Is that when you smooth your hair down, you shouldn’t see your braids through your actual, not so to flip it over the other side. In the same thing applies, you see a little bit of hair from what you don't see the braid exposed so to make sure that you're not having too much hair to the front of your head. You want to make sure that you work with small pieces of ringlets at a time, so, as you separate the hair out, try not to put one entire huge ringlet on the just break it up into smaller portions, when you're really concentrating on the front of your Head because that's the area where you don't it to look too dense, but you want it ti, look full so now what I will do is show you how my hair still prepared. I have my color number 33 here and I just have a duckbill clip to hold around the hair, and then I also have my other color in the color number six as well. My natural hair color is a color number one and sometimes it shades of 1b. As well, but since all of my hairs braided, you can have as much fun with color as you want. Whatever colors you want to use, even if you want your whole entire head to be red, you can buy red extensions and put them onto your braids, because your real hair will show. So you will have an issue blending your real hair with your extensions. So I just keep the duckbill clips on to keep the hair separate and I just like to take some of the pieces of the brown and put them on, and then I go back to my other color, which is my 33 and put that on as well. You could even just break apart your colors, you want to use for highlight to mix and the you could mix the other after you separated the ringlets. So is just your preference. I decide to keep a separate so now, as I go along when I am putting on my extensions, I like to start from the back of the braid and work my way up. Sometimes I start very close to the front of my head, because sometimes the rare times I may start to get a little bit sparse with my hair, and I would rather have sparse extensions installed here in the middle of my hair or the back of my head Than the front, so, however, you feel comfortable just make sure that the very front of your hair is really filled up as close to the response, so is going to install couple of more extensions. Is going to take some of my brown here and take my clip off and grab one of the ringlets, the closer you are to the beginning of your braid, the smaller your ringlet should be because it looks a lot more realistic. So when you break your extensions of, you noticed that some ringlets are a lot more bigger than put those back towards your hair, because the finer they are up front, it looks very beautiful, so not can hold here on my finger. I'M gon na take my small plastic hair beader, and I am going to slide that at the very beginning of my braid here, then i am going to twisting just a little because I just need to be able to slide it through the eye of the beader And I just slide it through. I just securable bot of be ends here, so this part doesn't get lost this, but that loosely in my hand, talking slightly hair back is a sometimes you make it. Some stray hairs caught on your beader, but that's fine. You just part, and then you can open up your hair beader and do your same turn in loop process, which I do about 4 to 5 times. So when you are pulling on the end of the extension to tighten it here at the root. If you feel any tension, just use your fingers and slide the knot down and pull at the same time, because you want to pull to where it is uncomfortable and actually pull some of your hair out. So just be careful, it's not that hard to do. You just want to make sure that you have a secure knot as close your braids possible and even if you don't like to pull the ends to make the knot, go down to your root, to separate the two ringlets and tighten it that way. It does the same effect over to the side and is going to continue to work my way back so for the front. I will just probably do a bow 3 to 4 inches of hair in the front here, just to make sure that I have enough hair building around my hairline and elders fill in the rest. I always have the hair left over, but it's just best to make sure that you cover those very important areas of your style, which is mainly the very front of your head to take another ringlet that my braid is so. As you know, I really love using this plastic beader because it's extremely flexible in it is no tension on my hairline and I know a lot of people have issues with styles because they have very sensitive or frail edges, and this is a perfect style to do Because it's literally no stress on your hair and even when you're using a plastic beader, it makes doing your hair a whole lot easier. So those are just some tips when you are doing your style, want to make sure that your pain, free and you’re comfortable, and to use a style that you prefer to use, make sure you use a tool that works best for your style as well, and that I show you in detail how to add your hair extensions onto your braids and your hair extensions. There are multiple ways that you can put them once your hair. I showed you two. The first method was by using a plastic hair beader to extensions once your braids in the second method, was by using a metal crochet needle to do so, which works best for you use the tool to help you achieve your style. So, now that your hair has been installed in the next step, step, number or I'll show you how to trim and cut your latch hook, crochet style

Comments
Breanna Rutter: YOUTUBE HASN'T Been Showing You All My New Videos?? CLICK THE BELL ICON Next To The Subscribe Button to Turn on Channel Notifications To Never Miss A New Video Again!
Dee Dee Michele: I wanted to say thank you Breanna because until now I was unable to successfully apply the crochet braid technique, and the tutorial on box braids technique was priceless!...thank you for being so generous in sharing your knowledge!
Trenekia King: I did my hair like this & it is definitely a keeper for a protective style!!
Pris B: Thankyou for such an informative easy to understand tutorial!! thanks to you i did my first crochet installation last night. im so excited!!!
Price CHERYl: Thank you Breanna for introducing the hair beader as an alternative to crocheting the hair.Im trying to maintain my edges and the beader has been very effective.
Laurinarin: This is so great Breanna! Thank you so much!
Gwenevere Butler: Excellent demonstration on applying braids!
Sharron Taylor: You are brilliant, I LOVE the way you do your tutorials. I watched your "box braid" and "senegalese twist" videos and I found it so easy to do because of your ways of teaching, so I just want to say thank you for your videos. PLEASE don't stop i appreciate them all :D xx
Angela Torres: Your tutorial was awesome. Thanks so much. Best I’ve seen. So helpful
Julia Madison B: What a wonderful tutorial, it's simple, thorough and I appreciate your commentary! You are such a beautiful young lady. Thank you.
Roses Flowers: Wonderful instructions! Beautiful hair you have and pretty carmel skin color with your colored hair.
Donna Smith: you remind me of Kimmay doing her tutorials; thank you for your patience. I have watched quite a few videos hoping to learn how to insert the crochet hook, Until now you are the first person to take the time to explain the correct way of insert the crochet/latch properly. Every other hair guru is just focused on themselves; how they look, twirling their heads etc.,
Tenneh Starr: You are such a great teacher thanks so much for this tutorial its so helpful.
Tara Moss: Hi Breanna,Your videos are very informative & easy to follow. Do you reinforce your hair (braid pattern) with extension hair before you install your crochet hair? I have been experiencing thinning out of my own hair since I've been doing the crochet methods (for a year now). I think it's cause I do not reinforce my own hair with extensions before the install. Any thoughts?
Mrs Robin R Graham: thanks for your informative video you made it so easy to do my crochet braids
Shernett Hinds: I really like how you teach, its simple and straightforward. I follow your pattern on my little girl doll and it work, so I am going to try on myself. Hope you are on Facebook.
Ibelongtohootie: Love, love, love your tutorials! You rock!!
nicole McDole: Wow!!!these was so awesome .thank you girl.
Chanel Tapper: This was such an awesome tutorial. Was able to do them and they aren't half bad...my braid pattern is horrible though and I wasn't sure if there was a pay to have a part without it being so obvious. Nevertheless, couldn't have done it without you!
All about princess Trena: This video helped me out a lot!! Thank you
Nycki M: This is soooo informative! How long do you leave them installed?
Harmony Nae: I so love your professionalism! Much continued success... peace * blessings
jackie biggers: Thank you for this informative video. I agree, the beater is the best thing rocking for us thin 4C natural chics. Your videos are Awesome! Jackie B. The Positive Blogger.
Madyyy's Channel: I love the way you did the crotchet braids
marquita83: beautiful i will be trying this and i will be buying the plastic beader this style is very convenient!! :)
Nicole Horton: OMG I love this tutorial. My question is, when using this technique, would I be able to pull my hair back in a ponytail or will I have to leave the perimeter out?
mstrishls: Love your tutorial! And thank you so much for identifying your "latch hook" as exactly that. I can't tell how much it irritates me that most of these videos call that blasted thing a crochet hook. It makes no since in trying to teach someone something and not give the proper name for the tools you're using; so annoying!!! But really good job and I like the way you secure your knots.
Tammie BETHEA: God bless you for you narrative. You are a excellent orator patient in every way. If you can’t follow this then blah blah blah. She gives every avenue to choose from to make it easy!!!!
Ele Harr: This is the second video of your I’ve watched. I really enjoyed it. Thank you so much. You spoke very clearly, and I understood you thank you
Breanna Rutter: Hey Beautyifulcoils, thanks for commenting do talk to me more c: I figured many of you would love the plastic beader because it is a holy grail when I do crochet styles!
Prospermiinow: WONDERFUL!!!!!!!!!!!!!!!!!!!!! tHANK YOU FOR TAKING THE TIME TO SHARE YOUR SKILL. REALLY WONDERFUL. IF YOU SHOULD EVER HAVE THE TIME COULD YOU DO A TUTORIAL ON THE BACK OF THE HEAD INSTALLATION? ONCE AGAIN, THIS IS WONDERFUL.
ANN POLLARD: I would have liked to seen how you did the back also. Thank you for the video tho. I'm definitely going to do my 12 year old daughter's hair. Again, thank you. :-)
Christopher Agenor: Thank you so much for the video, God bless you lady❤️
Breanna Rutter: Thank you, and all the materials I used, and even the crochet tool, is in the description box below this video.
kaylou184: I love your video. So well done. I have a problem keeping the pieces from looking frizzy. I dont know if I am preparing pieces that are too big or should it have a frizzy look?
DetroitCandy: Love your videos. Can u please do a crotchett video on doing the Senegalese twist. I want them and I would prefer to have it crocheted over actually braided. I want to learn to do it myself. Your So Awesome! THANK You Alot
Jasmine Fisher: beautiful hair this video helped me a lot
Cheryl Tomlinson: Very informative, thanks
Zenivalda Costa: Boa noite minha linda! Amei sua explicação apesar de não saber inglês.. sou do Brasil Estado Bahia bjos, fica com Deus, mas uma escrita pro seu canal.
Jewel Mosley: Hi I luv your tutorials! I just wanted to know can this braid pattern be used to put your hair up in a pony tail or up-do?
Monica Smith: You did a great job in so professional....
Yvonne Everett: Excellent teaching.
Janine Ryans: I really like your tutorials. What I am trying to figure out is how exactly do you do the back? Do u just go up each braid? I'm confused about the back
Claudine Nyamwiza: have learnt a lot thank u so much for your caring and share with us
Veronica Kofler: i love it... How long can it last for?
msmida wynn: u r so amazing. I'm not an hairstylist, but I feel like one with your help
Lisa Nicole W.: Thank you I appreciate you!
beautifulcoils222: i barely comment on vids but i had to on this one....thanks so much for the post. i love the plastic beader idea becauuse my latch hook was too small, didnt know what i was going to do but that works soooo much better.again thanks!
KY-ANN TAFFE- JAMES: Love it
Briana Ramsey-Tyler: nevermind! I saw the amazon link! Love this video! Thanks for all your help!
qwaneasia: LOVE IT
Breanna Rutter: If it helps, I've provided the link to the hair and the other hair products that I used for this style in the description box below this video.
Robyn_Mia: Amazing!
Ashley G: How closely do you put each crochet braid?
Nadje Armande Sonia: Perfect !!!
Kennda Justice: Can u apply oil to the hair to help reduce the frizz?
Cia Brister: I miss the days when every YouTube video didn't start with a freaking ad.
Breanna Rutter: Hey Lisa, I've provided a link in the description box below this video for you!
Andrea Camila: lindo!!!
Dee Dee Michele: Not sure if msg came through but thank you for your tutorials....I love them!
Sara Lopez: I love your videos were can I buy the plastic crotchet?
Lakeea Allen: oh my god i have been looking for you finally now im subscribing!!!!!! love your videos
Jasmine Pierre: well taught you are a good teacher u r the best i listen to others too complicated keep up the good work you are going places
Marie Walker: What to do if your not too good at cornrowing your natural hair?
jasmine furrowh: Love all ur videos. I have a queustion for the back how do u install do u double up on the hair because there are less braids or do u do it like u did the top
Lisa Williams: Where can I find a flexible hair threader like the one you use in this video?
blacknetizen: The beader's so cute. :3
Anjolaca Graves: Can I use weave to braid my hair and get the same style?
J Overman: how long will a style like this last ? plz respond ..thanks
LaRonne Quarles: You are a great teacher. No southern drawl and 'ghetto-ness'. easy to listen to. Thanks for the instruction
Hope Glory: Ur my go to lady for hair tutorials
Breanna Rutter: Thank you c:
G0DSGL0RY83: how long does it normally take to crotchet your own head?
Breanna Rutter: The hair and materials used is in the description box below this video.
Shea Ahuna: I love your videos , im hawaiian and my hair is like a little thick
Thelma Gant: What is the hair beaded and where do you get them?
Queen Bea: Thanx very much i now do my own hair without any hair dresser
Hustlette: i do not know how to braid my own hair can I flat twist my hair to scalp and proceed to your same technique?
TheRew413: can i use kanekalon straight hair for this pattern? thank you
Jazz M: Loving your channel
Jo Malloy: Thanks!
Lucy Ramos: I have a problem with the crochet braids to stay on. It is slipping off Any suggestion on how to keep them from loosening? Thanks
Jackie Thompson: Very beautiful!!!! What kind of hair you used?
purpletangish: why do none of these crochet braid tutorials show how to do the back?! seems way more complicated than the front
Anita Ruffin: Do you always start in the front?
popo Smith: waw this just amazing
Maxine Leibowitz: are you able to please show me how to do the foundation braids? Please, I am going to do my sisters hair.
Breanna Rutter: Thank you
Lisa Williams: Thank you
Ralenes World: Where do you get your eyebrows done at?
Redd Karamel: that look so hard to do but cute.
Andrea Taylor: Can please do a video with faux locs
Breanna Rutter: Yes but you have double the cornrow braids in the back than in the front.
Rebecca Harris: Pls could you show how do the back . Thank you bre.
J C: What other types of hair can you use outside of curly what about straight any particular brands.
Val B.: i see a lot of crochet braids with a middle part but i was wondering if i wanted to accomplish crochet braids with a bang not a straight bang but full around curly how would i have to braid the front
Scentsational Candles: can you use the silky jumbo braid and flat iron to straighten it #answer asap please and thank you
Briana Ramsey-Tyler: What kind of hair did you use? (the brand name?)
Breanna Rutter: Leave your perimeter out to pull your hair up into a ponytail.
Carmen Martinez: Dónde venden esos crochet