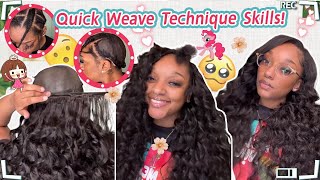
Ivy Flip Over Method! Quick Weave Technique!
- Posted on 07 September, 2018
- Braids Hairstyles
- By Anonymous
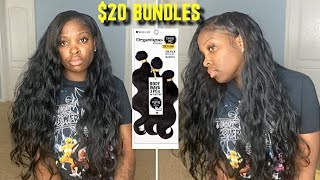
I am wearing Nadula Peruvian Deep Wave Bundles 20,22 and 22 inches.
Get $3 off by using the code "nadula1709" on Nadula Mall: http://bit.ly/2LLIlZL
Peruvian deep wave on nadula.com: http://bit.ly/2NHT6Na
Hair I installed: Peruvian deep wave 20 inch and (2) 22 inches bundles.
Nadula hair on aliexpress: http://bit.ly/2Lyibwv
Hot selling hair on aliexpress: http://bit.ly/2NJ5Jrg
Nadula Hair on Amazon: https://amzn.to/2rqyP57
Nadula Hair on Ebay: https://ebay.to/2Jy0OXH
Nadula hair youtube channel: https://goo.gl/dy3Cxd
Nadula Instagram (giveaway every month): https://goo.gl/BQFo3i
ORIGINAL FLIP OVER METHOD TUTORIALS!
♡ The NEW Flip Over Method !! ft. Ondibu Hair | TUTORIAL
https://www.youtube.com/watch?v=W0qaBc...
Signature Flip Over Method!! ♥ start to finsh https://www.youtube.com/watch?v=d3F8C-...
MY NEW HAIR TUTORIALS!
How To: INVISIBLE PART SEW IN For Beginners Step By Step! https://www.youtube.com/watch?v=AZEjsF...
Partial Sew In Weave Tutorial IN DETAIL! https://www.youtube.com/watch?v=vHlyF9...
EXPOSING LACE CLOSURE SECRETS!!!! https://www.youtube.com/watch?v=4MYTT7...
LACE CLOSURE SEW IN https://www.youtube.com/watch?v=PTLEaW...
HOW TO: MIDDLE PART SEW IN For Beginners https://www.youtube.com/watch?v=u0lnVg...
GLOW IN THE DARK WEAVE https://www.youtube.com/watch?v=ptfKFX...
How To: INVISIBLE PART SEW IN https://www.youtube.com/watch?v=AZEjsF...
How To: INVISIBLE PONYTAIL https://www.youtube.com/watch?v=khA436...
$5 High Ponytail w/ KANEKALON BRAIDING HAIR! https://youtu.be/tpYE14_IN00
Long Bob Hairstyle For Black Women Tutorial https://www.youtube.com/watch?v=_pekGh...
THE BEST QUICK WEAVE TUTORIALS ON YOUTUBE!
Ivy's FLIP OVER METHOD (QUICKWEAVE EDITION) Ft. Asteria Hair
https://www.youtube.com/watch?v=fYlb04...
NATURAL QUICKWEAVE SIDE PART LEAVE OUT TUTORIAL | VirginHairFixx
https://www.youtube.com/watch?v=h5Gnho...
Short Hair Transformation #2 | Liquid Cap Quickweave with a frontal UNDER $100
https://www.youtube.com/watch?v=o1Z3cO...
♡ The NEW Flip Over Method !! ft. Ondibu Hair | TUTORIAL
https://www.youtube.com/watch?v=W0qaBc...
How to do Protective Quick-Weave on 4c hair using Outre Remi Mylk Collection
https://www.youtube.com/watch?v=2KZiXQ...
Wet and wavy "flip over method" with a quick-weave with Tinashe hair
https://www.youtube.com/watch?v=iOTZh6...
IVYS FLIP OVER METHOD BEGINNER FRIENDLY AF
https://www.youtube.com/watch?v=EvhLMt...
QUICK WEAVE START TO FINISH (Natural hair leave out)!!! ft. Maxglamhair
https://www.youtube.com/watch?v=pR1QHC...
Natural Quick Weave Tutorial with Minimum Leave Out
https://www.youtube.com/watch?v=gIC2xW...
Business Email [email protected]
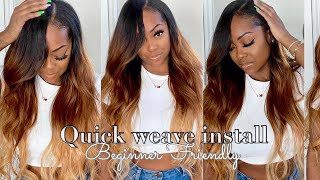
Hey everybody: this is breanna rutter and in this hair tutorial i am going to teach you how to do the flip over quick weaves that by step for beginners, if you are new here, subscribe right now to see more affordable, beginner friendly, hair tutorials on my youtube Channel also click the bell for notifications to make sure that you never miss a new video. For me, the hair I am wearing is from Natalja and I am wearing three bundles of Peruvian deep waves in the lengths of 120 inch bundle and two 22 inch bundles. So here are just a couple of seeds of how the hair will look when you receive it, and also these are the products I'm going to use to install my hair. Now I went ahead and I washed all three bundles. So that way I can begin installing them. Once again, I have one bundle of 20 inch and two bundles of 22 inch in Peruvian, deep waves. So really quick here is my braid pattern. It'S very simple, with my braids being straight to the back. It might leave out being in the front area doing the style. You will not have a defined part. You just need leave out at the very front of your head, so I went ahead and pinned my braids and now I'm going to put on a stretch dome cap. Now you can do this style with regular wig caps if you desire, but this gives better protection because you're going to be putting hair glue on your hair. So I'm going ahead and I'm stretching that cap into place right before I begin gluing in my extensions - and this is how you look - this style is called the flip over quickly, so I'm going to be showing you how to do that technique with this style. So you can also use some actual glue protectant on your hair, which is also called wonder weave. What you want to do is just get a very thin application and you want to put it over your real hair. Now you can't extend a little bit pad. You want to, but it's not necessary, you just want to make sure that you're protecting any of your hair, that's exposed. You can also put this at the very front of your cap, where a little bit of your scalp shows where your leave out will be. So. I'M just using the tail of my comb to just smooth my hair underneath the cap so now, after applying it, I'm gon na blow dry to make sure that it's dry, this forms a protective barrier in between your hair in the glue. So that way you will not have hair loss or breakage. Now I'm grabbing my longest bundle, which is 22 inches and I'm measuring it going on the outside of my cap, because I'm actually going to stick it on top of my hair. Now my hair is protected because of the Wonderlic, so you don't have to worry about it. Now, after you trim you're going to check one more time to make sure that it matches exactly where you want it and then you're going to apply hair bonding glue. Now, when applying your glue, you want to make sure that you're working very slowly and making sure to form a thin but consistent line going all the way down. You don't want a lot of glue because it will run down your hair and it won't make your hair sticky. You want it to only stay on the weft of your hair extensions. So after you smooth that consistent line, that's about medium to thin. You then want to use your blow dryer on a low heat setting, so that way you can make it tacky not to make it tacky. It literally only takes about ten seconds. You want to make sure that when you touch it, it's sticky, but there's nothing on your fingers now. This is the perfect time to stick it down to your head. So I like to start on one side to make sure that's police actually applied, and then I like to smooth it with my fingers going all the way around. To the other side, I like to stick down my hair by making sure to first start on one side, and then I like to use my fingers to gently press it in, and then I like to slowly work my way going around my section now. If you're doing the same exact technique, it will fit in place just perfectly, but if you placed it a little bit too far on one side and you just have a little piece, that's hanging off, all you have to do is trim it. So that way is a perfect fit. So, as you can see here, I only have one bundle install so now I have two more bundles to go. I have one more 22 inch and one more 20 inch bundle. Now, as you can see here, I had a little bit of lift and we do not want that now. You will have lived throughout wearing your style after about two weeks have passed since you're doing the quickly method. The actual extensions are not sewn down. So at times it may have little areas that lift now I'm experiencing lift here, because I over dried it with my blow dryer remember you only want to make the glue tacky enough to where it doesn't stick to your fingers and have any residue just tacky enough To stick down so that the glue does not bleed through your cap. Now, if you have the glue on your hair and it's a little too wet it still, shouldn't bleed through, but it's possible. So I always suggest that you just make it a little tacky before you stick it down that prevents your hair underneath from being damaged by the hair glue and make sure you're using this dome spandex stretch cap now I have my two bundles installed and I have One more to go at the very top of my head. Now our technique is going to get a little bit different, so I'm making sure to show you more up-close scenes as well as show you how beautiful and flawless the size look from layering your extensions when doing this method. So now, when I'm going to also show you as a way that you can clear the glue off your cats, you just smooth it in between your fingers to get rid of all the residue. So that way, you can easily apply a thin layer of glue without it being messy or too dried at the tip of your nozzle. As you can see, that's very easy to do so now we're gon na begin starting at the front and I'm demonstrating with my fingers the amount of space that you want to have. So I like to go from eyebrow on up to where I'm going to begin. Changing the placement of my extensions now, this roll here you're gon na have very small pieces, as I'm demonstrating with my fingers that will go up and down on both sides. Now at the back as well. You'Re gon na do straight across pieces. So no more curved see pieces like you would normally do with track placement and also they are going to be very close together, because you want the top of your hair. To look for for this lip to look gorgeous. So now I'm just going down one more section: that's going straight across and you're doing the same, measuring technique that I showed you earlier and you're also making sure to do a thin. It'S a medium sized application of glue like I've been showing you the entire time. So after you blow dry for just a few seconds, you're then going to stick it in place exactly where you want to be making sure to press it very firmly with your fingers, so that way is saturating into the cap. Now, at this point, I'm just blow-drying. It just a little bit and in a second we're gon na start off with those small pieces that are near the front. So, as you can see that fullness at the top makes the style look extremely beautiful and bright. Before this I'm going to show you a couple more techniques to achieving this look. So once again, you got to make sure your pieces are going side to side but you're going to switch the direction. So the piece is on the right side will lay to the right, and then you will have one or two pieces that go right there in the middle of your head. So now I'm just showing you that you just want to stick it down making sure to measure from where your actual levi's will be to the end of your cap. As you can see here, you're doing the same exact technique as far as making it tacky but you're just making sure to follow the direction of how your hair will naturally lay so all the little pieces on the left side are. You can see here going in the left direction and then, when I go back to the other side of my head, a little later, I'm gon na lay those pieces going in the opposite direction. So that way, I have a natural flow of how your hair would naturally be on your head. So, like I said earlier, you can use that wonder weave product that I showed you to actually stick right there on your scalp, where your real hair would be, but I didn't necessarily have to do that because it barely touched my real hair. So I didn't bother adding any, but of course you can, if you want to now we're getting closer to that spot there, that you want to make sure to say for the middle. So that way, you can stack two small pieces right next to each other, as you can see here, so one piece goes there and I blow-dry it and then I do my final last piece right in front of the cap, as you can see here, completing off That section make sure each piece you do is getting smaller and smaller and smaller. So that way, you only have a very tiny amount of weft exposed when you actually blend your leave out with your hair extensions. So now, after going it, this is how it looks, and you cannot tell me this literally - does not look like real curly hair growing through my head. All I have to do is blend out my leave out to help me to further achieve this look and, as you can see, this is only three bundles. I didn't actually need any more hair than this. This hair was extremely full and really quick. I'M going to show you the amount of shedding that guy and I actually cut my extensions and, as you can tell, I only had a few pieces that came out of my hands, maybe about four or five pieces and they're very hard to see. So you don't have to worry about any shedding at all. It'S simply very, very easy for you to actually install this look and this hair actually held up pretty well for me to actually achieve a style that lasted me for about a month or so. So if you want to look, that's very easy to do, and it's pretty much very easy to style, then this definitely is the lift for you now. What I'm going to do is use it curling wand, to blend small sections of my real hair into my hair extensions, because this hair texture is Peruvian, deep, wait. I can make sure to add a little bit of curl to my hair. So that way, I can have a flawless finish so now after sliding it out. I'M then going to stretch the curl just a little bit so that way it can match the way that curls on my actual head. Are you long gating and there goes that's how you make your curl match it, your hair extensions, so I'm just going to go ahead and finish curling some other sections, and to also make this look very natural, realistic. You want to make sure it's a curly about going in opposite directions. You want some being curl to the bride. Some occur to the left, son being curl forwards and some being curled backwards. So now, at this point, I'm going to make sure to tame down the edges of my hair and all I'm doing is I'm using an edge brush and some edge control to swoop they're, very, very edges of my hair. I didn't want to put too much product in my hair, so that's why I used a brush to pick up a little bit of products and then smooth on my hair. This helps you to not use as much edge control. So that way, you can maintain your look throughout the day. Now, after smoothing all of my edges, I like to use a hairspray that is about a one or two level, and I like to spray it right on my actual edges itself. So that way they can. Last, all day long, so now I'm going to show you a blending technique. You want to do because you don't want to leave the hairs it. You want to grab one of the curls of your real hair and you want to wrap it around one of your curly hair extensions. It'S simply easy to do. I just wanted to do a couple of quick styles to show you that you do not need a defined part to achieve an up-and-down look with your flip over quick leave hair style. So if you want to see more looks like this, let me know this style is great for those of you who do not want to have a lot of leave out, but you want to achieve a very natural look. I want to thank out so much for watching my sleepover, quick weave method and for the style I use three bundles of Peruvian, deep way in the length 20 inches and to 22 inch bundles. So if you absolutely love this look and you think it looks extremely beautiful and natural - be sure to give me a big thumbs up and let me know in the comments what other looks you want to see with this technique until then I'll catch y'all later, but Be sure to click that Bell for notifications, so that way you don't miss any of my new tutorials that I'm sure dropping Nicks. So I'll check y'all later in my very next video bye, bye,
Comments
Breanna Rutter: BreSquad SECRET CONVERSATION: I'm about to order some pizza, what y'all want? COMMENT BELOW!!!
Arkay Evans: One of the best I’ve seen. SO professional, well explained and illustrated. Great job sis.
Miss CC Miller: This is actually the old school half wig but we all forgot due to the new part looks. Thank you for bringing it back.
Mahogany Euphoria: Yes thank you! Right on time for me try this technique with some straight hair I'm so glad Ivy blessed the girls with this technique she deserves much more recognition.
J'Chateau: OMG yessss! This was the best flip over method tutorial ever!! Thank you for going slow and zooming in!!!
Nancy Noel: This video instruction was simple and easy to do. Well done beautiful look...
Brandi’s Gardenplus: I’m just super pleased u have credit to Ivy for this method. Allot of people don’t acknowledge where they picked up new techniques.
Tanaya Talks: Just got some bomb curly hair I’m ready to slay thanks to my girl Bre❤️
Juanita Morgan: Looks really nice thank you for sharing ❤️
AquaGal: Very detailed and neat! I love your video. Keep it up
Natasha Jackson: Love love love your videos. They are all super educational, sensible and just easy to follow. So I'm a root to tip natural with golden blonde ombre tips. I'm attempting to do a quick wave curly with no leave out. any tips, videos, or suggestions???
shirae bryant: I forgot all about the flip method!! I love it you did that!!
Melissa Hamilton: Looks beautiful great job
Queen of Diamonds 💎: You have a sparkling personality, i watched the whole tutorial, knowing that I'm not gonna put glue in my hair lol ( not saying that in a rude way, there is nothing wrong with your method, it's just a matter of preference ) anyways, great presentation, and your hair looks awesome. Nameste, pretty lady.
Terrie Brown: yes, I would like to see more styles in weaving. you are so wonderful at doing hair. i love it
Marisa Whitmer: Wow that video was perfect. You gave great instructions!!!!
Magdalene Ambe: I like how detailed you are in your videos
MrsLina 313: Beautiful I'm definitely going to purchase this hair. Tfs... Many blessings to you
Brooklynn Skyy: Very detailed video...♥️Will be trying this soon.
Yolanda Jones: Beautifully done
Don_ Veinte: Absolutely Beautiful!!
Danie V: Guuuurrl yaaassss u are a boss queen! Beautiful job! Thank you for teaching me this!! God bless have a great day!
Iamblessed 53: God Bless and Thank You for this fantastic tutor.
LadyD 03: Hi! love your videos...can this be done with straight hair without looking bulky...thanks in advance
Leelee: Haven’t watched your videos in awhile love this video , gonna do my hair similar
Jenn Jenn: can u show us a flip over method with straight hair please
cleo willis: This came out BEAUTIFUL ❗❗❗❗❗ BEST HAIR VIDEO I SEEN IN AWHILE
Michelle Richard-Calvin: Very Beautiful I love it❤
Daria Hutchinson: Nice!! Can you do a take out video with this style? I would love to see how the cap comes off & if there’s any glue left on the hair.
Miss Manu: Thank you for this video you slayed
Brittany Hill: More videos like this!!!
IAM BLACKBEAUTY: Good Job!..And I thought that you only specialized in braids...Your definetly a Gem of all trades!
andrea jackson: You look great and you have a good presentation , your video was done lovely
Ronisha Payne: Your awesome. Great tutorial
Stephanie's crafts and creation rug: Great job
Dimplies Kerr: Hi Breanna very creative love it what
Mary Roberson: Girl u did that
a handful of love: Beautiful! Haven't even finished watching lol
Jus Mek: Love it!!!
Being Just Mel: thank u so much I just did this and it works.
Anne Marie: I always clean the tip of my glue bottle frequently when doing quick weaves so it doesn't build up & make it more difficult to get a consistent amount of glue on the tracks .
Trendytinz: Biggest your video is very informative thanks
stacyann oxford: Looks so great
Ciera Aliez: Yessss love it’s so pretty
thearough: Can u do a tutorial on how to do this with 4z hair and buck shot edges that shrink up when gelled that will turn into an afro before you leave the house then fall out from the heat?
Sha 'mazing: Best one explained for the leave out part
Melanin Magic by Mika: Gorgeous!
Anstsi Fooz: Good job keep it up
Sonya Morgan32: That was amazing in I love it
Monica Mwanza Hara: So lovely
pauline whyte: Love the look
Mrs MK KAPUIRE: U are the best teacher ❤
Jn Bb: Very nice good job❤
Mihret Adhanom: Good job Thanks!
Tanisha Hunt: Your videos are the best I've seen so far
Paulina mega hair Dark: Gostaria de saber que cola é esta que pode usar na pele para colar cabelo qual o nome por fé tileza minha linda obrigada amei seus vídeos são maravilhosas
Christopher fairs: I love it!!!!!!!
Ciara Kim: Great job cucu
Chill Spot: Love it
Tosha Zerberini: For a beginner like my soul I wish I could be easy like that the way you saying it but practice make perfect I think I need to get me some cheap bundles first before I stop using the real deal first I mean obviously start off with the cheap bundles first and then see how it comes out but thank you for the video for beginners like myself
papa willylonglong: I have a question I had 4 inch plaits for a month and they where single box braids and I gel d them and left em dry for all that time and I took em out and alot of hair fell out is it shedding? Or did I damage it? The braids didn't feel tight at all ?????????
ernestine westbrook: Thanks for the help
Olivia Gregson: That hair is SO pretty
Bek Mussell: Does the cap stay on??
Mina Ampofo: Woow I love this hair
Poison Ivy Princess: You're a genius
Nani nene Nene nani: How can i make sure my cap doesnt fall off?
Anastasia Kenyadastar: Cute Great job
maria luis: It look beautiful
Queen C: So cute
Tosha Zerberini: I am really starting to be inspired by you for a first beginning like myself I'm about to go to the pre supply store and buy my first couple of bundle I hope it come out good for a first beginning like myself practice makes perfect and I'm going to keep on looking out your videos I'm really is being expired by you thank you so much for this video for beginners like myself
a handful of love: Omg i love it! Thank u for this ill be trying soon ur make up is pretty to what kind do u use
canal da claudines Claudines: Gostei
Excellent O: Nice nd lovely neat .love it
Saryia green: Great video as always. However, I feel like the exaggerated edges take away from the style.
Adailza Azevedo: Magnific!!!
Simona Collier: Can I get this look with thin edges?
Terrie Brown: I follow you on two different computers. You are just that good. I don't won't to miss a thing LOL. All notifications ON
treasure man: Can you do that with straight weave
cynthia morgan: You are very creative on your own, but I like how you didn't try to take credit for someone else's technique
Jay Double U (Moe): Too cuuuuute!!!
Ayeshah: Amazing
Bevy Green: Perfect
Gina S: You are a beast this is too bomb!
Venha Comigo: Ficou muito linda gata
Daughter of Zion: Lol I been doing this sense I was a teen and I'm 31 now. I been on I been on lol. I hated that flat look I remember my big sister saying you learning girl Lol.oh and the style looked exactly like this lol.
Lorette Soutcha: Very nice
BeautyyBy TheBEAT: Yes I like this
Tks _: I can already tell its gonna be a good video
Happy Mathew: Lovely
Happy home: My best teacher, love you alot
Naya Ego: Flawless and natural
Lorena Almonte: Te kedo lokisimos la mejor k e visto felicidades bendiciones
DONTE SPORTS LIVE STREAMS: This is cute
Bossalini: Looks great!! Now watch I try it and it ends up looking like cheap trash
Lorena Almonte: Me encanta tenkiu love.
Rita Isibor: This is beautiful darling
Miss workingitout: It looks really good
Tayla Austin: You are so wonderful
alexcia bell: Her makeup on point