How To: Diy Knotless Highlighted Braids W/ Curly Ends *Very Detailed*
- Posted on 25 July, 2021
- Curly Hairstyles
- By Anonymous
Hey Killas!
Today's upload is a protective style tutorial on these knotless 'Coi Leray' Braids that I've been seeing a-lot lately. I absolutely LOVE them! Let me know what other protective style tutorials ya'll wanna see from me. Leave a comment down below.
♕ Products:
- Freetress Clean Therapy - Pre Stretched Hair #27 (About 6 Bundles = 2 Packs of 3) - t.ly/0TKT
- Shea Moisture Loc & Braid Butter
___
♕ Similar Content:
➊ How To: 24" Bohemian Faux Locs + Crotchet Method - t.ly/uu8S
➋ How To: Easy Faux Curly Bun + Makeup Tutorial - t.ly/Zk5q
➌ How To: Maintain + Grow Long + Healthy Hair Under Wigs - https://www.youtube.com/watch?v=wRdYo-...
━
♕ F.A.Q.
Name - Krystal
Ethnicity - Jamaican
Height- 5'5
Location - ATL
Age- 25
Camera: Nikon D 5300 - (Kit Lens) - If you get this camera, get an auto focus lens.
━
♕ Music By: Epidemic Sound
__
Tags:
#COILERAY #KNOTLESSBRAIDS #HOWTO
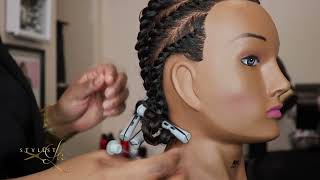
Like i call them the coilare braids, but like just a little longer, you know hi guys, welcome back to my channel. If you are new here welcome. My name is crystal for those of you guys who are new to my channel. You are a returning subscriber. Thank you so much for your support for tuning in to my video today. If you don't get straight into it, all right, i've been seeing coiler ray wearing these braids, for, like god, knows how long now i feel like this is like her signature hairstyle and i absolutely love them. So i went ahead and did that same thing to my hair, but i did it a little differently. I changed the color and the length of it. I wanted mine to be super long and i wanted my color to be similar to my natural hair color. So i went ahead and did this and i wanted to show you guys how i did it, so i recorded the entire thing, so you can tune in to see exactly how i accomplish and get these braids like. I call them the coilare braids, but like just a little longer, you know these braids actually come all the way up. Here i mean all the way down here to a little bit a little bit past my waist um. I have a body shape, so my sides are out, but they come all the way down here so yeah. I am going to tell you guys pretty much all the details and everything how long what you need. I basically remixed her hairstyle with the color of my hair and i made them longer. So if you are interested in seeing how i got this, look, please keep on watching. But before you continue, don't forget to subscribe, don't forget to like comment and share and i'll see you guys over there. Okay, so the first thing you want to make sure you have is freshly washed hair. I only do my braids on freshly washed hair. I don't want any product, any oil, anything in my hair. I want it to be fresh and blowed out and, as you guys can see, i'm blowing it out right now and i'm going to be using the freetress clean therapy kanekalon here. This is really a really good product if you are allergic to alkaline that they spray on the synthetic hair, and this is pre-stretched and pre-rinsed, so you will not have any issues with any allergic reactions or anything. I know i suffer from that. So that's a really really good tip for anybody who suffers from that as well all right, so the first thing we're going to do is going to be parting, our hair, i'm going to start with the back. I really don't care how the back turns out in terms of like the parting, because who's going to see the back, and i start to braid my hair about an inch long and once i get to an inch, i typically can kind of feel how long it Is and that lets me know when to start adding in the synthetic kanekalon hair. So i start with little pieces with small pieces and then i kind of like just start adding them in try to make sure that when you place the hair on your braid, you are gon na. Have one that's gon na go to the far right piece and then one that's gon na go to the far left piece and then you're going to pretty much start to secure the braid and braid down using the middle piece that does that make sense. Um. Okay, i'm gon na try to explain it again in the next few clips, because i show you guys kind of up close exactly what i'm doing so, maybe if you guys see it closer you'll, be better able to understand what i mean. Okay, so now that we're done with the braid, i want to start to wrap the flexi rod around the end of this braid um. You guys see i'm using a rubber band right now to tie at the end of the braid, but it's completely optional, because the rubber band is going to break eventually and i'm going to show you guys how so you can skip that step. But you want to get orange flexi rods or maybe a little bit smaller and wrap the end of the braid around the flexi rod and make sure that it's secured at the end tie it and just kind of like wrap it all around to create this knot. So that it stays it stays in place just like this. Okay, so back to the braids. So now that i have a little bit more of an opportunity to show you guys how i added in and feed it in the braids, i'm gon na show you guys what i do. So let me get these baby hairs out the way. Yes, i cut my baby hair. Sometimes if i need to it's gon na grow back, it's just hair um, but i try to get my baby hairs out the way just so that i know like what i'm going to leave out and then for this braid right. In the front corner, i'm going to make sure that part is straight. Um, honestly, it's up to you guys if you want to use braiding butter or if you want to use gel, i'm using braiding butter and gel just to make sure that my hair is like secure. And it's going to be neat. And now, as you guys can see, i'm just starting in to braid my hair and after one inch of braiding, i start adding it in feeding in the braids and i lay the hair flat. That'S another tip. You guys make sure that you're braiding very flat and you're holding the braids like you, can feel them going through your fingers. If you don't know how to braid, i suggest you watching about a braid video, but it's pretty simple you're just going to lay the hair right where you want to feed it in and you're, going to bring the right side of that feed in braid connected to The most right side of your braid and then the left side of the feeding, braid you're, going to connect it to the most left side of your hair and you're, going to basically just braid it down like just like that, um so yeah. So that's what we're going to be doing for the rest of these braids and i like to add about six different pieces all throughout the hair. So every other inch i would say i would add, about six pieces and it really like extended my hair to be like super long, and i just liked the consistency and the and the thickness of the braid. So i suggest doing that um. But if you are still trying to understand how i did it, i'm gon na continue doing it for the rest of this video, so just pay attention and follow my steps. It'S pretty simple y'all! It'S pretty simple! Now, if you, if you need to watch a how to knotless video, i might could do that for y'all. Let me know what y'all, if y'all want me to show you guys a very in-depth how to braid how to not list braid tutorial, but you guys see. I just added that piece right there and just started feeding it in just started, feeding it in it's. It'S so simple. Once you kind of get the hang of it, i really would suggest you just practicing on maybe someone else's hair or even your hair or on a doll or a mannequin and try to see if you can get the braiding down pack, because once you get that Down pat you'll get this hairstyle down like super easy, and now i'm just finishing up my hair. I was on the phone you guys, as you guys can see just talking my mouth off and now we're all done, and now we're gon na go ahead and i'm gon na show you guys how to set your hair with hot water. So what i like to do is i like to actually add some coconut oil into my hot water. I get a big pot and i make sure it's at boiling temperature add some coconut oil in there and now it's time to dip our braids inside the hot water. This is very, very dangerous, so make sure that you know what you're doing and if you don't get somebody to help you um, preferably somebody 18 or older, that got some common sense and make sure that they have a towel or, if you're doing it have a Towel nearby, so that once you dip your hair, i would say maybe three to five minutes each side, maybe not even that long, maybe two to three minutes, maybe one to two minutes: the way that water be filling i'd, be like listen, but maybe two minutes. I would say dip it for two minutes. That should be good, and this just sets your hair and your braids and then especially those curls. At the end, it's going to be able to really set the curls so that they don't get frizzy, and then they don't go back straight. Hot water is just like the best thing to use for synthetic hair. Do not try to use a wand on this hair. It will probably burn, i think i don't know it would just probably stink, though don't do it, and now i'm just going to do the next side and i'll show you guys how i do it. Please make sure that you get those curls down there and soak them in the water as much as possible and try not to get your real hair in the hot water so try to just do it dip it up to where your real, your real hair ends And dry it off with a towel very carefully, making sure none of that hot water is getting on you and you don't get burned, um, so yeah! This is pretty much how i do it hey y'all, so we are finally done with our coilare braids. This is how they look. I absolutely love them. I'M going to end up redoing my ends, though, because i i really want to use the perm rods to get just a tighter curl, so i'm probably going to end up redoing them, but i really do like them. How they are, but i'm definitely gon na, probably tighten these girls. I hope that it was informative. I hope that you learned something new and if you did please make sure to give this video a thumbs up comment down below. Let me know what you learned. That was new. Let me know what style i should show you guys next, because listen summer 2021, i'm trying to be a different girl every other day like trying to switch it up. So let me know what other hairstyles protective styles you guys would like to see, and i will see you guys in my next one. I love you guys.

Comments
Adelaide T: Girl you did that!! The colour is gorgeous
Assia D.: Hi girl!! Love love love the braids! Is there any way you could explain the parting? I don’t like my braids to be too full (too many) and your amount looked perfect to me. I guess what I’m saying is how many per row in the back and the front
Life with St.Marilyn: Love the braids and the color
jakquanjackson: Still gorgeous
Sade Brown: I'ma be honest Coy leray nothing these are your braids cause you did this ..these are the Kk braids lol this my 50th time here trying to get this style down pack ..and your so pretty
Christina Singh: You should have did this for Jamaica ❤️
Mia: You look like Halle Bailey pretty pretty pretty!!
LaTia Cureton: How many braids did you have?
Sl Firmin: Can you show your parting ?
Karabo Chuene: What's the name of the song ?