Taylor Swift Inspired Fancy Curly Bun Hairstyle Tutorial
- Posted on 21 December, 2012
- Curly Hairstyles
- By Anonymous
Hello lovelies!!! This is one of my very favorite updos and it's really so easy once you get some practice :D I'll show you how to section off your hair after curling it, pin those curls into place and come out with a big beautiful curly bun that is sure to wow everyone that see's you. Enjoy!
Let's be friends!!!
❤ INSTAGRAM: http://instagram.com/Megalizabeth9
❤ FACEBOOK: https://www.facebook.com/Megalizabeth9...
❤ TWITTER: https://twitter.com/Megalizabeth9
❤ GOOGLE+: https://plus.google.com/+Megalizabeth9...
❤ PINTEREST: http://pinterest.com/Megalizabeth9
Stay lovely!
other social media sites you can find me on:
IPSY: http://www.ipsy.com/Megalizabeth9
Join Ipsy here: http://www.ipsy.com/r/114n (it's like getting a present in the mail each month!)
BEAUTYLISH: http://www.beautylish.com/Megalizabeth...
Taylor swift inspired hairstyles, hairstyles for long hair, hairstyles for medium length hair, wedding hairstyles, Lauren Conrad curly updo, DIY hairstyles, formal hairstyles, low curly bun video tutorial
Music by: Danosongs.com
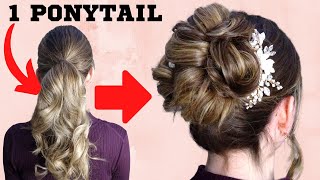
Hi everyone - I have a great updo today that can be good for a Christmas party. A wedding get-together a really fancy date, anything, but I decided to make this one of the 12 days of Christmas, just because simply it's that time of year, where most people are dressing a little bit fancier, because there are different events to go to so this is One of my most requested bridal looks, and this is what it looks like. So how do we do this? Well? First of all, I showed you how to use the curling wand in this video. So if you don't know how to use a curling wand, please go watch that because that's going to help you a lot. That is the type of curl that we want, specifically for this up to just a regular curling iron, with the clamp isn't really gon na work, because we want that coil defend this originally, when I first did this up through ever was inspired by a picture of Taylor, Swift, probably about a year or two ago when she had the really ringlet curls, but she had it in and up to the girl that I originally did on. This is a picture of it. She had so much hair, so I wound up putting her hair in three ponytails for the first section, you'll see what I'm talking about when we get there. So really this depends on how thick your hair is. My hair only needed one ponytail. Well, let's go ahead and give it how to do it. Let me know what you guys think. The first thing I've done is taking down the first two rows on the bottom of the set. Now the general idea here is that you want pretty much all the hair from about the top of your ears all the way around down. If your hair is thicker than mine, you probably want a little bit less if your hair's thinner than mine, you might want a little bit more so, like I always tell you guys. I want you to tailor, make this to your hair, because you all don't have my hair, so I'm gon na show you how to do it on kind of medium density hair. What I'm gon na do is this is pure ologies, cuticle polisher. It'S pretty much. Just a shine serum smooth out any rough things going on, I'm taking some of that and I'm rubbing my hands together and activating it. That'S how you activate this one, whatever you use just follow the direction. I want some shine and I want some tap so I'm putting that in here, so that we have that - and we have some bouncing curl up here now so now I'm gon na turn around so that I can show you what to do. First, we want to take the hair to our designated side or, if you decide to do it in the middle, wherever you decide, you want the main part of the bun to be so now. What we're going to do is we're going to specifically take out a section of curl and with the bobby pin we're going to turn that curl into a couple of different sections and pin it so that it looks like if this curl is wrapped several different time. So I want to start by placing it a couple inches down, you can see the bobby pin and what I want to do is twist it and pin it like. So all right, I'm taking the end and I'm putting the bobby pin close to the end and wrapping it around and sticking it into the ponytail, so that curl I made into two different sections. You don't want a really big piece to wrap around, because your curl is going to fall, so you want to keep it at about three to five inches of hair between each one, because that will keep it from falling down and then looking like a mess. Did you see my curl wants to stay right now and that's important? We want to do that over and over until we have all of those curls in that ponytail position. Okay, so we have the bottom part of the bun done. I want to give it a spray. Next, we want to take down about from the eyebrows all the way around, so these curls are going to be curls that we want to freehand. So each one know that we put serum on we're going to want to do individually rather than as a group, because we want to keep this spring. That'S what gives you that really textured effect in this update, I'm gon na start with larger bobby pins, probably go to smaller, but you want to take the individual, curl and you're using again mirror position yourself into the mirror so that you can see the back of Your head and take the curl in your hand and figure out where you want it, and it helps to twist it some to help. Keep some of that curl in I'm using a small, bobby pin on the ends of the hair and a large bobby pin on the center, because I really want these individual pieces to be secured, finding a place where can put it and securing it. But I'm checking each time to make sure that it's in the right place. If you need to move it, that's this is when bobby, pin taking the hair and twisting it in towards itself and then hitting it into the pin twist and do it. So I have this piece sticking out, so this would be a perfect one to tuck in with just a small bobby pin. So now I've gotten to the pieces that are in front of my ear, and this is what really makes this updo soft and feminine and really pretty these pieces on me are pretty long. So I don't want to leave them down if you have shorter face framing though, and you want something to soften your face, you can leave these down and then that way you have a little something I'm gon na. Take it and twist it back away from my face, but I'm going to keep it a little bit over my ears, tucking that into the bottom of the bun, because we want to make it a little fold in here as well. Okay, so this is what we look like so far: no granite your bun is gon na look different from mine. Just like my next bun is gon na look different from this one. Each and every single one is different from the other. That'S the beauty and updos they're, always different, which makes them more original, so I'm putting more cuticle polisher on each individual strand. Now that we're at the top, I think different things can be done as well. When I do this on a bride. Typically, I tease back here. I want my curl to be more focused on, so I'm not gon na do any teasing on line I'm twisting my curls so that it shows that texture that we want I'm hitting it into the bun. Now by now, you have a lot of bobby pins in here and you're gon na want to start feeling how it feels when you put it in, because, if they're clashing on each other, it's gon na hurt by the end of the night so make sure nothing Is hurting right now, some of these I'm just putting exactly where I want them and pinning them. I don't need to curl them under and rearrange them, because now we're just getting towards the finish line, and we want them to look really placed now. These last couple of pieces, I want to bring a little more back, but still twist them so that they have that textured effect so keeping in mind. You want to look up to it from the front as well. I'M just pinning it right at the top of the bun and here's the side and if you have embellishments by all means put them in anywhere, you want I've done several different embellished kind of things with this and a lot of brides with it. So, if you're looking for a rival updo, this is amazingly popular for things that I am so if any of you decide to actually try this, let me know how it went. If you have any questions, if anything wasn't completely clear, let me know leave me any comments and I will try my best to help you all right, bye, guys,

Comments
Kathryn Elaine Phillips: I've looked at so many tutorials on how to achieve this look and this is by far the best one! Definitely doing this for prom! Thanks for the help :)
Kailee Mitchell: This is exactly what I wanted! Thank you so much.
iZZiRae: This is really pretty!!
Megan Pirrocco: NICE! We even spell it the same..that is awesome :]
Megan Gerbrandt: Love this! My name is Megan Elizabeth too :)
Marie Buhler: Tried it. Loved it :) Here's a pic of the front and back: http://instagram.com/p/vK4fy4BPPx/ Thanks for sharing!
Lucija Karaman: if i'm going to dance a lot, will it keep together?
Faiza Hussain: It's kinda ok
nikki rincon: ...is she drunk?