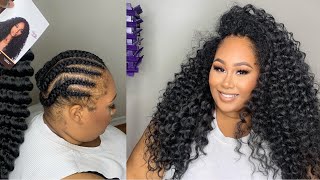
Crochet Braids W/Invisible Part - Step By Step Tutorial - Freetress Aruba Curl By Samsbeauty
- Posted on 22 October, 2017
- Curly Hairstyles
- By Anonymous
In this DIY crochet braids tutorial, I teach you step-by-step how to install a crochet weave on yourself with an invisible part. I am using 3 Packs of "FREETRESS SYNTHETIC HAIR BRAIDS ARUBA CURL BRAID 20" in the color 30. Thanks again to SamsBeauty.com for providing this hair! Happy Learning!
-
LINK TO HAIR: https://www.samsbeauty.com/service/pro...
-
COMPANY STORE LINK
- http://samsbeauty.com/index.beauty
SAMSBEAUTY IG&FB
follow samsbeauty on instagram
https://instagram.com/love_samsbeauty/...
like samsbeauty facebook page
https://www.facebook.com/love.samsbeau...
*******************************************************
MORE GREAT VIDEOS
1. How I Started Making Money YOUNG Braiding Hair - Beginner Braid Tutorial: https://youtu.be/fQWzjcH4-aQ
2. How To Feed In Braids: https://www.youtube.com/watch?v=OcuNXz...
3. Mother Daughter Bubble Ponytail Tutorial - DETAILED: https://www.youtube.com/watch?v=WiHA5r...
*******************************************************
LET'S STAY CONNECTED:
Instagram: http://www.Instagram.com/ItsMeMissRuby...
Twitter: http://www.Twitter.com/ItsMeMissRuby
Health and Wellness Products I sell: http://www.Linktr.ee/ItsMeMissRuby
Hello, ladies welcome back to music and beauty TV. Thank you so much for subscribing and checking out my content today. I'M gon na show you guys how I achieved this crochet braids. Look I'm featuring hair from equal free tress. It is the Aruba curl 20 inch long. I'M gon na be using three packs a little bit more than three packs of this, and I was blessed with this hair by Sam's beauty.com. They sent it to me for a review. So if you want to get your hands on some of this hair at the end of this video make sure you go to Sam's Beauty, comm. So right now, I'm sectioning my hair off, so that you guys can see my braid pattern for this style. I'M gon na be doing a middle part closure. So when doing crochet braids, you have to start out with a foundation of cornrows, which is what I'm doing right here. I am not using too much hair, I'm using like semi small braids, especially for the closure area. My front two braids right here in the center are gon na, be where I do my my invisible part closure, which I will show you guys in detail later on in the video. But basically I want these braids to be kind of small. Typically, when you braid your hair down for crochet braids, you don't want the braids to be super tight because you want there to be room underneath the braid to stick the crochet hook. I did these a little bit tighter than the rest of the braids are going to be just because I really want this closure to stay intact as long as possible, and I know how to do it pretty well, so I want to have much trouble sticking. The hook through this is not a feat in cornrow. You can do a feat in cornrow. My hair is kind of like soft and it just like slips out of braids a lot easier than more coarse, textured hair. So I usually like to do a standard cornrow and, as you can see right here, I crisscross the braids and now I'm going to continue to break them down toward the back of the crown of my head, because whenever you're doing a crochet braid closure, you always Want to criss cross toward the back of whatever part you're creating that way. Once you hook all the hair in there's, not just one consistent part going down the middle of your head, it looks like it kind of fills itself in so I'm going to proceed just doing more braids that are going backward and I'm going to be Criss crossing. Some of them, the reason why I did Criss crosses throughout some of the areas of the top is because I had the intention on making two to three different closure areas. That way, I can flip my hair from side to side, but by the time I was finished with this style, I did not feel like like making closures whenever you do the closure part of this style. It takes a little bit longer and I was dog-tired y'all, but it's a good thing. I did the braid pattern like this, because I can always go back in with the extra hair and make closures when I feel like it. So if you are only gon na have one closure area, then once you do the crisscross braid, wherever that closure is going to be, you can pretty much do the rest of them straight back now, I'm gon na do the same thing on the other side. Just to I get the top half of my hair braid it down and the reason why is because now I'm going to end up joining all of these braids together to create bigger braids going down the back, but this is just to show you, the area that I want to do the closures, as you can see one of them. I did one straight back braid before I did the next closure area, just because when I wear that closure, I want it to be a little bit more of a deep part before I do. The braids in the middle I'm gon na do the two edge braids. These are the perimeter braids for my hair. It'S really short, so I'm adding extra synthetic hair, but basically just make sure you do perimeter braids that follow the entire perimeter of your head, because once you crisscross those in the back, it's going to give you that closure in the back, so that you have hair That goes all around your head. I just feel like it makes the style more comfortable to wear, especially as time goes on, and now I'm just doing all the rest of the braids braiding them straight back, joining them together. When I can so it's not like a whole bunch of braids now I'm gon na go in with the needle and thread and I'm just gon na stitch. The tail ends of these brains down. I'M not gon na spend too much time on this, but just to show you guys a couple of visuals, so you see how it's done. Some people don't do this part some people just crochet the hair in and as they're hooking, the hair ends and they're hooking. The braids together, but I've had clients report to me that they really don't like that. So I've never tried it on myself because it doesn't seem like the most secure way to tie down all of my hair underneath and just in case you did start to come out. I don't even want to take the chance at getting annoyed, so I just stitch them all down, and here is the first pack up the hair. I'Ve never worn a full head of hair this color before, which is why I wanted to try it out in front of you all you guys can. Let me know what you guys think about this color. Honestly, it's okay! It'S not gon na hurt my feelings because I'm not attached to this color. I just wanted to try something new. I feel like it's fitting for fall, so here we go, I'm sectioning off little tiny pieces of hair. I just wanted to show you guys like how small this piece of hair is. It'S not the tiniest as it's going to be once I get to the front, but you want to get a small amount of hair slide. The hook underneath the braid attach the hair into the hook slide it back through and then you're going to knock this hair 4 times at least now. The reason why I really like the Aruba curl from creatures is because, contrary to some of their other curl patterns, this hair is not that silky. It has kind of like a coarse feel to it, but it's still soft enough to appear shiny and pretty, and it definitely doesn't feel disgusting or anything but its coarse enough to where it doesn't like slide apart really easy. Sometimes I deal with crochet here that I feel like I have to not 15 times to make you not come unraveled and it's really annoying, so you either have to do a whole bunch of knots with other, more silky or textured here, or you have to do Smaller pieces of here, which takes forever this style already takes a few hours. So imagine if I had to break all of these pieces in half and yes, I'm just realizing that it's extremely late and I'm gon na be up on I doing my hair. So you know just getting a little caffeine in my system with this hot tea and we're gon na get back to work. So I'm just showing you guys run-through, I'm literally, I can't see what I'm doing. I don't really think I need to I'm just feeling for space. That'S available sticking the hook underneath and attaching the hair looping it four times every time and just filling in this space until I finished the first bundle of hair - and this is what it looks like once - the first pack of hair is fully installed in my head. Now I'm gon na go into the second pack of hair. Do the exact same thing and I'm gon na work my way all the way up to get to the top of my crown, because I want to use an entire pack in the front area. Actually, once you'll see at the end of this video, how it looks it does look really full, but I'm glad that I have extra hair on deck because I'm gon na want to go through afterward and probably add more pieces, happy dance. Okay, I was really just happy because yeah I was tired. Oh I forgot to show you guys. I have put this oil on my scalp, so I just added some more for demonstration, but this is the scalp cocktail from weave pronate check out. We Pro dotnet and get you some scalp cocktail. Little update on time and now we're gon na get started with the closure in the front before our proceeds with the rest of the hair in the front, I'm gon na do the closure first. This tends to require me to place every strand extremely close together, so typically you're going to have more hair in the closure area. Then you do for any other braids toward the front. So I'm starting out by sticking the hook underneath this braid as so and instead of grabbing both strands of hair and knotting it four times, I'm only grabbing one strand of hair and knotting it twice and then flipping the other piece over once you do this over And over and over you start to see how you get that invisible tart effect. Now, since this hair is like Brown or like blonde, basically dark blonde and my hair is black, then it's definitely not as seamless of a closure as it would win. Had I been installing black hair, but the idea is for it to look like it's natural, like it's yours and it's growing out of your scalp, I'm gon na proceed following this method. I'M only nodding these ones two times when I get to the other side. I actually experimenting with nodding them three times I just wanted to like get an idea as to how different it might be when I actually wear this style. When I do my clients hair, I usually just like feel for what seems to be the most effective depending on the type of hair they bring me, but at least two times you have to knot it three times might be preferred, but sometimes too many knots in The hair that's showing in the front if they begin to loosen up or unravel then they're, going to show a lot more than than less knots. So just be mindful of that. When you're doing your closure piece also pay attention to the direction that I'm sliding the crochet hook, underneath the braid in so basically, you need to slide it in the opposite direction that you want the hair to fall. So if I want the hair to fall down to the left side of my face, then I'm going to stick the needle up heading in the right direction underneath that braid, so that when I pull the hair through and knot it, then the hair will fall on The appropriate side to create the closure. This is what it looks like if you open the hair up. One side has the knots and the other side does not. If I were to pull the hair on the right all the way over, I could pull those knocks underneath the braid, but I don't want to do that when I keep the knots on the left side of the braid, so you see how fool this looks already. I haven't even added any hair to the brains underneath this closure area, and this side of the head already looks full enough to be complete and that's why it's important to do your closure at first number, one. You want to make sure you have enough hair to close it off number two. You want to make sure that you have a benchmark to go off of when you begin to add more hair throughout the rest of your braids. So on this side I am doing three knots, as you can see, make sure if you decide to do three knots that you pull as you go, because the thing about doing three knots is that the second knot tends to knot up really quickly. So if you're not knotting it like pulling it really snug as you go, if you just decide to pull it all really long, and then you think you're, just gon na tighten it and it's gon na be a knot. You'Re gon na end up getting a knot like a few inches away from where it needs to be, because once you loop that hair twice it tends to want to not right away. So you can't do it too far from where you want it to end. I really hope that makes sense if it doesn't just do it you'll see exactly what I'm talking about so for demonstration purposes. I wanted to try this and, in the end, they both look the same on both sides, but I'm gon na wear it and test out to see how they both last a couple of disclaimers. This invisible knot, method looks so much better when you use more coarse, textured hair, and you can do all of this looping with your crochet hook, as I tend to do when I'm working with clients, but if you're doing it on yourself. Like me, for some reason, it may feel a little bit easier to use your fingers that way, you don't make as many mistakes, because you need your visibility to be really good when you're, using your hook. So now I'm going through and I'm maintaining smaller strands of hair. Since I am toward the front another thing, if you guys didn't notice, I'm kind of like sticking a strand of hair just before the braid actually starts. I'M just sticking it into like my hair, just because in case this loosens up, I don't want you to be able to see the knots of my braid. It'S already bad enough that you can see. I have black hair and anything's blond, but I can deal with that. I just don't want you to also be able to see the knots of my braids and, as you can see, there is space in between this hair because, like I said, I didn't want to make it too full, but I did want to make it full enough To where, if I decide to pull it back or do anything, it won't look completely like ratchet, but ultimately I'm gon na need to go into some of these areas and feel them anymore. If I decide to actually wear a side part - and this is how it looks once all the hair is installed - it's extremely fluffy, extremely big if you like, wearing your hair, super big like this long, no bangs do as you please, but I'm gon na go ahead And trim some of this hair toward the front, because I wanted to frame my face a little bit better, I'm just taking my shears, I'm not pulling this hair until it's straight and then cutting I'm like just very loosely tugging on it and then trimming as I Go because it's curly hair, you actually don't have to pull it at all, but I just have a tendency to do that because I feel like it gives me a better grip or something. But if you don't pull it at all and you kind of just trim that may actually yield better results and you're gon na constantly need to trim the ends of this hair because it's gon na constantly shed or just not up towards the end. So keep that in mind - and this is the finished look I added a little bit of mousse to my hair. I didn't want to make it super flat. I actually like it to be kind of big and fluffy. So that's what I did. I am rocking my middle part closure. I hope you guys like how this turned out. I actually loved it, but I'm gon na see how I feel as time goes by, if you have any questions about this style that I didn't explain already. Please leave your questions in the comments below I haven't forgotten about the giveaway. I told you guys in my last video I'll, be announcing the winner next week, so make sure you guys come back next week to find out who is the winner of the Jumbo shower cap. I showed off in my last video haul. Thank you so much for liking and subscribing god bless you and I'll see you on the next video
Comments
It's Me Mrs. Ruby: I'm so humbled that so many of you have been blessed by this tutorial. Please keep in touch on my most recent video where I break down (in detail) how I learned how to braid, and started making money with it very young: https://youtu.be/fQWzjcH4-aQ I'm hoping this video can be a guide to those interested in creating a serious side hustle post-quarantine. I look forward to hearing from you
Andin Joy: The color and style is super gorgeous on you! Great job installing the Invisible part
ExaminedPilot15: This is probably the best, detailed and informative crochet tutorial I have watched in a long time. Thank you, much appreciated. You did an awesome job and yes the color suits your complexion beautifully.
Marilene de Cruz: Ficou muito lindo
Patricia Fanthynati: Amei obrigada por compartilhar
Leila Fattobene: Ficou lindo,
NFT Nurse: This was the best crochet tutorial that I’ve seen on you tube so far. Thank you for being detailed, for real.
Mary Oliveira Oliveira: Ficou lindo, vc como sempre arrasa
154angel154: Thank You immensely sis for blessing us with the "whole process"; braid pattern included!!! New subbie here!!! OMGAAAH THIS IS SOOOO PRETTY!!! LOVE your invisible knotying technique as well!!! You are a KEEPER!!! Oh, and you SLAYED this Sis!!!
Arlette Villegas: What a great job! And by yourself! Wow! ❤
Carol Outler: Great tutorial!! Great job!!! This is Beautiful!!!
yousra yabi: This looks gorgeous on you!
Jessica Nascimento: Que maravilha
ROBERTA BEUTHY: maravilhosa amei
Abigail Montes Yngar: I love it! Great color
Shelly Anderson Ballew: You are gorgeous & did an amazing job! You are a hair genius! Much love & respect!
Denise Cláudia: Amei ! Ficou lindo !
Kathy Flemmings: Late watching but it looks amazing great job
Markedalove: Absolutely love it!
Pche: Beautiful I love it!!! It looks very natural..love the color
My Place: You really did an amazing job and the color of the hair is beautiful against your skin keep up the good work and I'll keep watching
Carolyn Truby: Thank you for explaining the front closure. I am new to doing crochet and I have run out of hair before and have found the sides to be fuller than I wanted. This video has cleared up so much for me. Thank you!
My Soul is Gold: i love this so much! can't wait to try!
Maria Helena Morais: Ficou lindo adorei
Godsgraceish: Amazing instructions and demonstration!
Dádiva Santos: Nossa que lindaa
OnejazzieDiva: That is so beautiful
Lorie Silver: Thank you for this. You look wonderful and you did a great job!
Reyna moreno: Hermoso gracias por la información
dramafreequeen Feliciadonttoleratenonsense: That's a pretty hairstyle you have done such a wonderful job!
Elsi Elsi: In my opinion this is the best crochet tutorial. Thanks to it I can take care of my appearance. Thank you !
Sage 888: That looks absolutely gorgeous on you! Will try!
Esther Jonson: Phenomenal. Hands down best video on crochet I have seen. Great attention given to detail and tips I had never heard or considered before, truly professional. Bravo
DAUGHTER OF THE MOST HIGH!: Thank you for taking the time out to share the beautiful details
Lauren Coleman: This is great!! Thank you for teaching me the invisible method!!
Lesley Stone: Thank you for sharing. And seeing you doing your own hair so neat is bonus!
iamtrinaful: I love this video. I just bought the freetress Brazilian braid and plan on doing this braid pattern
Thaiis Wright: This was a perfect step by step tutorial. I've watched TONS and this is the BEST ONE hands down!
Scovya Porsha: Thank you so much for this video. Because of you my invisible parting turned out really good. Sending Love and Light from the UK
JaNee’s Life: This color looks pretty on you!
HealthyGemini: Omg that invisible knot method is the best demonstration I have seen for someone who is DIY. How come I never thought to clip the hair down as I attached the next section love YouTube! Thank you
marketta stevens: BEAUTIFUL!!!!!!!!LOVE IT!!!!!!!!!!!
tasha striker: This is by far hands down 100%, the BEST and I mean the best crochet hair video I've ever seen out of all of my searches in the last couple of years. Congrats to you
Andreia Guimarães: Ela faz sozinha uauficou top. Arrasou
Pretty Greeneyes: This is beautiful, I wear this color, but you did a awesome job with the crochet. you can wear it.any style and look natural .I'll try this method you rocked it
Stephanie: this tutorial changed my life! what an amazing job
Javenna Avery: Nice hairstyle, good explanation, and thanks for getting to the point!!!
Janice & Tyrone Harvey: Thanks it looks great! I will try and do my own hair!
Yeny karina Mesa: Gracias por compartir ❤️
T Bott: Awesome video and very informative!! Thank you so much!!
Nicole Helko: Love it
Everything Tyn: Very beautiful!
earkwookerum: Neat, I love it
Walknnluv: Great work and beautiful color on you ! Make- up slayed! Thank you for sharing!
Queen Bee: I absolutely loved your tutorial, just found your channel.
Natasha Meeks: Wow, good braiding skills and I like the color too
ITS_ME_TLD: Love it!
Linda Owens: Beautiful color and you did a great job.
Jontanae Barnes: Thank you for this video. It’s very informative and detailed. The color is pretty and it looks good on you.
videochus vedeos cotidianos: Hermoso
Sherry Evon: Love this I used this hair on my 16 year old daughter it came out great it took me about five hours because I was taking my time especially in the front putting the hair in.
ChinyQ Apu: Beautiful tutorial. Thanks
Yolanda Wilson: Three years later this is STILL gorgeous. Definitely getting this style.
Charlyn Hogh: Thank you for trying this color ! I was looking for this all over youtube since I prefer blonde and wanted to see how it looks like !
Carol Elie: This was one of the best one I've seen so far. Great job and thank you so much for teaching us.
Victoria Oluwagbesan: This is beautiful! Thank you for this tutorial. You are beautiful; this hair colour is perfect for your lovely skin.
Jackie Starr: Great Job, I'm definitely going to try that hairstyle, Thanks for sharing.
Clee Albert: Love it looks easy will try it. That color looks very nice on you
Cremilda Jesus: parabéns
Stephan Koch: Incredible! So gorgeous.
yvonnia123: I'm just amazed at the prep work. God, you did all the braiding and sewing by yourself!. Love the closure technique!
Halle Berry: Beautiful
etherealeagle: Beautiful!
Gris michel Elisondo: Genial felicidades excelente trabajo
Kandi Cornell: Hello, I Love this do! The color suits you PERFECTLY! I truly like the criss cross braid technique, Unique and I Love the reason for it. Also, I like the closure as well. Very nice, KUDOS. Thank you for sharing and Happy Holidays!
D JohnS16: Such a helpful video and it doesn't hurt that it's cute too!
Brown Skin60: I know this is a old video but honey you did that! You gave perfect instructions! Thank you soooo much! New sub here!
S Washington: Looks so great!! You always give such great tips!
Marilin Ariosa: Beautiful ❤️
Jurandira Pestana: Ficou lindo
Shirma: Love it!
Chelle Weatherspoon: I like it a lot. Full and natural looking. I love the loose crochet styles because I get the benefit of protecting my natural hair and I dont feel suffocated by a wig cap and clips and I get to change up color and styles. I love it.
delise lameaux: Loved the video and the hair and how you went step by step. You look beautiful.
shirley hogans: I have watched a ton of crochet hair tutorials and everyone seems to have different ideas as to how far apart each knot should be. Your hair is by far the best looking I've seen. How far apart do you suggest the knots be apart? What is the best oils mixture to put between the real hair braids? Is there anything you recommend to put on the added in hair to make it last longer?
Marie Hawkins: That color hair is very beautiful with your skin tone! Thanks for sharing.
Christy Larry: Great job!!! What do you do to it at night to keep it from tangling? I want to do this so bad but I don't want to have to take it down after a week.
Laila Zara: Best Crochet Video i have seen. Thank you so much. Your style looks beautiful
Alejandra Rubalcava: Mis respeto para esta mujer que hermoso trabajo yo soy cosmetologa y este trabajo es para que le demos un. 100 ❤️
Aparecida Nascimento: Ficou lindo
Jubilee4us NOW: Nicely done! Thanks for sharing!
Ivy Ramirez: Beautiful
Kylie Johnson: It looks amazing
L.C Marie: Awesome video I would love to see a video of the deconstruction of this type of braid, you go into detail so well that I think it would make a great vid.
JACKELINE LOPEZ: Muchas gracias x la explicación...
Virginia Stirnweis: Amazing look and impressed you can do this on yourself
Alicia Jones: It looks soooo good!
LILIAN SANTOS: Boa tarde! Perfeito! Mais coloca legenda nos seus vídeos devido ao idioma. De preferência na língua portuguesa . Blusas! Parabéns!!!
Lillian Curry: This is beautiful great job you look beautiful
Toni H. Justice: Girl my arms be hurting like hell trying to get all my hair braided. My daughter be like "you on yo own honey!!" Your work is flawlessly done an I love this video!! Thanks for posting!!
Rosegarcia Ulysse: Beautiful