Diy Half Feed In Braids Half Curly Crochet Braids | Beginner Friendly Summer Hairstyle
- Posted on 24 August, 2021
- Curly Hairstyles
- By Anonymous
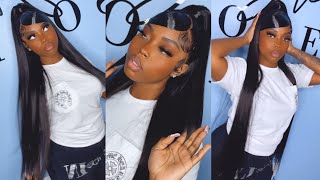
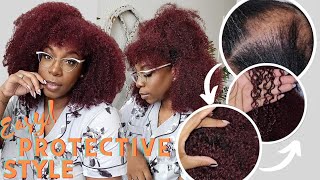
Get into this easy crochet braid hairstyle! I did feed in braids in the front and crochet curly hair in the back and created this cute look for summer and fall! Definitely a good protective style for natural hair or for relaxed hair.
Freetress Waterwave Hair TT27: https://amzn.to/389VdFF
Sensationnel Waterwave Hair SM1b27: https://amzn.to/3kleARS
Braiding Hair: https://amzn.to/2WmVXVJ
SHOP NIRVANA BEAUTY
https://www.shopnirvanabeauty.com
KEEP IN TOUCH!
Instagram:
https://www.instagram.com/tanieya_/
https://www.instagram.com/nirvanabeaut...
BUSINESS INQUIRIES:
Email: [email protected]
#crochethair #protectivestyle #feedinbraids #naturalhair
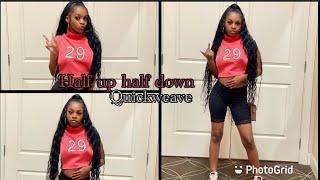
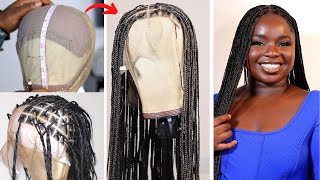
What'S up guys it's tonight, i am back with another hair tutorial, i'm taking my sulfur eight grease. This is the only grease that helps me with my dry flaky scalp. I'Ve always had a dry scalp, whether i was relaxed or now i'm natural. So i always use that, and i'm just showing you guys. I just did some chunky braids in the back for the crochet, because we're going to be using this water wave hair for the back, and this is in 1v20, and i'm also going to be mixing it with this other hair that i have. This is the freetress water wave and i'm just mixing it because it's been lying around in my house. So, as you can see it's tt27, so i figure i can just mix the two colors together and actually came out really really cute, and this is just the braiding hair. You can grab any braiding hair. It doesn't matter for the braids in the front just giving you guys a close-up of the two different hair colors that i'm gon na be mixing together, and i liked how it came out. So i'm gon na show you guys what i did now. It'S so easy to just pre-section your braiding hair and that last piece i added the crochet piece, because i want the braids in the front to have a curly end. So i'm going to be doing a few braids in the front and i'm just taking the murray's edge wax putting that on my edges and then i'm going to start the feed in braids. So, as you guys saw, i already have my um braiding hair section out. So it's just easier to do that before you start your feet in braids to have all of the hair like section out, so that you can just pick up the section and go so as you guys can see when i'm ready to add a piece of hair. In i'm just grabbing it off of the back of my chair, and i am just adding it into the braid and i'm just going to go all the way down until i get to the last little piece where i'm going to be grabbing. The crochet hair and feeding that in as well so with this braids on the side, i'm not adding a whole bunch of pieces in. I think i added like three or four pieces in, but once i get towards the center of my head. Of course, you have more room to add more pieces in, but take your time with this part just try to do it as neatly as possible. Of course, when braiding your own hair, it doesn't always come out like is, if you're going to a stylist to get it done, but just take your time and you will get through it do now, i'm basically going to do the same thing for the next braid, But i'm just going to get my parts together. That'S also another thing that can be so challenging when you're doing your own hair is trying to get straight parts, so i'm doing six braids in the front and i'm just gon na. Let you guys just watch me finish up the braids, because it's literally you know the same technique all across the front. Do so all right. So now i'm going to be crocheting the back of my hair, so i'm just going to take that crochet hook that i have you can find them always at your local beauty, supply store, amazon, they're everywhere and i'm just going to add the hair to the hook And then you close the um the latch on the hook and pull through and it creates a little knot. So i'm going to do this to the entire back of my head. It felt like it took forever, but it really didn't. It took me about two to two and a half hours to do this hairstyle, but it's a lot shorter than doing like full-on box braids or like a style like that. So it is like a quick, easy little protective style with the leave out, which is always the best and as you can see, you just pull it through and it creates a knot there and then you just kind of keep going. So what i did was, i just alternated the color. So if i just did one color the tt27, then i did the other color right after and, as you guys can see like this is kind of what it's turning out to look like, and i was just super sad that it just felt like it took forever. But i was just being impatient so take your time and once you get to like the top of the start of the braid, try to go as close as possible to the feed and braids in the front so that you get like a nice little blend. And look seamless so there's like no like gaps or whatever you know what i mean so yeah and you may have some issues. So if you crochet it wrong, just pull it out and take it out and you'll be good to go. So all right, you guys, so i only have about three breeds left in the back. Thank you. Jesus um. It just felt like forever with crocheting, but it is a simple process, you're, just repeating the same steps over and over again, but um. I believe i used about six packs because one of the packs came with like three bundles in it, and then i used three packs of the freetress waterway, so i used six packs of hair and at first like it did feel like there was some weight to It, but that's just because i'm also not really used to having this much hair, like i haven't, done a crochet hairstyle in a really really long time where you're, like crocheting, the back of your head or all of your hair. I haven't done a hairstyle like that since college, so i probably just wasn't used to it but yeah. I had about six packs in my hair, just in case you wanted to know to recreate this style. So this is what the back is looking like. I just wanted to show you guys, you know the blend of the two colors along with how long it is. This definitely seems like a nice summer style, and this is what the hair looks like when you just leave the feed and braids down, but i also wanted to show you guys you can do a couple. Other looks that you can pull two to the back and wear it like that, or you can also do a different style and you can pull all of it up and you can wear it in like a pony kind of thing. With on the half up and a ponytail since the ends are curly and it blends right in or my favorite, you can just put it into a little bun at the top with the curly cute messy ends, and that's a cute look as well. So you can wear, you know a few different ways and it's cute all your hair is braided up and tucked away, and you can always like cut the back and layer it to your liking. I did end up cutting it a little shorter off camera because it was just it was too much for me and now i'm just going to take my murray's edge wax and just lay my baby hairs. If you use a toothbrush to lay your baby hairs too. Definitely give this video a thumbs up and share it with people that you think you know can utilize. This quick hairstyle help out a friend help out your sis. You know something cute and quick to do for summer or fall so yeah. Okay, so i just want to talk to you guys really quick about my hairstyle. I hope you guys like this tutorial. So this is the final look. My favorite version is just like a bun with the back just out now i used one full pack of the three pack curly hair, that was the 1v27 and i used about three packs of the freetress, smaller ones that was in the tt27. So there's a lot of hair back here, but i didn't want any gaps or braids to show, and i did smaller braids in the back. Some people do like four chunky braids in the back and just do whatever they want now. We all know that this is um, not human hair, so it's gon na tangle. It'S probably gon na last you about two weeks and what i am debating on doing. I'M probably gon na cut this a little bit, because it's that long this would be like this length is great for like vacation, but for everyday wear for two weeks. It'S a lot of hair, but you can definitely, you know, keep the length because the longest i have is like 18 mixed with 22. So you know it's a lot going on, but um. It'S definitely a cute quick and protective style, and i, like it a lot and if you wanted to just have the braids hang down. That was like my original. You know original thing of what i was going for. You could just have the braids lay down and you could put some hair jewelry in it and then you know pretty much be good to go and um. You can pull some of these braids back and, like you know, you can really play around with it and create you know different different looks so i like it a lot, and it was like really quick to do so. I hope you guys like the tutorial, and i will see you in the next video bye
Comments
Ms. Shabria Gxo:
Mimi Sam: Cool