Goddess Box Braids With Curly Ends !! Tutorial ! Boxbraids 101
- Posted on 30 April, 2020
- Curly Hairstyles
- By Anonymous
Can we get to 1k subbies on YouTube please !! :)
I'll buy everyone cookies
Instagram : @uchechi_
tik-tok : @uchechi_
For this tutorial I used
2 (3- packs of kanekalon hair ) and
1 (1 pack of kanekalon hair )
eco styler gel
rat tail comb
patience
strength lmfao
I hope you all enjoyed this tutorial ! Don't be afraid to reach out if you have any concerns .
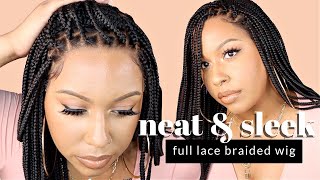
Oh hi, guys, what's up welcome back to the channel today on my channel, i'm going to be showing you guys how i get my medium length box braids with curly ends. I love this look so much. This hairstyle is literally everything. It is super cute. So before we even start our braids, we need to make sure that our hair is washed moisturized and as stretched out as it possibly could be. This just helps our natural hair blend in a lot better and smoother, with the braiding hair. Okay, y'all now for the hard part, so for my parts, oh wow, hard part parts, get it get it: okay, but anyways. For my parts, i'm going to be using a rat tail comb. So i'm going to start by parting from the middle of my ear. On my left side to the middle of my ear on my right, then i'm going to split that part down the middle to make two braids in the back after we part we're gon na grab our favorite gel or whatever gel we want to use and then We'Re going to add the gel to that parting and tie that part up with a rubber band. Guys parting is so important like i know you guys hear me say that in all of my videos, but it is so important. Please take your time so i went in and added another row. This row stretches from a little bit over the top of my ear on my left to the top of my ear on my right, and i split this row into three sections for three braids. Okay, so this part stretches basically from the middle of my head on the left to the middle of my head on the right, maybe like a little bit above the middle, and i split this section into five parts. Now we are up to the front, hang in there guys we're almost done. We got this, we got this first thing i did. Is i split the front in half it just makes it easier when we're working on a right side and a left side. So, in terms of the parting, we're gon na have five braids on each side. We'Re gon na have one braid directly at the left side and then we're gon na have two braids next to it, and then two braids. Next to that one, and that's how it's gon na be on both sides, all right awesome. So as soon as we're done with the parts we're gon na start, the braids, i'm making sure that i use a good amount of hair, because i want the braids to be a lot thicker than a normal box braid. So what i did is, i grabbed the big chunk of hair and then i separated that chunk into two different pieces. After i separated the pieces, i then cross the pieces together and use that to start my braid okay, so the first thing that i'm going to do before i even start my braid is i'm going to go in and put a little bit of product on my Hair so make sure that this product is like an extra hold product that way, there's less flyaways and your hair is less frizzy when blending in with the extensions okay. So i'm gon na keep braiding, but i'm not gon na braid all the way down to the end. Now, that's just because i wan na leave a good amount of hair out for the curls, so i'm gon na keep going and braiding the rest of my hair. Black leather gloves buckles on the jacket, crossbody got a piece got ta dance, but it's really on some street. I'M gon na show you how to get don't you wan na dance with me. Hey guys all right, so i'm gon na show you guys how to put the perm rods into your head. Okay, so i already did my entire right side, as you can see so so these are the strands of hair that i didn't perm rod. Everything else is permanent, though, for my hair, i'm gon na use the dark, pink perm rod just like this. Okay, i'm also gon na use a couple of light pinks, so the difference between the color is basically size. I feel like, at the end of the day your curls turn out the same, but whatever we're gon na get a little banshee shmancy and use a dark, pink and a light pink perm rod. Okay, the permod looks just like this. You have the rod and then you have the little stretchy end. That goes in just like that. Very very easy, be careful, be careful with these perm rods, y'all they break like in two seconds. So what other? What i'm gon na do is i'm gon na grab? My first braid and the first thing that i'm gon na do just to make sure that the curl is nice and clean. Is i'm just gon na comb out the bottom hair just so that there's no snags? It just looks nicer that way, trust me! So then, what i'm gon na do is i'm gon na start at where the braid ends and what i'm gon na do is i'm just gon na wrap the ends around the perm rod? Just like this, you see wrap it just like that and maybe i'll wrap it a little bit to get a little bit of the extra braid in and then what you do. Is you take that little rubber band side that i was telling you guys about and then you just close it and then voila voila super nice and easy all right, awesome, yay, all right! So when you're done, this is how all of your perm rods should look. Okay, make sure that all of them are relatively on the same level, i'm so excited. I know this is gon na, be a look there. You go so the next thing that i'm gon na do is i'm gon na boil some water, because that's the water that we're gon na use to dip our perm rods in okay. So make sure you guys have a kettle or whatever to get hot water. Make sure you guys have a nice cup, i recommend like a coffee cup or a cup, that's built for boiling water and make sure you have a towel, because this water is caliente. So you don't want it to get on your skin and you don't want it to get near your face because that you just don't want that. Basically, i'm saying okay, so after we've dipped twice and our hair is completely dry, we're going to start the curl takedown black leather glove, no sequins buckles on the jacket, nike crow's body got a all right guys and that's it for today make sure you guys, like Comment and subscribe to your girl so that we can be besties. Okay, love, ya and stay beautiful.

Comments
BlahGirl: If anyone wants a little hack, if braiding the hair into yours is hard. Keep the rubber band parts and just crochet the hair in and then braid down. Saves me so much time too! Much love!
lost in the cosmos: thank you for making this detailed they look bomb
Arianna Paul: just found this video on instagram and I love this look going to give it a try soon! :)
BlahGirl: Girl you DID that!! You are so gorgeous!!
milky snooj: So nice! Gonna try this tomorrow
Anekah Wigley: I love this look, If I get this kanekalon delivered I might attempt this.
Kelsie P: Cant wait to try these
ShauniceB: cute hun gonna try this!
Elease Barrow: I saw your video on TikTok and had to see all the products! Thank you.
DIY HUB: You're so talented....
Chaveley Wezer: itried it yesterday it worked out sooooooo fine but my heads a bit little so it was kinda hard im so thankfull its cuter then cute
Catherine Auguste: Lol why am I now just discovering this channel
P_nella: Which extension did you use sis and
nah ••: You're so pretty
Briana Shelton: Okay cutie!!
Bria Jewell: Pre stretched hair or no?
Kala George: JUSS LIKE DEH LMAOO!!
Queen Laurry Jonsson: Its voila not walla, u have to pronunce the v or else it sounds like wallah in arabic<3