Diy Wig Using Kanekalon Hair
- Posted on 15 July, 2022
- Curly Hairstyles
- By Anonymous
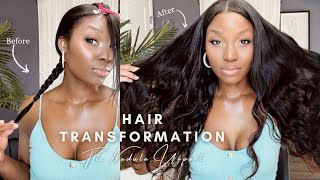
Hey Y’all! A lot of people asked about my hair so I felt it was only right to do a tutorial on this hairstyle. This took me about 6 hours to do but, I feel like having to record the process is what made it longer. The brand of hair I used is called Afri-Naptural in the color 1B and I got the bundle pack that came with 7 or 8 bundles. This style is so easy to do if you have the time, and can last you if you take care of the hair. I wouldn’t recommended sleeping in it if you want it to last longer! Thanks for watching and don’t forget to subscribe! #ambertriana
Connect w/Me!
Music:
Intro- Music by VirgoZilla Beatz - Aesthetic Groove - https://thmatc.co/?l=D24AF8CB
Background-Music by Naomi - A Place Called Home - https://thmatc.co/?l=9476F3C4
If you're like me, you know that hair can be really expensive when you're on a budget. I took this 10 pack of kanekalon hair and turned it into this wig and i'm absolutely in love. It'S giving a 70s blowout slash 85, and i'm literally obsessed with it. So if you want to see how i got this look stay tuned, so i start off by taking some yarn yarn that matches the color of the hair. So, in my case, black - and you want to find two different objects that are almost similar in height, because you're basically going to create something, that's kind of like a clothing line that will be the base for your track. In my case, i'm using my tv stand and my camera tripod, which is off camera. You can really use any household item from like chairs or like stands that you might have dressers anything it just as long as you can stretch the yarn, because you want to make sure you can pull it tight, because if you pull it too loosely or leave It loose you're not going to be able to judge how much space you have left as you go along and add the hair. So you want to make sure that it's pulled firmly tight so that you can have an accurate judgment and in terms of length, it really doesn't matter how long that's really up to you. I kind of like to just make sure that i have enough to wrap around my head. I think this was about 52 inches once you have that set up, you can begin the process of adding the hair. How i go about it is taking a small piece of hair and small enough to where it's kind of tiny like that and just wrap it around the yarn. It'S really simple and i'll show it in a second. All you do is loop, it and just pull it through the loop and that's really it you pull it tight and make sure that it's like firmly pulled and just make sure it's pushed over, i'm not sure if there's other ways to loop. This is just how i do it if there's a better way or more efficient way for you to do it. I would suggest you do whatever is the most comfortable for you, but i would just place emphasis on making sure that the pieces are small because you don't want really fat chunky pieces, and you can see here that sometimes like. I can't accurately judge how small the piece is, but as long as it's consistent in terms of size throughout little pieces here and there that aren't exactly the same, won't really make a difference. I'Ve made them larger before and that's why i'm saying this because it turned out fine, but it just wasn't as track like like it was too many spaces in between. So i feel like making them smaller makes it more track like, but it doesn't hurt if they're larger. I first saw this method of making tracks like this from a youtuber named delia's empire. This was like two years ago and i loved it immediately because i felt like it was so cool, especially because i love kinky, hair and sometimes kicking straight hair can be very expensive. So this was kind of like a cheaper alternative for me and i felt like it always turned out looking so natural. However, i would not suggest you do this hairstyle if you do not like to do repetitive things, because you're gon na be doing this for a hot minute, not like too long like this. Didn'T. Take me that long, like maybe two hours to complete all of these tracks, but for some that can be a lot. I work with my hands a lot, so this isn't really too much of a stretch for me, but for people that do you might want to consider another hairstyle tutorial, but i'm just going to work all the way until i get through the bundle i like to Just do a whole bundle just so it kind of feels complete. Once i'm done, i take my flat iron and press the top part of the track to basically seal the top and make it harden. I like to press and hold for a couple of seconds not too long, because i don't want to burn the hair, because if you burn the hair, whenever you comb it, it's just going to shed like crazy, and i mean it's already going to shed like crazy. Because it's kanekalon hair, so you want to prevent that as much as possible. I like to use a low heat setting that way. I can hold it for longer without it completely melting the hair. So if you have a flat iron and is able to do that, i would suggest that you put it at the lowest heat possible and work your way up. If it's not like melting it at all, because you want it to to be melted somewhat, just not completely and you'll know when it's hardened, because it'll kind of have like a shiny appearance, as you can see here once i'm done, i just kind of cut it Down and the way that i seal the ends is i knot it to as close as possible to the knots of the hair, because i want to make sure that it doesn't slip and slide too much, and this kind of prevents that this is how they look. When they're done, i ended up with four total and i only use three so when i begin to kind of put the hair on the cap, i kind of just like to go in a circle. I go around a couple of times, but not too many from the front, because i don't want the bangs to be super full, even though they kind of ended up being full anyways. But i want them to kind of have a little bit of a wispy appearance to them, so i kind of just wrap it around and i'm not going to show too much of that process, because it's really it's really pretty self-explanatory. Just kind of go around a circle and then you know just follow the shape of the cap. I also like to use the yarn to sew the hair. I don't use this for all types of wigs just this wig because i feel like it really secures the kanekalon hair, because when i comb it it barely sheds. When i use the yarn, i think the yarn has a more firm grip and it's more sturdy to me when i sew with the yarn i like to make sure i hold the yarn outwards. Otherwise, the hair will get caught up with the yarn and it will kind of just bunch up, and you don't really want that. So you have to kind of be a little bit more careful than maybe you are with thread, but i think it's worth it. So i'm going to sew all the way around and then i'll meet you back when i get to the top. Now i'm going to use this small piece to make a closure all i do is kind of wrap it around itself in a circle. It can be a little tricky and it's not going to look perfect and we're not aiming for a perfection here. We just want it to kind of look like a closure, because before i was just sewing, it closed and it just looked crazy from the top. So i want to be able to wear this in public, so making a little fake impromptu closure kind of gives it a complete look. So once i'm done putting it in a circle, i'll just take my flat iron again on low heat, not too high and just press it kind of close, i'm not going to hold it on there for long. I just kind of want to get it to stick together because in a second i'm going to kind of flatten it out and then press it again with the flat iron to kind of get it give it that flat appearance. I feel like i'm in sort of uncharted territory, because people don't normally make tracks with kanekalon hair. So it's kind of weird to try to make a closure with tracks that you made from kanekalon hair. I don't think i've seen people do it. So i know it's probably gon na look a little crazy, but that's because we're doing a diy - and it's not supposed to be perfect once i'm done with that, i'm going to take the glue and take the closure and press it into the glue and really press Firmly because you want it to stick and it will it'll stick and it'll stay once you press it. What i like to do to even help it further is turn it inside out and kind of blow dry it from the inside, because i'm going to put it on and it'll be sticky. Now this part is really up to you. How you want to style it um! I like to cut my bangs in increments as you'll, see here, because i want to be able to make sure that i don't cut too much because i've done that in the past and it's really irritating and defeating when i do that. So i like to kind of just: do it gradually just to make sure that i'm i'm not doing too much, but how you cut is totally up to you. I like to cut a little bit of layers around my face, not a lot just a little bit to kind of frame it a little bit because i'm gon na curl it with the flat iron to kind of give it like a more wispy appearance. I feel like i've used that word like four times today, but i kind of want to have it have that retro feel to it. So i think framing my face works now. If you want to do like the the straight look, that would be cute too um. I just feel like with this hair: you might want to curl it a little bit just to kind of make it look a little bit more natural, and here i am kind of just thinning the bangs to kind of make them a little bit more see-through. Not too much because i don't want to mess it up, because i've done that before and made it look really angular. This is just to make it look a little bit more spaced out and then i'm just going to take my flat iron on low heat. I think i had it on like five or i think, there's a setting right here that says low and i just kind of flat iron it and this hair flat iron as well. Not all connect line hair is the same. So i would just advise you to make sure that the hair that you do get make sure that it is able to use heat, and that is the final look. Let me know what you guys think in the comments. Do you think this is doing way too much for some cheap kanekalon hair, or are you absolutely in love with it? Personally, i love this um. I love putting time into things, even if i don't wear this more than like four or five times i just like the look, and i appreciate being able to get the look that i want without having to pay too much. Let me know if you have questions in the comments and have a nice day guys bye,
Comments
Marcia Moore: It is so cute! And u done a good job.
ukiyo: ive needed this forever!!
Carol Mahler: it looks awesome. what type of hair did you use for this project?
Derge Francois: I’m in loveee, how long does this last?
Devon Denson: You inspire me to create
Sisi Msgoodie: It's giving sza vibes