4 Back To School Hairstyles For Curly Hair| 2021
- Posted on 03 August, 2021
- Curly Hairstyles
- By Anonymous
Whats up you guys today I'm sharing some hairstyles perfect for back to school and even work environments!
I want to start posting once a week on youtube so feel free to leave any specific videos you guys want to see down below Love you and stay safe !
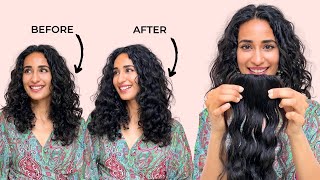
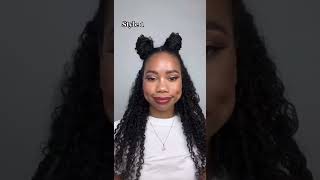
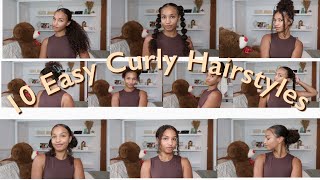
What is up you guys and welcome back to my youtube channel before we get started, make sure you leave a like and subscribe, because it helps me out a whole bunch and let's get into the video, i have been getting countless of comments, dms and requests to Do a back to school style video, so i obviously had to pop out with a youtube video for you guys, real quick just so i can give you guys, like a full detailed like how to, because you know a lot of my tech talks are a little Bit fast - and you guys want some more detail like okay, well, specifically like how does this work and da? So i was like you know what i'm just going to go ahead and post the transition parts on my tick tock and do like an in-depth youtube video for you guys, so you guys can really grasp you know how to do it and genuinely do these, for When you go to school, i've put together um four styles from like different hairstyles that i've liked - and i kind of just you know, put them together to create something that i thought was personally cute. That would be easy for you guys to also try out so yeah without further ado. Let'S get started into that first hairstyle. So for this style, i'm going to start off with a continuous spray bottle, and this is going to be filled with just a little bit of water and conditioner, and i'm going to go ahead and coat. My whole entire head just to make my hair a little bit softer and easier to part, then i'm going to grab that wide tooth comb and make a part directly behind my ear and go all the way around the crown of my head and creating a half Circle semi-circles, i mean. However, you say it um, then we're gon na take that piece and just decorate it from that back piece and i'm just going to go ahead and coat it again to make my curls softer and a little bit easier to work with your part doesn't have to Be like perfect, i mean obviously look at mine, i'm it's looking a mess, i'm still working on my parting, but back part, isn't as important as these front ones that we're doing right now, so you're gon na try to get these as straight as you possibly can It'S still not even that straight, but from afar they look good, so that'll work for me, so you're, basically doing two parts on each side of your hair, therefore, causing your hair to split into three different sections. I'M then gon na grab my smoothing brush and just brush out all around that area, trying to get that area nice and clean, and then i'm going to grab a quick rubber band and tie her up real nice and tight. I'M then going to grab the rubber band and pull it back out about an inch and reach through and pull through that extra remaining here, just a quick little loop through and she should look something like that and then we're going to go ahead and tighten it To the scalp, i'm going to repeat this whole process again, just taking my spray bottle. Taking my brush to smoothen out that area, keep it nice and clean. I'M gon na grab another rubber band to tie up that front piece nice and tight as well, and pulling that rubber band out just slightly and splitting it in half reaching in to pull our hair through doing our little loopty technique once again, and then we're going To tighten her to the scalp and by now i'm sure you guys understand the technique when full for that last piece, you're just going to do the same thing and look at how nice and clean she looks. It looks just like, as if you were like to braid to the scalp like i literally love this technique so much, but so we're gon na take our remaining hair in the back and give her a good old spray with our conditioner and water and we're gon Na pull it up, pull out a little bit of those side, curls and edges, and i'm continuing to work my hair up because we're going to put her in a half bun sort of so like on your last tie. You don't have to complete it all the way you're going to do something like that. Then we're going to proceed to flip it the other way so flip it right side up and fluff her out. Lastly, i'm going to work on my edges and i'm just going to add a couple of curls and just you know, work to get it nice and clean. I spray it with some got to be because we need that extra hold and then i go in with a silk scarf and tie it nice and tight. I usually leave it for around like 10-15 minutes, and here are the results. So here is the first style. All complete, i have a little shot right here that i had to take and it hurts really bad. So i'm like struggling to do my hair right now, but that's besides the point: here's how the hair is looking all the way around a quick little bun. You know and make sure she's even back there um. You know your hair is going to be out of your face, you're having something a little slowed down. It'S not just a boring little slick back. If you can't braid, that's cool because it still looks really nice. You know you touch up those edges and yeah yeah, so i'm in the process of taking them out and this style looks super cute down down. It looks super cute down as well so on to the next one girlfriend this time, let's get it so for this style, you're going to start with a deep side part, it can be your right or left whichever you prefer, we're going to coat that piece to Make it nice and soft because we want a smooth brush out for later. I'M then going to part that front piece all the way behind my ear. Just like that, so i'm going to create one little section like that. I'M then going to grab some gel. This is just some eco gel, it's the coconut version, the coconut oil version one and i'm going to slick down that top piece and give it a little swoop. I always like to pull out any little small piece of edges that i can play with for later. I'M then going to grab another piece of like on the back of my hair. That'S like connected to the way back and i'm going to tie it down to the same front piece just giving that front piece something extra to hold on to so we can stay nice and tight. So i'm going to use a rubber band and go ahead and tighten her again and fix up that little swoop area. I'M then going to create a middle part with the remaining of my hair, going all the way down, so we can go ahead and create two pigtails now warning, i'm not a professional and anyway. So again, these parts may be a little triggering because they're not going to be even throughout this style, just continuously check up on that swoop and keep her nice and clean until we put on that scarf. But now i'm just taking each side of my pigtails and tying them up into two little pigtails in the back, make sure you keep them bad boys, nice and tight, because you want it to look clean. So now i'm gon na go in with the edges. Once again, and i'm just trying to define certain areas, i added a little curl and i'm going to touch up on that swoop once again fill her in areas that i want to make sure stay, nice and slick throughout the day. I go ahead and spray with my goths to be and wrap her nice and tight with my silk scarf okay, so we have let this sit for about 15 minutes or so oh she looks so good. All right did i do this. I don't know if i did this side like if i drilled this side down, i'm just gon na. Do it real last minute real, quick, wow, she's cute. This is style number two for this next style. We'Re going to split our hair down in the middle. Make sure that part is nice and clean. I'M going to pull out a decent sized front piece before creating a part behind my ear and pulling up the remainder of that hair up into a little ponytail. Make sure she's, nice and tight and then we're going to do the same thing on the other side, so grab out a nice front piece, pull it up behind the air and create a tight ponytail once those two ponies are created. I'M going to take my rubber bands and just tie it little bubbles going all the way down and i'm just tying it twice each time and then fluffing them out once they're all tied. We are then going to take our bubble strand and wrap it around. Creating a cute little bun with it and you can secure that bun with a bobby pin once our two buns are completed, i'm going to go ahead and do some touch-ups. So that's going to be. You know perfecting those two little front curls, you know getting it to where it's not going to be completely in my face and just working around the whole crown of my head and just making my edges and everything, look nice and clean. I'M truly convinced that just paying that extra attention to the detail around your hair, it just really brings a hairstyle together, i'm going to leave the remaining curls out, so i'm going to go ahead and give it a spray with our conditioner and i'm going to take Some strictly curls just to kind of define those curls a little bit and you can't forget to wrap those edges up nice and tight for around 15 minutes, and once we take out this scarf. Here is the results and how she looks, and you can definitely take those two buns down and rock the bubble strands. I'Ve done that before, and it is also a super cute look. So, let's move on to our next style, so this is going to be our final style and this one is for the girlies that can braid. Now is your time to show out i'm going to coat my entire head with the product because we are going to be braiding, so i want this to be as easy as possible. I'M going to grab my wide tooth comb and do a part behind my ear. Connecting up to that middle part, so you should create a section that looks something like this. I'M then going to tie that piece just to leave it to the side for now and then i'm going to create that same part behind the ear. On the other side, i'm then going to tie back the rest of my hair, because i don't want any of my hair in the way, while i'm trying to braid i'm still a beginner, so i needed to be you know as clear as possible, but yeah. So i'm just going to start off by taking three strands in the front, and you know working my way down and just braiding it down to the scalp that one little piece all the way back, even once the braid is no longer touching the scalp. I'M going to continue to braid her all the way down. You guys look at how good she looks like i'm getting so much better and i'm so proud of myself. Yes, but um we're gon na continue and do that same thing on the other side, you know just work. Your way, look at how concentrated i am like. I wanted it to look as good as the other side, so bad, but yeah once your two braids are complete. All that's left is, like i said before, clean up those edges make them nice. Make them clean, make them detailed, so we're going to remove this scarf. One last time and boom, how cute, how shiny, how beautiful and that is style 4 - all complete all right, you guys, and that is the last style. So those are my four back to school hairstyles. I hope you guys found this video super helpful and hopefully you know you can rock a couple of these styles next week at school. Don'T forget to leave a like and subscribe because it helps me out a whole bunch and also check out my tik tok page, because i have a couple of cool transitions to these super cute styles and yeah. Here'S all my socials, where you can follow me and get some more info, whether that be for makeup hair room decor, all that fun stuff i'll see you guys in my next video bye,
Comments
Natalie: hey! just wondering if these styles are more for POC, or are they for anyone with curly hair? i am half hispanic with very curly hair and i don’t know if i would look good in these, they look so amazing though
Honey Vee: Ahhh we near have the same hair texture but I just can’t get my hair as healthy as yours ✋ What’s your hair texture?
Hannah: I have no idea what hairstyle I would do if our classes are back, I embrace my wavy to curly hair 7-8 months ago and now I'm used to my new routine (not washing my hair for few days or a week) and I really dont know what to do aside from ponytail, buns and let weigh down, this video is a big help, thank you.
DorianD: #4 is my favorite because I can braid and I think I’ll look good with it
saj: what products do you use to get your curls like that?
linawina: Are those ur natural lashes? If not where did you get them?Pls I need a makeup tutorial.
Faye Marie: I love this
mer -: love this<3!
lais reis: girll, pls, show your workout rotine, diet and everything
Brie: I LOVE YOU
Vlogs: LIFE SAVER
Neon Orange: Is it me or does she look kinda like Zendaya?
Danny Soto: Can u do this the night before?
Marlee Major: I was virtual for a long time and I go back to school in 5 days and I need more hairstyles for school like you are my fav youtube and I need more hairstyles. Because I'm in 4th grade and I need to stand out pls help me my hair is a mess pls I beg you so much you are a good hairstylist so pls HELP ME PLS PLS PLS PLS PLS PLS PLS PLS PLS PLS PLS PLS HELP