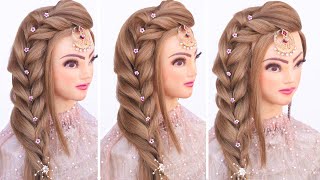
4 Easy Wet Hairstyles
- Posted on 29 September, 2016
- Easy Hairstyles
- By Anonymous
Four Easy Wet Hairstyles
Do you find yourself rushing out the door in the morning without having a chance to manage much besides throwing your wet hair on the top of your head?? () Then this video is for you! 4 super easy, fast hairstyles to do on wet hair! So hit that snooze button, ladies, and rock those wet hairstyles!!
Please subscribe! New Videos posted every Wednesday!
Follow along:
Instagram:: @_hairwithatwist_
Facebook:: Hair With A Twist
Website:: www.hairwithatwist.com
Email:: [email protected]
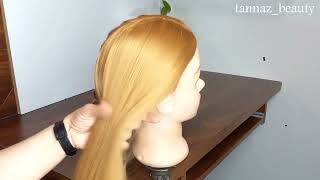
Hello: everyone, it's eileen from hair with a twist. This is my first full length video, so bear with me. Today we are going to be doing four wet hairstyles to start off with you're going to want to comb out the hair here, i'm using a wet brush, but you could use a wide tooth. Comb just be careful not to damage the hair and to start off with we're going to do the twisted bun you're, going to put your hair up into a high ponytail, making sure it's all smoothed out and that there's no bumps once your hair is in a Ponytail you're going to split it into two: take the piece on the right and you're going to twist it to the right and then twist it around the ponytail and then the second piece will be in the center of that bun. It doesn't really matter um. If you start on the right or the left, but just you're going to twist it one way and then wrap it the same way and then you're going to take the second piece and here you're, going to twist it to the left and then wrap it around To the left as well so that they're going in opposite directions and then you'll just pin all of the ends down and if you have some pieces that are still sticking up, that's fine we're going to pull it apart, a little bit more just so that it Has a fuller look and then, if there's still any pieces sticking out, you can leave it if you're going for a messier look or if you want it to be a little more sleek, you can just pin those right in and that is the twisted bun. Next, we're going to do the elsa twist, because this definitely reminds me of elsa's hair from frozen before it's in the big iconic braid. So what you're going to want to do is split your hair on the side, whatever side, you part, your hair on make sure it's all combed out and not tangled, and then you are going to part your hair off from your ears forward and you're going to Do that on both sides and then with the hair in the back comb it out and form it into a ponytail and then twist it into a bun and you're going to want to make sure that it lies flat to your head rather than bunching out. And then you can put a hair tie around that you're not going to see it. So don't worry if it's that it's not hidden and then the part with more hair side of your head with more hair you're going to twist back and then twist the whole piece and then wrap it around the outside of the first bun that you made. So this is going to essentially completely hide the hair tie, so pin that into place, and then you're going to do the same thing on the other side just twist it back. If you angle it backwards, it will hide the part line from sectioning off the hair. So you won't see it at all and then wrap it around the bun. If you have more hair you'll wrap it more times. Obviously the bun will look bigger and even if your hair is shorter than mine, it'll still work. Your bun just won't be quite as big and then you'll pin it in place and you're all done. That is the elsa twist. Next, we have a very simple top knot once again: you're going to want to collect your hair up into a high ponytail and make sure that it's all smoothed out and there's no bumps. This one is so fast. It'S such an easy go-to, but it looks so much more put together than a traditional, just messy bun on the top of your head. So you're gon na wrap your hair tie around it and then on the last loop through you're, going to pull it up and not pull the hair through all the way. And i look insane and you're going to want to pin the sides down to your head. So that there's no space there and then take all that hair, that's flopping around in front and separate it into two pieces now the piece that is on the right, you're going to cross over to the left and wrap it around and pin it in place. You want to pull it as far over as you can, so you don't have a mess of bobby pins and matted hair in the back, so try and keep it really smooth see i'm pulling it all the way up. So it might take a couple bobby pins to just keep your flyaways from the ends of your layers and then take the other side and wrap it around the other way. You can also do this on dry hair, but if you have layers, it's definitely going to work best when the hair is wet. If you have a lot of layers you're going to want to spray it to keep all the ends of your hair in place, but this holds up really well and then you can just kind of tug on it to adjust it place any bobby pins. If you need any more - and there is the top knot, next is the braided bun. This one is a couple hairstyles in one and it's a little more complicated, but still really fast. Once again, with your hair parted on the side, you're going to do we're going to do a dutch lace braid. So basically, what that means is you're going to act like you're doing a regular dutch braid, which is bringing the pieces under the middle rather than over. And here we're going to start with the piece closest to the face and bring it under and then the piece furthest away and bring it under add a piece of hair to the outside, bring it under the middle. But the back piece we're not going to add any hair to that's what makes it a lace, braid we're only adding hair to one side and what that does. Is it takes a lot of the bulk out of the braid and also makes it so that there's no visible part line so just adding hair to the front strand and then just taking the back strand and moving it under without adding any hair? And then, once you get to the top of your ear bottom of your eyebrow area, you're going to stop adding hair and just finish with a regular braid tie it off with a clear elastic and then we're going to pancake the braid. That'S just pulling on the edges and making it a little fuller and just has a really nice softening effect to it. On the other side, you're just going to twist a front section of hair back, that's just above your ear, and you don't want to take a lot of hair in this. It'S just enough to bring it back. If you have a long side, bang or anything. This is great in keeping it out of the way and you're going to join those two pieces together in the back with an elastic now take pieces from just above your ear, not a lot of hair just enough to pull it back and tie that off with Another elastic you're going to make a topsy tail out of that by taking that second ponytail, you just made there and flip it above the braid and twist pony and flip it under, and it creates a really nice loop effect on the side. Then you can take the hair tie out that was holding the braid and just comb that out then you're going to take that first section of hair that you tied back and just flip it over onto itself and make another little topsy tail. This just helps to hide the hair elastic a little more and you could stop here and just have that be your hairstyle and that's fine. I don't love the way my hair air dries, so i'm going to take it a step further with the remaining hair you're going to separate it into three pieces and just do a regular three strand, braid all the way down to the bottom, then we're going to Pull it apart, pancaking the braid again just going to give you a fuller bun. You could just leave it as a braid if you wanted to, but once again we're going to take it one step further and just make a little bun out of it twist it around itself and then pin it into place and then any pieces that are sticking Out just pin them in place with some bobby pins, and then that will complete our fourth hairstyle. If you guys, like this video, give it a thumbs up, give it a share. Leave a comment: i'd love to hear from you. This was my first voiceover full on youtube tutorial, so thanks for bearing with me till the end - and it means so much to have you guys watching and i will be posting every wednesday. So i will see you next week thanks so much you

Comments
Geraldine Monique: Very nice video, explained very simple but still very informative. Thank you so much, I will be sharing it with my friend that wants to know how to do that side braid.
amanda blunier: Loved this video..so tired of clicking on videos that say they are "fast and easy" hairstyles and then they end up being so difficult I can't even do them..I finally found your video and your hairstyles are so easy and so cute!! So thanks so much for making this!!
Funny Foxes: Wow the Elsa twist was so fast and easy I was running late for school with wet hair. Your AMAZING
Privee Sure: Thank you for this video. Very nice and easy to do styles.
Soozq 726: Great video, please ignore the negative Nellies :) Thank you for speaking and showing the steps slowly. Other videos are too fast and NOT easy! Lovely!
Mark: I liked the top knot style the most, I hope you continue to do other hair videos
Claudia Boczkowski: My hair is to long and thick and I can’t do anything with it when it’s wet and after my showers it can be wet for 24hrs
Ella Weise: omg ur hair is just like mine and you do stuff with it that IS SO PRETTY i’m trying these right now
Jillian Bright: Love the top Knot
katie.0brixn: the first one was the one for me thanks so much
peepeepoopoo: What! All of these are amasing and look really cool
Merlady Idaho: Love!!
manisha bhadoo: I loved The elsa twist
Aylinne Romero: Omg we have the same name mines is also Aylinne
Hallie Mott: my hair was so long and so thick and I wasn't able to do all of those hairstyles so I decided to chop my hair and I weighed it and it was 12.3 pounds
M A: Great video
Firdous S: We can never try this hairstyles for wet hairs coz this tight plats will cause u severe head ache and back neck pain
Myles Gray: Wet your hair with water
Lynn Ford: Wow you have very thick hair and very fast. How long have you been doing these styles?
Jasmine: But I have a huge head it dosnt look nice I love think a boy when I do all the hairdos
Prabhaker Reddy: Average
manisha bhadoo: Sorry no