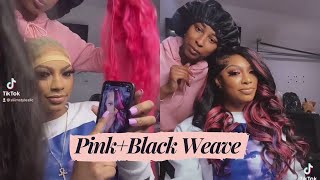
3 Quick & Easy Rubber Band Hairstyles On Natural Hair / Tutorials / Protective Style / Tupo1
- Posted on 10 April, 2022
- Easy Hairstyles
- By Anonymous
3 QUICK & EASY RUBBER BAND HAIRSTYLES ON NATURAL HAIR / TUTORIALS / Protective Style / Tupo1
Hey guys,
In this video I will be showing you how to achieve a 3 QUICK & EASY RUBBER BAND HAIRSTYLES ON NATURAL HAIR / TUTORIALS / Protective Style / Tupo1#protectivestyle #4cnaturalhair #updo #roadto500K. I enjoyed filming this video I hope you guys enjoy it too. PLEASE DON'T FORGET TO SUBSCRIBE, LIKE, COMMENT, SHARE & RING THE BELL so you don't miss anything.
Thank you guys for watching my videos
Have a blessed day
Love you guys.
VISIT OUR WEBSITE https://tutphil.com
PRODUCTS USED:
*4X DIY PRE-STRETCHED HAIR 50" (Color 1B I USED 1 PACK)
*Jumbo braid Kanekalon 1 pack (Color 1)
*Edges brush :https://amzn.to/38yykgF
*ECO Styling Gel 80 oz :https://amzn.to/2UkACYz.
*Wrapp-it Styling Strips : https://amzn.to/3nBK72z
Business Inquiries: [email protected]
Let's be friends on IG : https://www.instagram.com/tupo1/?hl=en...
Check out my videos:
HOW TO CREATE: NATURAL BRIDAL HAIRSTYLE on 4C HAIR /2020 - 2021 / PROTECTIVE STYLE : https://youtu.be/txBFUQc5ixE
5 QUICK & EASY HAIRSTYLES USING BRAIDING HAIR / Protective Style : https://youtu.be/30WBpayDcAM
How To: DIY JUMBO TWIST RUBBER BAND METHOD / Beginner Friendly / Protective Style : https://youtu.be/XUR6f5r2sdE
How To: DIY JUMBO BOX BRAIDS RUBBER BAND METHOD / Beginner Friendly /Protective Style / : https://youtu.be/TOtXdwZAgFM
How To: DIY CROCHET JUMBO TWIST IN AN HOUR /RUBBER BAND METHOD / Beginner Friendly : https://youtu.be/q9dY-svFoqQ
6 Quick & EASY Headwrap/ Turban Styles / Tutorials : https://youtu.be/12WMpIWMSAc
Camera I Use : Panasonic LUMIX S1R- https://amzn.to/3gHnN6L
Panasonic Lumix S PRO 24-70mm F/2.8 L-Mount Lens- https://amzn.to/3vniuxw
Editing Software- Final Cut Pro
Location : Rockville Maryland
Nationality : Malawian
KEYWORDS
Elegent updo
Sleekdown
Updo
protective style
THIS VIDEO IS NOT SPONSORED.
Hey guys welcome back to my channel, it's your girl tupo, if you're new here welcome, welcome. Welcome please subscribe like comment. Give me a thumbs up guys today, i'm going to show you three easy rubber band updos. So if you guys want to see how i achieve this looks, please continue watching all right guys. My hair is already washed and moisturized i'm going to be using my shine and jump. My rubber bands, my rocktail comb and my scrunchies to achieve this look. So what i'm going to do is i'll start by sectioning my hair from ear to ear just a straight line. You know exactly the way i'm doing, because i want to start working with the front first i'll, take my scrunchie and secure the hair in the back. So what i'm going to do is i'll start by sectioning, my hair from the tempo of my head on the side right there and it's just going to be a slanting line, going all the way to the back guys and then i'm going to take my shine And jump just to make sure everything is nice and clean or whatever, and then i'm just going to take my scrunchie to secure the hair first and then i'm going to section the hair again. So i want to do like two slanting lines on the front right there. Those are going to be like my little style or whatever, and then i'm going to do like a little um slick down. It'S just going to be like a little zigzag kind of situation in the front right there, sectioning into little boxes, taking my shine and jump, applying it to the hair, taking some more shining jar making sure you know it's really nice and sleek and then i'll take My rubber band and then make sure it's nice and secure. So, as you guys already know, i don't try to tie these rubber bands too tight because you don't want to break your hair or anything like that. Okay, so i'm going to section the third box exactly the way, i'm doing and then i'll take my shine and jam apply to the hair again taking the hair from the second section to the third section and then using my rubber band to secure the next section. Is gon na be the bigger section or whatever, but what i'm trying to do is i'm trying to you know i'm trying to have them like in a nice straight line all the way to the top right there. Okay, while we're still talking sis, have you subscribed to my channel, don't forget to turn on your notification button, so you do not miss out on any uploads, because this channel is getting what jessie. Yes, i'm going to go on the other side and do the exact same thing. I'M gon na take my water bottle spray to my hair and then i'll. Take my eco styling gel and apply some gel. You know all over the hair, and just you know slick it all the way down and then i'm just gon na pull it together using my brush. This is just my detangling brush, take my scrunchie and secure it, and then i'm going to go to the back again doing the same exact thing. Taking my water bottle spraying the whole hair apply some gel. You know all over the hair and just you know slick it all the way down and then once i'm done, i'm just going to take my scrunchie and make sure everything is nice and secure all right guys. So i'm using this twisted up 4x diy pre-stretched hair, and this is 50 inches guys. It comes four in a pack, i'm gon na use the whole pack, so i'm just gon na take a little piece right there, okay and then i'm going to take my crochet needle i'm going to place my crochet needle in exactly where i have the last rubber Band, you know situation over there, just gon na take the braiding hair place it on the crochet hook, pull it out and then i'm just gon na take my hair. You know section the hair into two and then twist it all the way down. So exactly the way i'm doing guys, i want it to look like have a little twist situation on the side. Once i'm done twisting the hair all the way down, i'm just going to tie a little knot at the end. That way it does not unravel once. I'M done twisting it all the way down, i'm just going to take my kiss edge, fixer and make sure my baby hairs are nice and latest, and you already know what it is by now. I'M using this brush that i got from um just gon na take my styling strips and make sure these baby hairs are nice and late. I'M using the same twisted up 4x diy braiding here, and this is pretty straight. This is 50 inches guys, i'm just gon na take the rubber band out and then i'm just going to take a scrunchie and secure it on the hair exactly the way i'm doing okay and then i'm just gon na place it on my head just gon na Section it into two and then you know just twist it exactly the way, i'm doing all the way down. Once i get to the bottom, i'm just gon na tie a little knot at the end. That way, it does not unravel very, very easy guys. Oh, my gosh, this is actually the easiest style. I mean this is cute and easy and fast 15 minutes since i was done and then once i'm done guys, i'm just gon na start. You know going around with this, making this into a bun exactly the way. I'M doing just start going round. I'M just gon na take my bobby pins and make sure i'm securing this hair on my head guys, then the rest of the hair, i'm just going to tuck it in taking some more bobby pins, making sure this bun is really nice and secure, and then the Spicy part of this hairstyle guys, i'm just going to take my little twist, i'm just gon na pull it to the front exactly the way, i'm doing and then start going around with it using my bobby pins to secure it. Making this into like a nice twisted bun with some little twists on the bottom right there you know me: i got ta, use some more bobby pins, just to make sure it's nice and secure baby and bad. When i tell you this little, cute style came all the way through. Yes, yes, i am living for this elegant twisted up situation, and you see my back is looking real cute too. Okay, this style right here is very elegant, very easy, very beginner, friendly 15 minutes. You are done and bae when i tell you this doll came all the way through as well. Let me know if you guys are feeling this hairstyle right here. Let me know if you guys are going to be rocking it this way or the first one. Let me know which one is your favorite style, because i love them both and i want you guys to try them. Both. My hair is already washed and moisturized. I'M going to be using my shine and jump. My raw tail comb, my rubber bands and my hair clips to achieve this look alright guys. So i'm just going to start sectioning my hair from the side of my head exactly the way, i'm doing just a straight line, going all the way down guys and then i'm going to take my shine and jump just to make sure the line is really nice And clean or whatever, so what you want to do is try to make this line as clean as possible. That side is going to be showing the whole time. So you better make sure this line is really nice and legit. Okay, once i'm done, i'm just going to take my hair clips and secure the rest of the hair. So what i'm going to do is i'm going to take my rat tail comb again and then i'm going to start sectioning their lines into boxes. So i'm just going to do like one box at a time taking my shine and jump, making sure the line is really nice and clean or whatever, and then i'm going to take a little more shine and jam. You know just to make sure my scalp is really nice and sleek, and then i'm going to take my rubber band and secure my hair. So, as you guys can see, i'm not securing it way too tight because i'm going to go back and then section my hair into two and then just give myself a little tug. This is going to take a little more shine and jump and then apply to the rest of my hair. Okay, i'm going to section the second box guys. So what i'm going to do is i'm going to do the same exact thing. Take my shine and jam making sure the line is really nice and clean or whatever, and then i'm going to take a little more shine and jam. You know just to make sure my scalp is really nice and sleek i'm going to piggyback the first section to the second section guys, so i'm not doing any type of braiding, i'm not doing any type of twisting. I'M just doing a simple piggy back. You know just taking the hair from the first section to the second section guys and that's about it once i'm done securing with the rubber band. I'M going to you know, do the same thing section my hair into two and give it a little tug. So once i do that, i'm going to take a little bit more of the shine and jump. Then once you get to the six sections you're going to do the exact same thing, so you take your shiny gem, apply to the scalp and section your hair uh into two and then you're, going to take your hair from the fifth section to the sixth section And then you're going to use your rubber band to secure it. Now, at this point, you're not gon na you know uh slick it down or whatever you're just gon na. Let it go we're gon na work with that a little later. Okay, so once i'm done, i'm going to be using my acre styling gel and my water bottle, as well as my diana brush for the rest of the style. So what i'm going to do is i'm going to take my water bottle spray, the hair and then i'm going to take my eco, styling gel and then just apply it all over and then what i'm going to do is i'm going to take the remaining of The pieces from the back, you know from the um from the boxes from each side, so i'm just going to combine those with the hair in the back. You know just exactly the way, i'm doing and then use my scrunchie to secure, make sure um. It is nice and sleek, but not way too tight that you're going to give yourself a head exit going to take my water bottle spray all over my hair and then take my eco styling gel, apply it and then use my scrunchie to secure once i'm done. I'M just going to take my styling strip and make sure everything is nice and light this okay. This is my styling strips. You know i got this from the beauty supply. You can get them from amazon, okay guys. So i'm going to be using this springy afro twist, and this is in color 1b. This is 16 inches and i'm using one pack. It comes three in a pack, so this is how it comes. I'M just gon na take it out of the pack. You know it's nice and springy, i'm just going to take my scrunchie and secure the top, i'm going to go all the way to the corner and then i'm just going to secure the top right there and then i'm going to take my styling strip again. Just to make sure you know, i don't mess up my edges and my you know my boxes or whatever, and then i'm just gon na take the um, the scrunchie with the hair on it. I'M just gon na place it on my head and then i'm going to flip it this and then i'm just going to start going around and making this into a bun exactly the way. I'M saying guys very, very easy and i'm just gon na you know twist it a little bit and tuck it in and use my bobby pins to secure it, and you know just make sure you're fixing it with your fingers and then i'm going to do the Same exact thing with the second one, as well as the third one says and bam. When i tell you this hairstyle came all the way. Yes, i am living for this natural bun situation. Going on these buns right here are giving me life. Let me know if you guys are loving this style right here. Let me know if you guys are feeling this elegant updo right here, because i am killing myself right about now. Let me know in the comments below how you guys are feeling about this style situation. Let me know if you guys think this is easy. You already know what it is by now. Okay, i'm going to take my styling strip and just you know place it on my head. That way, i don't mess up my boxes, i'm going to be using this curled hair, and this is in color, two t, one b, burgundy and i'm using two packs for this. Look. It'S gon na take it out of the box, so it comes on a scrunchie guys, so i'm just gon na show you guys you can actually take it out and just place it on your head or if you don't want to use the scrunchie, because it's not As stretchy you can use whatever scrunch you want to use okay. So what i'm gon na do is i'm just gon na take it out of the pack and then i'm going to take my crochet needle and place one strand at a time. You know on the crochet needle and then i'm going to place it on the scrunchie. So i used two packs of the hair i placed one on the top and then the other one, placing the other side and then the other one on the back and then the last one on the bottom. Okay. So i'm just gon na separate the hair took me about another five minutes just to separate the hair. I just wanted it to be nice and full. You know big hair, don't care, you know what it is bye now and then i'm just gon na take my scissors and just start shaping it, because i wanted to do a really nice mohawk on the top right there and that's about it and bam bam. When i tell you this mohawk came all the way through. Yes, i am loving this mohawk frohawk situation going on. Let me know if you guys are feeling it. Let me know if you guys are going to be trying it. Let me know if you guys think the color is juicy. My hair is already washed and moisturized i'm going to be using my rat tail comb, my shine and jam and my rubber bands to achieve this look. So what i'm going to do is i'll start by sectioning my hair from the side of my head exactly the way, i'm doing a straight line, going all the way to the top right there and then i'm going to take my shine and jump just to make Sure the line is really nice and clean or whatever anyway, so i'm going to do the same. On the other side, i'm just going to section my hair from the temple. You know on the side of my head right there and then i'm going to use my shine and jam just to make sure the line is nice and clean, and then i'm going to section the hair on the back as well. I'M just going to take my scrunchies just to hold the hair. You know out of the way, so i can work with the front first. So what i'm doing is i'm just going to start sectioning the front exactly the way? I'M doing so i'm going to section about four lines. Guys and each section has two boxes use my shine and jam. You know making sure it's clean and then i'm going to section the hair into two boxes. Okay, so i'm going to take my clips and just hold the hair in the back. I'M just going to take my shine and jump and make sure the scalp is really nice and clean, and then i'm going to take my rubber band and secure it. And once i secure the rubber band, i'm just gon na make sure it's not too tight. You know that i'm gon na get a headache or anything like that. You know i'm just gon na give my hair a little tug, apply some more shine and jump to the hair and then i'm going to twist the hair all the way down, and then i'm going to do the same on the second box guys. So the first line, the second box, i'm just going to take my shine and jam, apply it to the hair and then i'm taking my rubber band and just securing that as well. Okay, taking some more shining gem applying to the rest of the hair and then just twisting it all the way down, alright guys. So i'm going to section the second section: okay and then i'm going to section the boxes as well. So the two boxes on the second section, take my shine and jam and apply it to the scalp. You know just to make sure the line is really nice and clean. I'M doing the same thing, applying my shine and jam and then i'll separate the hair. I'M going to take the hair from the first section to the second section, but in a zigzag way in a crisscross manner. Okay, exactly the way, i'm doing very, very easy, you're just going to take the hair from the first section to the second section in a crisscross manner and that's about it and then you're just going to use a rubber band to secure it. Why was you talking sis? Have you subscribed to my channel? Don'T forget to turn on your notification button, so you do not miss out on any uploads, because this channel is getting what juicy? Yes, today's shout out goes to trudian nukes. I hope i'm pronouncing your name right, sis. Thank you so much for supporting my channel. Thank you for rocking with me. Thank you for all the love. I really really appreciate it. You are everyone today, okay, sis, taking some shine and jump, applying it to the scalp sectioning, the hair into two take the hair from the first section to the second section in a crisscross manner, and then you're going to secure it with the rubber band and then Once you're done, you're just gon na give yourself a little tug, taking some more shining jam, applying it to the hair and then twisting the hair all the way down. Very, very easy guys. Even if you haven't done any of the rubber band techniques that i've shown. You guys this one right here says star: i mean give this a try. You know just be patient with yourself. It took me about 30 minutes to do this, but i'm sure it's going to take you a little longer, but that's okay, sis, if you're doing this for the first time, you know it's not going to be as easy as i'm saying, but it's easy once i Secure the hair with the rubber band, you know giving myself a little tug, i'm not going to do the twist on the top right there, because i want to be able to take the hair from the last sections together and combine it with the hair. In the back guys, okay, i'm going to be using my eco styling gel my water bottle and my dana brush to sleek the hair down in the back. So what i'm going to do is i'm going to give myself a little base on the top right. There spraying the hair with my water bottle, taking my eco, styling gel and then applying that to the hair. I'M not gon na go into sections in the back. I'M just gon na you know spray the hair in the back and then i'm going to you know apply my eco styling gel just to make sure everything is really nice and sleek. I'M just gon na make sure i apply enough eco styling gel i'm using my brush. You know just to make sure everything is nice and sleek okay and then i'm going to tie that on the base that i have on the top right there all right guys. So once i'm done sticking the hair down in the back, i'm going to do some sections on the sides right there, because i want my hair to be really nice and sleek. So what i'm going to do is i'm going to go into sections when i'm slicking the hair down, so i'm going to section the hair, take the water bottle, spray, the hair and then use my eco styling gel and then do another section and spray the water Again, use my ink styling gel and then use my brush to make sure everything is nice and light, and that's what i'm going to do until i get to the front. So once i'm done with one side, i'm going to do the exact same thing on the other side, sectioning the hair spraying, the hair with my water bottle, taking my eco style in gel and then applying that to the hair and then using my brush to make Sure everything is nice and light and, as you guys can see, this actually helps me lay my hair down, especially if you have 4c hair. Like me, sis, you better try this technique right here. This is connect colon guys. This is 3x. It comes through in a pack and if i want to have like you know a natural look, if i want to have like something that looks like my natural hair, i usually go with this look right here. It actually looks like my natural hair, so i love this hair right here and it comes three in a pack and i'm going to be using two of them right now for this style right here, okay, you know i'm going to secure the hair with the scrunchie Once i'm done securing it, i'm just going to stretch the hair, you know just to make sure it looks really nice and realistic or whatever, and then i'm just going to place it on my head exactly the way i'm doing and then i'm going to flip it And then i'm going to take a little bit on the side. You know just a little piece from the side and just to make sure this is really nice and realistic, and that's about it very, very easy, very beginner friendly anybody can actually do this. Thousands, and when i tell you this style, is easy peasy i mean come on. If you haven't been able to do any of my styles, this you better be trying this one, because this one were her this one where hers is. It is easy, peasy, lemon, squeezy. Okay, once i'm done going round guys, i'm just gon na take my bobby, pin and secure the hair exactly the way. I'M doing. Oh, my gosh. This is actually the easiest style right here and you can actually tell already the hair looks really nice and clean and bad. When i tell you, this style came all the way. Yes, yes, i am living for this ponytail right here. Let me know if you guys are feeling it. I got ta give you options. Okay, so today is about using the same kinetic long hair. I just wanted to show you guys you can actually rock this hair in different styles and i'm just going to section the hair into two and twist it all the way down. So exactly the way, i'm doing guys very, very easy. Once i twist it all the way down, i'm just going to take a little rubber band and secure the bottom that way it does not unravel and baby. This dial came all the way through as well. I am feeling this twist situation going on. I love it on the sides, but you can throw it to the back. You can throw it to the sizes you can do whatever you want with this twisted pony situation going on. I cannot be the accessorizing queen without adding some accessories so babe here you go. Adding some gold accessories and you took the style all the way to 100. Let me know if you guys are filling this out right here. Let me know if you guys are going to be trying it gon na give the the twisted pony a little twist again. Okay and then i'm going to flip it to the top exactly the way, i'm doing, securing that with some bobby pins and then i'm going to take the third piece from the hair guys. The last piece that was remaining um from the pack and then i'm just going to twist that on the side and place it on the top right there and then i'm going to you know secure it with some bobby pins, taking the remaining of the hair. You know just tacking it in on the side right there and that's about it and babe. When i tell you this came through as well, i am living for this crown situation going on. Thank you so much for watching my videos. Thank you for subscribing. Thank you for liking. Thank you for all the love i am receiving on my channel. I cannot believe i am here today. Thank you from the bottom of my heart. You guys are the real mvps make sure you share this with your cousin, your best, your mama and your aunt sharing is caring and i will catch you guys in my next one. You
Comments
Kui WaKamau: Hi siz, I love this style too. U make it look so easy to achieve it and it looks beautiful too. Thank u for this. Regards from Bavaria Germany
Sandra Jackson: Gorgeous hairstyles! My favorite Mohawk buns! I like all the styles! Most definitely will try these styles!TFS
Juevette Weaver: Love it!! Your styles got me through some events!! Definitely plan on trying these!!
Grace Agbakwuru: they're all absolutely gorgeous. I particularly love the last one with the ponytail.
Latoya Lucien: Girl, u out did yourself sis! My birthday is on Thursday and I'm definitely gonna try one of those up do's! Much love from Trini❤❤❤❤
Sharon Manlove: Your hairstyles are the reason I continue to love my 4c natural hair. Those styles are on point. Can't wait to try them.
esther michael: I love your creativity. Always coming up with gorgeous styles.
Sandisiwe Madzwila: I'm definitely trying these you always come through for us
Elizabeth George: Greetings my Sisterrrrrrr you always come through for me it's like you know exactly what I need my daughter ❤ You to she's always looking forward for another hair style I have a dread & I still practice ur styles in my hair you're unique you're Heaven sent ✨ great job Respectttttttttt Alwayssssssss
E Littlejohn: Omg your styles are amazing and I love how you explain and show each step. I am so glad I found your channel. Thank you for being creative with natural hair.
Kajika Kalaaratri: You blessing my life sis...now I don't have to wear a scarf all the time I can do these easy styles and be cute ❤️
Abigail Brewster: I have been looking for a simple mohawk style that I can do for myself and I do think that I have found it!! This is gr8! I am not very familiar with the hair game but I'm in!
Stella: You are always on point,Miss Tupo.keep the styles coming in,love it.
Monique brown: You are the best sis thank you so much for teaching me these styles.
Debra jones: sis you giving me life with them easy hairdos ❤❤❤❤❤
Charity Kwaghngu: Miss Tupo I love every of your styles. Have tried so many already really nice and easy. Good job sis.
Tiesha Mack: Sis you are amazing I love your videos and the styles are gorgeous you never disappoint so glad I found your channel
Claudia Thomas: I love them all. Wow! I will be trying them. Thank you.
CrazyNaturalPrincess: Perfect styles, every time❤️❤️❤️❤️
bella kinish: I just tired the second style with rubber band method you use for the first style using passion twist. It looks absolutely gorgeous
Jackie Kent: Queen thank you so much . You just gave me some great ideas you look Gorgeous!
Becky Love ,, Expert ☀️☀️: amazingly coming out perfectly
Sarah McNeal: Those styles are great thank you I was looking for easy summer looks .
Thandie: I love all the tutorials❤️ Very easy...
Bernice Odonkor: Wow! Wow! Sis you always surprise me. I love them styles
jelithaful: Perfecto, amaziiiing as usual sis. Thank you so much. We appreciate you ❤
Adel Deng: My Easter style has landed Thank you for this sis
Benita Wisdom: Tupo u are a supper self stylist honestly am trying dis ❤️❤️❤️
Jennifer Smith: I've watched so many of your videos and I love the hair styles, but most of all your personality is absolutely great and you know how to hold a person interest, you know or "what evva"
Jay WhoLovesEveryone: ooh, Tupo! I am ALMOST sicc o' you, Chile! You killin' me with these styles! _I looovve them_
Amanda Leeks: Beautiful styles! My favorite is the mohawk buns!
Ora Harris: ❤ love all the styles, definitely trying
Jamilah Perry: You have amazing skills!!!! They all look amazing!!! My favorite is the Mohawk.
Rose G: Happy Sunday sis, this is a fabulous treat, all of these beautiful hairstyles, i will try all of them but my favorite is the curly burgundy one take care see you in the next one.
biclvr: …. And also those biceps. Your workout realy does it job. Look at those peaks, not even flexing. Very cool.
Beverly Shealey: I love watching your channel you be showing out with the hair sis
Sylvia Smith: Beautiful styles, thanks for sharing
Mosella Felder: Fabulous style as always!
CeeCee Tracey: Those first two styles I LOVE. The Burgundy mohawk is fly too.
Terresa: Tupo you did it again girl!
Mosella Felder: I absolutely love these hairstyle!!!
Emeth: I like both of the first two styles, but I am a sucker for a bun. I love both of the mohawk styles. Wow, I love the pony styles. You make it hard to choose a favorite. I guess I need to do all of them.
RosemarieGrantWalker: Okay! I'm not that computer literate! I found your videos. I LOVE YOUR ENERGY! Yessssss, Sis!
Dolls Way!!!: Loved all 3 styles!!! FIRE!!!
Marilyn Wilson: Every hair style you do I like and you do it effortless I wish I had your skills
Drbeautyglam: OMG !!!! I LOVE how easy u made everything look I LOVE yer styes that u created I wish u lived next door 2 me
Mrs. Smith: My dear thank you for your videos, you are very talented, I'm loving your hairstyles!!!
Angie Jarvis: Wow!!!!...Thank you..I love the styles..you are so creative...
Philomena Kasambwe: Beautiful work❤️
White wolf: I love those hairstyles and I always try your hairstyles I think this going to be hard
nellz lioness: Love them all ❤️❤️❤️
CoCo Bee: I can't wait to try these styles, especially the mo Mohawk
sheryle garrett: When I get up the guts, I'll will try this one too!!!
Felicité Leny: Amazingly genius
Alice Onuh: Very lovely styles
JANE AJUH: I. Love the last one it's so beautiful
Naturally Jordan 🤍: Okk Queen You did THAT !
Judith Gondwe: Babyy I am feeling all these styles, u are killin it my sis
Myra's Studio: Beautiful thanks for sharing sis
Jennifer Ford: Loving the styles.
Raqy #Blessed: The last style and the Mohawk one
stacyann oxford: Wow I love them both you go girl
Lucilia's Kitchen & Lifestyle: LOVE THEM ALL ❤️ THANKS TUPO ❤️
Trudie-ann Nooks: Styles are Popping Sis
Stephanie Williams: Hello I like them both!!
Dk Muthie: Good work madam , do you have somewhere where you can accommodate an attachment for cosmetology students this approaching may??
Sharon Mazibeli: I love all your tutorials
Hairstyle GalleryHQ: I am gonna give you a thumb up right now
Tamny Fitzpatrick: I love it and I will try it
Natalie Mukundu 4c Hair: Amazing video
Maria Geralda: Amei
Mcia somp: Very cute i would love to rock it
sindisiwe ncube: Waal I love your hairstyles. My sister, you have a beautifully smooth face.
angeline Mudyara: Ooooooh gal all the styles are a bomb . But I love love love the not mohock one .
caribbean girl TV: Where can I get that hair you used in your last one? Please and thank you
jehovah jireh: How do you make your natural hair to be soo easy to work with without blowing it.
Angel Ashton: Look at sis pulling out the hair I got laying around. I got 50“ in and really wanted 60“ (had 60“ in storage). Now I have something to do with those packs.
Tea Cup: Soooooooooo freakin cute!!!!
Amina Namusooko: Excellent work
Linda Loving: Great I will be trying
stacyann oxford: Girl your one of the greatest
Florence okoko: Beautiful
Linda Loving: Beautiful
Denise Hawes: I love the last one more ❤
Janna Bee: I wanna try all the styles especially both mohawk styles. But can u tell me the name of the red hair specifically. Plz and thanks
Monique Blair: I need these!
Kelly Wilson: I love ❤️ both
Grace Designer: Hi sis, you are fire .
Ohvie Quarshie: Thank u,God bless u
Elizabeth George: Love ❤ those earrings
Cee: Make it look so easy
Denise: What is the name of the hair that she used for the Mohawk??
Wetozze Adalefina: Thanks ❤️❤️
Penny Howard: Love the fro
sharon holden: What kind of lip stick and lip gloss you use. It’s so pretty.
New Account, Who Dis'?: When I searched on Google for hairstyles your picture came up on so many websites. I saw three that use the same photo of you but they use an overlay and change your outfits. And now the real you pops up into my feed lol
Kumah Juliet: Wow you look beautiful sis
chizelmichael: They are all beautiful styles, but babee that earring is gorgeous
Lihle Thobile: I love your styles sis ,big up,whr can I get those scroching I don't know what you call,am in South Africa, please help
Asuko Babra: The styles are okay n easy to make but i would lyk to pardon me on the gels u use thanks