Salon Blowout At Home With A Straightener | 90’S Blowout Waves | Hair Tutorial Laura Marquez
- Posted on 04 May, 2021
- Hair Styling
- By Anonymous
Hi everyone! Welcome back to another video! Today’s video will be my first beauty video on how I style my hair. See how I create a 90’s blowout using a straightener and what hair cut I typically get to achieve this look. Let me know on the comment section below if you’d like to continue seeing more beauty content!
Let’s connect!
My Instagram: https://www.instagram.com/laura.amarqu...
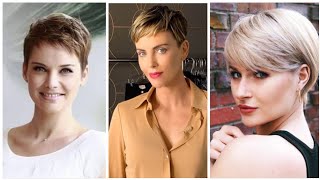
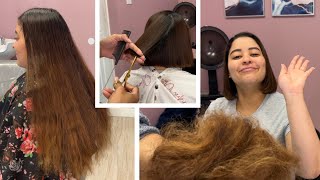
Hi everyone welcome back to my youtube channel for those of you who are new. My name is laura and welcome to my channel um for today's video. I am going to be doing a hair tutorial. I'Ve been receiving a lot of comments and a few dms on my instagram account regarding how i style my hair and just what type of haircut do i get at the salon. So before i go ahead and start on the styling portion of the video, i will be telling you guys the type of haircut, which i think is really important, especially if you guys want a similar look, such as mine like, if you guys want your hair to Look exactly or at least similar to mine. Let me tell you what i asked for at the salon, so i usually go to one hairdresser only we are pretty close. I go to her all the time, so this is what i ask for um. The first thing i do say is that i want a u-shape in the back, so what that said is when you put your hair in the back right here and you show yourself in the mirror, you will get a u-shape right now. It looks a little choppy because you see my layers because it's all straight right now with on top of that i do have bed hair. So this is me in the morning right now, but it is a u-shaped. Another thing i ask for is layers so mine's about a medium length right now, it's below the shoulders almost hitting my bust area here, but i do ask for long layers. So long layers will typically be at the ends. It won't be choppy everywhere. So you kind of don't have to look like a christmas tree, so it will be long layers and yeah. They do texture it and everything so it blends in well. This is what it looks like with bed hair, so i don't have too much flyaways except this one here i did ask for a few levels of layers, so usually about three just so it's all at the bottom here and then. The third thing i asked for is it's in style right now, but it's those curtain, bangs um. The only difference is, i didn't get full on current bangs, where it's shorter and it'll cover your eye area. The only reason is because i have really fine asian hair and i don't want to have those flyaways in the morning. You can kind of see an example here with my baby hair from my pregnancy, my post pregnancy. I did have a little bit of hair loss, but it's all growing back now, um yeah, so you will see a little bit of my flyaways in my past videos and future videos, but anyways it's growing back - and i do not want this as my bangs. So i do get longer curtain bangs guys, okay, uh, that's about it! As for what i asked for from my hairdresser uh before i go ahead and start the video and show you the styling portion, uh, please feel free to like and subscribe. If you want to continue seeing videos such as these, this is my first uh beauty content, video, which i i'm looking forward to creating this as as of right. Now, just because i've been waiting for that confirmation from everyone, i wasn't sure if you guys were interested in the beauty side of me, anyways um, yeah feel free to like and subscribe. I do have an instagram right over here. If you guys do want to follow me on there, i do post fashion and lifestyle inspo content type of stuff i'll put the days. You know that type of stuff but yeah feel free to um. Follow me on there and yeah just get into the video i'm rambling again, let's just get into it all right, so i have the strainer all heated up during my little intro portion of this video um. My hair is already brushed, but i will brush it again. So, like i said, my hair is pretty straight: it's pretty fine. If you do have the same type of texture, it should be easy for you, okay, and it also depends on how you like to part your hairline. I usually like to have it more towards one side, as you can see right here, especially with the type of style i have. If i had it on one side, then the crane banks will mostly fall on one side, so you can see that in a lot of my instagram videos or instagram photos and posts and also my youtube channel, i do the same hairstyle ever since high school trust. Me all right, and then i just do it - i split it apart, so you have even amount of hair on each side yeah. This is what i use here. I just got this from target: it's pretty inexpensive. It works perfectly fine. It doesn't really matter the price, wise um. It gives the same amount of quality, and what's nice, that you have the temperature mode here i usually stick around 25. You do not want to burn your hair, so that's what's great about this strainer. Is that it's quick and easy compared to a curling wand, which i do have it takes longer and i feel like i always end up burning myself, because it's more exposed but yeah. This is what i do so i will be starting with the first portion here at the front area and what i'll do is bend. It outwards away from your head and you kind of already see here the volume of it and let me just go ahead and continue doing that, for you guys just little portions, if you did a thick portion, you probably wouldn't get the curl right away. Unless you have really um thin hair, i would say mine's a little in between, but you start seeing it and then just continue going outwards. Okay, you can also clip your hair in portions if you'd like to do that, but i kind of just keep track of it. I don't. I have clips bumped, i'm too lazy, so i just kind of like section it off you kind of know. When you're getting your hair, you can see the layers all right, but you see how long i use the strainer. I don't use it too long. It'S just literally a swoop, and that's it depending on how your hair is and how long it holds the curl will depend on how long you should leave your strainer on your hair. For me, my hair holds the curl pretty well, so i don't even have to like leave this on my hair, that long again, another layer all right, so you kind of see it it's more of a wave. It'S not much of a curl um. If you were to do a curl, you can certainly do that with the same movement. So, instead of going there, you would keep going outwards. My hair, i mean my arm, looks kind of weird right there, but you can kind of see the curl right there. That'S just a little demonstration if you guys do want to end up curling your hair. For me, since my hair is midi length, i just like to wave it. If you do curl it, it will um, your hair will rise a little higher and it will look shorter um. Now, if you do do that, you can always just brush it down and it will weigh down, and you can always add water through your fingers and run your fingers through your hair. Like that see, it has more of a curl right there, and what's also good about layers, is that you could just totally play with each layer and wave and curl it and it'll still look effortless in the back it'll. Just look like a bombshell type of hairstyle like you got ta blow out. So if you definitely want that, look like in the victoria secret fashion show you'll definitely get that with this type of layer and wave. You could already see right there. Okay, again, we'll be going outwards, so you can already see the difference in one side versus the other, and i didn't even use any product which will kind of it's kind of great. I don't really use product to be honest unless i am going out, i want to cover flyaways or i want a little more tamed for a photo other than that. This is what i do see that you got a little curl there but yeah. I love it. Okay, so you have one end already, and i will be doing this one right here and this is the portion where you have most of the curtain. Bang so again same movement, same position, moving away from your face and your head, and you get that curl wow guys. Look at that. You get that again now, what's also good about just going outwards. Is that when you do push it to the back i'll show you, after the end of this video, but when you do push it to the back all the hair goes. You will get more of that u-shape and they'll all curl in one position versus everywhere. For some reason, it's curling more on this side. It'S not a bad thing, but i just noticed. Maybe i have more layers on the side. I don't even know okay and then from there you can already see which ones have been curled. So another reason why i don't really like pin it in different sections: my lips are so dry. I didn't even put chapstick. I'M sorry course. This is the last strand guys i am done. Let'S make sure yeah, i got everything and that is it turn off your straightener, so you don't burn yourself, and that is my hair, so that is what i do. That is like my hair and all my videos. It already has volume, as you can see, so i really don't add anything if i do want to tame it a bit because i do have flyaways and a little more texture, then i'll wet my hands and then just run my fingers through my hair, but i Kind of like how it looks right now and how the light is shining, the lighting is perfect right. Now it's still warning here in san francisco, so yeah. This is my hair guys if you guys are interested in seeing the type of products i do use. If i do want to tame it, i could show you one and my little armor here, sorry guys, okay, so this one here guys is the holy grail. I don't even know if you can see it. Let me show you right here: it is the holy grail, anyways, it's by r plus co, and it's the dark. Pomade stick this. Oh my gosh. It is perfect if you guys want to get rid of those flyaways on top. What you do is you just put the balm right there and look how tasty? Oh my gosh. Now these here are a little more of a they're, more stubborn. It will. It will be tamed for a short time but anyways like any flyaways. On top of your head, just had it there and it's a little more tame. So if you guys are trying to take a picture or you just want to look a little more clean cut on top, i recommend this pomade guys. This is oh, my gosh. This has lasted me a long time, well, yeah it'll. Last me a long time. It'S practically like almost like a glue. Stick. Looking thing you just like place it on your hair, yeah, that's what i use another product right here, two other products i do use on. My hair, if you guys, are interested in those, is the shoe and shoe emiura shumura art of hair moya holds so this one's kind of like a finishing spray. This one kind of gives you a more harder texture, not too hard, though uh you can. Even you could brush it through afterwards, so it kind of softens out. We just shake it and put it everywhere, so the hair stays in place. This is perfect for those of you who don't the curl, doesn't stay that long or doesn't have a strong hold on your hair. Then i do recommend the shoe mirror. Art of hair moya hold spray finishing spray and then for those of you who want to style your hair, real quick, but you guys can take a shower it's a little oily. This is perfect. This is a living proof, perfect, hair day, dry, shampoo, this one! You don't know how many times i've used this i'll, even use it if i'm just doing a slick, bun but i'll just go ahead and spray it around and then brush it through. Okay, spray, it far away because you do want to see a little bit of a white powdery cast first, but yeah. Those are the products i use on my hair, nothing crazy! This is just how my hair is. It just has that volume, which is why i always touch it. I always want to make sure it has that poofy voluminous volume and then i will also show you what it looks like in the back here and yeah. That'S the layers on the back of my hair and the u-shape you can kind of see already and how all the curls at the ends kind of just fold in to create that u-shape. Alright, guys! That'S the end of my video. I hope you guys enjoyed it. Um, as i mentioned before, this is my very first beauty type of content video. So if you guys do like to continue seeing more, please feel free to comment down below on what you guys like to see. Until then, i will see you guys next week feel free to like and subscribe if you'd like to stay in touch with post notifications, and my instagram will be right up here as well. Alright, you guys take care and have a great year day, bye,
Comments
Stacy Hills: GIRL u dont UNDERSTAND how much I needed this. I’ve been wanting a blow out look for so long and I could never do it! Or it would never sit longer then 20 minutes. I googled blowout look with a straightener AND this is the best tutorial ever. It loooks Amazing and it sits all day and night. IM SO THANKFUL FOR THIS
L K: i love the way this was filmed, felt like you were my older sister and i was in your room and you were teaching me how to do my hair for the first time, really comforting and relaxing thank you for the tutorial i'm going to try this method tomorrow!!
Karo Demar: This was the easiest tutorial I have ever seen, will try this ASAP
bella ivanova: omg this looks so easy!! I literally cut my curtain bangs a week ago and have been dreading having to use rollers every-time but this looks sooo easy I have to try it asap
michellejy: whoa... i didn't know you could do that so easily with just a hair straightener. i used a hair dryer and hair rollers in my video to get a 90s blowout look, but this looks so much easier and less time consuming! i have to try it out next time :)
Time U: My gosh you make this look so effortless!!! I need to try this now I’ve been planning on buying rollers but I wanna try this first I’m from the City myself and I hate how the weather kinda makes my hair heavy towards the middle of the day, but I trust you!! Wish me luck
Melissaa: Can we please talk about how freaking amazing this hair technique is??! I LOVE THE RESULTS, thank you for saving me girl <3
Katie Snider: I'm so happy to see someone with the same hair achieve this look! Thank you for this!
Ashley Brannon: Thank you for this tutorial, I get a lot of compliments when I wear this style! It’s easy & looks amazing!!
Tracy Moore: This was such a great tutorial! Thank you! It also reminds me of a classic Kate Middleton hairstyle! I also love how you decorate with all the white and the gold mirror frame. So elegant!
likkxs: ive had layers for like a year and have never been able to style them properly. this legit just saved my life. just tried it and im blown away. didnt even take 5 mins. i am in shock
Marcela: This looks so beautiful and easy, thank youuu! and you are gorgeous! :)♡
Karen Molina: Lo hace ver tan facil , te quedo hermoso❤
Farlie Solomons: This looks so beautiful and easy, thank youi
Marie Fran: Simple yet it works! Maybe a makeup tutorial next time? :)
xime 12: New sub! I love it you made it look so easy! ❤
hana lol: 4:50 is when she starts :)
Lisa Dumitru: This is such an amazing tutorial!! thank you soo much for this!!! I was wondering what is the name of your hair straightener!?? I really want to buy one and this one looks soo good!!
Ashita: Thanks! This was very helpful!
Alyssa N.: I’ve been wanting to try this!!!
mr. bean fan 2006: you are stunning!! gonna try this tonight
Maribel: You had a baby? You should do a video about postpartum “bounce back” tips! Great video, will definitely be trying this
GroovinFairy: This is the best hair tutorial on YouTube. I would love to see more tutorials filmed like this. It made the look so easy to replicate. Thank you so much, seriously ♥️
Amie: I love this so much! Thank you! Could you share the name of the straightener from Target that you’re using?
xo: Loved this! What straightener do you use? Did I miss it?
Maya: definitely gonna try this! what heat protector you use?
C T: you deserve so much more subscribers!
Nadia R.A: Hello! Me gustó tu video. Que marca de straightner usas porfavor! Gracias!
Brynne Stover: I have naturally curly hair and I don’t have layers so… HOW DOES IT FEEL TO LIVE MY DREAM AHHH AHGGG
luff oxox: Thank you so much for this❤️❤️
Ari: Heyy i love this it looks so easy but before i try it i just wanted to know if it will still look like a blowout if i dont have layers? ❤️
Nancy Orellana: Loved it !!
Keila Ximena Mazariegos García: Loooove your channel :D keep going grl <3
ku200986: Pretty!❤️
Ainaa N: i love this so much <3
Heffojeffo: Omg thank u for this u have subsided my uncontainable urge to buy a Dyson air wrap
Eliza Eberhard: hiii, i was wondering what cut you ask your hairstylist to do? it looks like you have short round layers but i want to make sure!
Nay: Hello! I loved the video! It's the easiest tutorial I've ever seen! What kind of haircut do you have?♡..
MiraTV: Im abt to try this with my sew in for school,wish me luck
NELSIE: You’re so classy ♥️
jos: your vibe is so calming
Evin Boga: It Looks so easy But when i do it, it Gets straight do you know what i can do when this happened bc i really want this Blowout
E B: Does this work if I don’t have layers? And also you are so beautiful ❤️
Dat Cat: "My post pregnancy " caught me wayyy off guard. Could have sworn you were 18
Rubyy: This is the best thing ever girl ily
Cafeteria Soup: Oh my good girl!! What is that vanity??? I want one ahhhh
Rubyy: You should do a 10 things I can’t live without video
Renegade Renegade: So underratedddd
Jo-Anne Winmill: Is it just me or does she look like Mulan its like seeing my fav Disney Princess as a kid in real life
lil hellmouth: big sister energy
Wafa Suwaileh: Girl great tutorial thank you so much! But that’s one long ass intro
Eirini Dekavalla: I LOVE YOUR ACC THANK YOUUU
Clay P.: What's your hair straightener?
bernie flores: a fellow bay area baddie <3
Ri Ya: Love ur mirror.
siriusloveshismoony: i love u ong