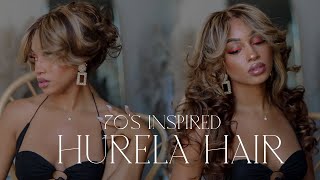
70S Inspired Hair Tutorial | Dyson Airwrap Complete Hair Styler
- Posted on 01 January, 2021
- Hair Styling
- By Anonymous
70s Inspired Hair Tutorial | Dyson Airwrap Complete Hair Styler
Hey Everyone,
I hope you're all well and keeping safe! Today I have created my 70s inspired curls using my Dyson Airwrap kit.
Products I used:
Bstyled Blow Dry Balm - https://www.bblondehair.co.uk/item/73/...
Bstyled Smoothing Spray -
https://www.bblondehair.co.uk/item/68/...
So Eco Biodegradable Detangling Leaf Brush -
https://soinvogue.com/product/so-eco-b...
Dyson HS01 Airwrap Complete Hair Styler -
https://www.johnlewis.com/dyson-hs01-a...
Check out :
ELLIOTS NEW VIDEO: https://www.youtube.com/watch?v=Dkh1nf...
ELLIOTS CHANNEL : https://www.youtube.com/user/BOTBEllio...
Make sure you like this video and subscribe to my channel for more content coming soon!!
-
FOLLOW ME!
INSTAGRAM - @Poppylinehanx
-
Email: [email protected]
Thank you for watching xx
Hello, everybody, i hope, you're doing well and keeping safe. Now in this video, i'm going to be showing you how to create this gorgeous bouncy wave hair. Look. So if you would like to see how i create this using the dyson airwrap kit, then please keep watching the first step to this style is beginning with wet hair. I have just come out the shower and washed my hair. We are then going to want to prep the hair, because prepping the hair is the most important step, i'm going to be using two jerome russell products. I love this brand they're vegan and cruelty free, of course, and the two products i'm going to be using is the blow dry balm. This is a heat protection and it actually protects up to 230 degrees. Although the dyson air wrap is really good for preventing heat damage, i still like to use this just in case, because it's always good to protect the hair. Also, it leaves my hair feeling really nice and gives a good smell, so i enjoy it. For those reasons too, the next product i'm going to be using is the jerome russell smoothing spray. I love this because it controls any fly. Aways, you may have with your hair, which is fantastic when you're drying it and styling it, because you want it to look as smooth and silky as possible. So i love these as a duo, they're, so good and we're gon na be popping those on now now with my so eco detangling brush, i just like to quickly brush all the product through, so i have an even distribution. So i know that my hair is 100 prepped and ready to go so now is the parts that we've all been waiting for and it is dyson kit. Oh, my goodness, this is my baby. This is my child. I am so in love with this kit. Honestly, it's so amazing and i highly recommend i was very lucky to receive this for a christmas present by my lovely boyfriend and i have enjoyed creating so many different hair looks with this kit. Although i know it is more on the higher end of the price range for hair dryers, but honestly, once you go dyson, you will never want to go back honestly. These products are so amazing and i'm going to show you how amazing they are in this video. For today's look, i'm going to be using two different attachments. The first attachment is the actual hair dryer attachment. This is to get our hair damp, not fully dry, because that is what we're going to be using the second attachment for, and that is the smallest barrel. This creates the cutest curls and i absolutely love the look that we will be finishing with i'm now going to be using the hair dryer attachment first and clipping it in this is so easy to do. Honestly. It was that easy and i like to use the hottest setting to dry my hair and the most amount of air pressure. So the top one there i'm gon na dry, my hair until it is slightly damp and then we will move on to the curling part. But for now let's try the hair before we begin with the error i like to just give my hair a quick brush through just to get rid of any knots that we may have created when drying our hair. Now that our hair is nice and knot free, i like to take the top section up of my hair and clip it up. So we can start to air wrap our hair in layers. It just makes the process a lot easier and you get those really nice and defined curls. Now the air wrap is super easy to use. It literally does all the work for you. All you need to do is take a small section of hair and get the air wrap and pop it towards the end tips of your hair. The air wrap will then suck the hair in and start to curl it. What i like to do is once all the hair is up and into the air wrap i like to hold the hair there for about 10 seconds and then put onto a cool setting so that the curl can set and then slowly release. This should produce the cutest little curl. All you want to do is now continue this technique all the way around your hair, so you can produce nice curls all around the bottom section of your hair. So i'm now taking down the top section and i'm just going to repeat what we did before but on the top section is so easy to do. Honestly. If you can see the hair literally just gets sucked up inside dried and comes out curly, it's literally the best thing i have ever used and saved so much time. Let'S crack on and do the top half of our hair. The front part of my hair always dries a lot quicker, so i quickly went off camera and just put a little bit of water on my fringe part. So i can crack on and start curling the front of my hair, and then i will finish off the rest of my hair and come back to you when the hair is finished. Now that all the curls are done, i'm going to brush this side out because, as you can see, they're quite tight curls and i like a more like kind of brushed out. Look. So i'm just gon na grab my sewico brush again and just brush through the curls like so and oh, this look is so nice and guys. That is the finished. Look how gorgeous and easy was that to create? I am so obsessed with this. Look i feel like it has such a retro vibe. I live for the fringe. I feel like i'm going to the disco honey. This look is everything i just feel so glam, but it was so easy to do. I'M literally living my hair fantasy. I am obsessed. This look was so easy to create and i hope my instructions were easy to follow. But if you do have the dyson air wrap, then you do know how easy these kind of looks are to create. Although i know it is a little bit more on the pricey side of hair tools, but honestly, once you have a kit, you literally have everything you could ever need in there, and you can create. Looks like this highly recommend a dyson air wrap kit. You can't go wrong. I really do hope you guys enjoyed this video and that my instructions were easy to follow. If you do recreate this look, then please don't forget to tag me on instagram. With your looks, i would love to see how you get on honestly. This is so easy to create and anyone could do it. So i would love to see if any of you do recreate this, but for now guys, please don't forget to give the video a big thumbs up, don't forget to subscribe and hit that post notification bell, but until the next time guys stay safe and i will See you very soon bye, guys
Comments
Megan’s Mind: LOVE this look Poppy + the video too! Beautiful girl, happy new year ❤️
Summer Sadie: Such a helpful video! Absolutely love your hairstyle! I couldn't tell for sure, but it looks like you change the direction of the curling rods while creating your hairstyle. Is that right? Also, what hair texture do you have - eg, fine, thick etc.? Also love your sweater! That color blue is beautiful on you!
Caitlin Golder: Your hair is amazing
Elliot Stephens: I’m glad you like the dyson air wrap hair looks great