Step By Step Beachy Waves Hairstyle Tutorial For Valentine'S Day Ft. @Prakritisingh | Nykaa
- Posted on 07 February, 2023
- Heatless Hairstyles
- By Anonymous
With Valentine's Day right around the corner, it's time to start thinking about your look for the special day. Planning out your date night look is a taxing task as it is and Valentine's date calls for something a little extra special. If you are looking for a relaxed yet captivating look for your hair, then we have got you covered! Watch this video where Prakriti Singh teaches you how to create a simple yet stunning beachy wave hairstyle that is perfect for any occasion, whether it's a brunch date or a romantic evening. With this effortless hairdo, you're sure to leave a lasting impression on your significant other this Valentine's Day.
#ValentinesDayHairstyles #BeachyWaves #DateNightHairstyles #hairtutorial
Shop the products below:
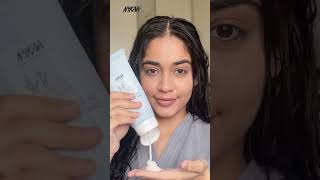
BBLUNT Hot Shot Heat Protection Hair Mist: https://bit.ly/3HWSqkX
Philips BHS393/40 Straightener With Silkprotect Technology: https://bit.ly/3wZQSS4
Liked this video? Also watch:
2 Easy Ponytail Hairstyles You Must Try | Messy Textured Hairstyles | Nykaa: https://youtu.be/OlDSi_ZcJ10
Cute & Simple Hairstyles Ft. @vitasta | Nykaa: https://youtu.be/pGkNHd2IdgE
Nykaa is an online multi-brand beauty retailer. It is your 'Beauty Buddy', which makes your life a whole lot simpler by not only providing you with expert advice and guidance but also by shipping products right to your doorstep. Find videos on makeup haul, makeup tutorials, skincare routines, flawless skin secrets & much more! So subscribe today and stay gorgeous. ;)
Download the Nykaa app here:
Android: http://bit.ly/2zYmP1f
IOS: http://apple.co/2iKfg4c
Follow Nykaa:
Facebook: http://bit.ly/NykaaFacebook
Instagram: http://bit.ly/NykaaInstagram
Twitter: http://bit.ly/NykaaTwitter
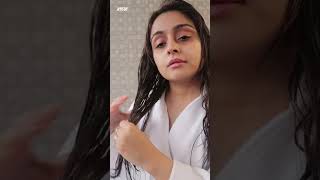
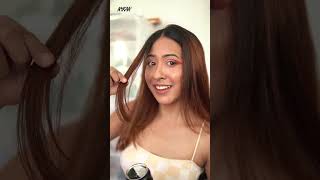
Hi everyone welcome to NykaaTV, I’m Prakriti. And in today’s video, I’m going to show you How to achieve this super easy, beachy, wave, hair look.. It makes my hair look super voluminous and bouncy.. This is also a perfect hairstyle for a brunch date Or a date night. Look. Now I have pin-straight fine hair with very little volume.. So this is the perfect effortless hairstyle for me.. You can wear this with any outfit or makeup look.. This is also my go-to hairstyle.. This video is going to be a step-by-step tutorial, So it’s going to be super helpful for beginners., So let’s get started. Before anything, I’m going to use a heat protection mist., Because I’m going to use heat on my hair. I’ll be using a straightener.. The mist that I will be using is the BBLUNT Hot Shot Heat Protection, Hair Mist.. This is for all hair types.. I used this on my damp hair before blow drying., So it’s already there, but I’m just going to touch it up a little bit. Before I go in with the straightener.. You also have to focus it on the ends.. The straightener that I’m using in today’s video is the Phillips Silk Protect Straightener. What straightening will do is it will make your hair super smooth. And it will make sure that there are no knots in your hair. So I’ll just tie most of my hair up And just straighten the part. That’S down., I’m straightening, a lot of hair in one. Go Because for me this is just to get rid of excessive moisture from my hair.. Make sure that you are combing your hair before straightening, So that there are no knots in your hair.. You can also skip the straightening process If your hair is not super silky. Or if it doesn’t hold a lot of moisture., So always start with the hair. That is near your nape and move upwards.. In the end, you want to curl your hairline., So I separate my hair from here Like right above my ears., You can just create a rough bun.. You don’t have to be super precise., So I like curling my hair with a straightener, because I have short hair. And I feel like it’s, easier to curl my hair with a straightener. I’m, going to take one section and show you how I actually curl the hair. I’Ll just take the straightener I’ll place it here and give it a curl., And then you just pull it out.. As you can see, I did curl this anti-clockwise., Which is away from my face., So I’m going to curl the next strand towards my face.. This is going to give your more volume. This time I’m going to place the curler like this, Because we are going to curl it towards my face.. Then just go like this and pull it out. Don’t have to put a lot of pressure because there is already heat involved., Make sure that you’re taking smaller sections. And not a lot of hair in one go. Because if you take a lot of hair in one, go It won’t, curl, properly. And after curling, I just give it a twist and leave it.. So I’m going to repeat the same thing on this side. I’m, going to curl one side first and then I’ll move to the other side. For taking down a section. I’M again, placing my finger over here Near my temples, I’d say. And then go back and take that hair And pull it out from the bun. And then I’m just going to clip the rest of it in place.. I’M just going to start taking sections from the back as you can see.. If you straighten your hair before curling, You can easily differentiate between straight and curled hair.. Another thing that I want you to know Is that go slow with the curling.. Make sure that the front pieces are always curled away from the face. And never towards your face.. Now I’m going to take another section. Try to work with smaller sections, as they are more manageable. Now generally. For me, the whole process takes 20 minutes.. It will take more time if you’re curling, your hair for the first time. It’s super easy once you get used to it. Now for the section at the top of your head, Curl, the mid-lengths properly., Your hair has a little support at the end, But the mid-lengths Flatten out easily. Go a little slow when curling the mid-lengths. Here, I’d like to remind you that Keep alternating the direction of the curls.. This applies to all the sections and not just the one near your nape., The smaller the sections, the more defined your curls are going to be.. So if I want the waves to stay all day long, I need to make the waves a bit more defined.. Otherwise, it will straighten out in a few hours., Just trust the process. It will look wavy in the end.. Now I don’t have to create a separate section for my back, Because I get all of that hair in these sections.. You can also create a separate section from the back., But generally for me, it’s difficult to curl the hair at the back. So I take it to the sides and curl it.. The reason why I keep my curls a little bit tight right now, Because they are going to open with time. And they will look more like waves instead of curls.. So in about 20 minutes, I’d say They are going to open.. So now I’m just going to adjust my parting. Now I’m, going to show you how I curl my hair at the back., Take the straightener very close to the root., Give it a twist. And then just pull it out. For the crown You would want to take The straightener parallel to your head., Get the strand and give it a twist., Then pull it up for a tighter curl.. If you want a loose curl, you can pull it to the side.. So this is how my hair looks after curling.. Now, what I’m going to do is I’m going to run my fingers through the curls.. This is just to kind of loosen them up a little bit., And this will also separate the strands. And that will make your hair look more voluminous.. So this is the finished look.. Your hair is going to look super voluminous.. It also feels very, very bouncy. And that’s it for this video.. I really hope you enjoyed watching this video. If you did find it helpful Don’t forget to give it a thumbs up and subscribe.. Thank you. So much for watching., Bye,

Comments
Nykaa: Hey #NykaaFam! Hope you enjoyed this super easy hair tutorial which is perfect for a date night especially since Valentine's Day is right around the corner Get your hands on the products below to recreate this stunning look: BBLUNT Hot Shot Heat Protection Hair Mist: https://bit.ly/3HWSqkX Philips BHS393/40 Straightener With Silkprotect Technology: https://bit.ly/3wZQSS4
Tamyang: Your makeup looks flawless ❤️
Ayanokoji: Amazing look
Prapti Buragohain: What are you using to maintain those curls? I have type 1a/b hair and curls wouldn’t stay for more than 2 hrs tops
Lasa M: Plz upload nykaa femina beauty awards 2022
Miss Alive: This is not thin and fine hair
Kapil Vig: Hey Nykaa.
Kapil Vig: Hey Nykaa
Jagrati Singh: ☹☹☹☹☹☹