The Ultimate Guide To Mini Twists For Natural Hair Growth!!
- Posted on 05 April, 2022
- Heatless Hairstyles
- By Anonymous
Here is your ultimate guide to installing mini twists for natural hair growth! I'm going to give you a step-by-step tutorial on how install my mini twists starting with a blow out featuring a review of uncle funky's daughter's maximum thermal protection line! Make sure to subscribe for part 2 of my install of mini twists for natural hair growth on fine natural hair!
Time Stamps
0:00 - 4:00 Blow Out Routine
4:01 - 8:19 Parting Plan
8:20 -13:31 Install for fuller-looking twists
13:32 - 15:44 Finished look
✨I’m on the road to 20k subscribers! Please help by subscribing to my channel if you like my content! ✨
Check out my Amazon store for all my fave hair products! - https://amzn.to/2jWXTkw
_______________________________________________
Let’s Stay Connected!
♥TikTok : @Neliabedilia_ ( https://www.tiktok.com/@neliabedilia_ )
♥Instagram : @NeliaBedilia ( https://www.instagram.com/neliabedilia... )
♥Snapchat: NeliaBedilia
♥Business Inquiries Email : [email protected]
_______________________________________________
♀️My Current Favorite Natural Hair Products! ♀️
♥Leave-In Conditioner- https://amzn.to/2FN3ket
♥Clips - https://amzn.to/2U7yYHsDeep
♥Rinse out Conditioner - https://amzn.to/2CDqosM
♥Gel - https://amzn.to/2Mm6BT5
♥Edge Control - https://amzn.to/2CzubYk
________________________________________________
MORE Videos!
Chunky Twist Out → https://bit.ly/2R5IKMr
Extra LONG Spring Twists → https://bit.ly/2rJQJjZ
My Mini Twists Protective Style → https://bit.ly/2xRuig2
DIY Sugar Wax → https://bit.ly/2YNS8Ey
5 Spring Twist Hairstyles → https://bit.ly/2Wte0Yw
__________________________________________________
My Tech Gear!
Camera: https://amzn.to/2SN39DL
Lighting: https://amzn.to/2C5hfsX
__________________________________________________
Music:
-Gal. 4:7-
# Hashtags
_________________________________________________
DISCLAIMER: This video and description contains affiliate links, which means that if you click on one of the product links, I’ll receive a small commission. This helps support the channel and allows us to continue to make videos like this. Thank you for the support!
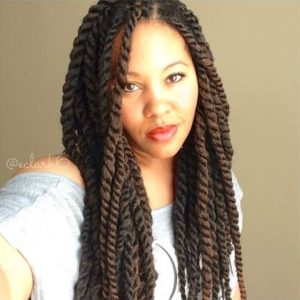
Hey guys, what's up it's your girl, amelia welcome back to my channel in today's video we're going to be doing these mini twists on blown out natural hair and to get this blown out. Look we're going to be using and reviewing this maximum thermal protection line from uncle funky's daughter. They were kind enough to give this to me and it comes with their whole entire line. You get the shampoo, the conditioner, the primer, the split end, serum and a shine booster, so we're gon na review and use all of these okay guys. I just got out the shower. I sound congested. It'S because i am it's allergy, there's a lot going on. It'S springtime. I just finished washing my hair with the shampoo and deep conditioner. So far, no complaints, i will say the deep conditioner i had to use a lot of it to get it through my hair and also the packaging that bottle um. Well, let me just get it for you, this whole squeeze it out. The bottle system doesn't really work for the consistency of this it's kind of thick, so that was kind of hard to get out. This system does not come with a leave-in conditioner, so i ended up just putting in my own leave-in conditioner um, just a light. Leave-In conditioner. Now i'm just gon na. Let this um air dry a little bit and i'm going to blow dry it and apply their products and blow dry it and then yeah. So i'll see you guys in like a few hours, so after shampooing and conditioning you're to follow up with their primer, which is their basic heat, protectant spray. And, of course, you guys know i had to smell make sure you know everything was good over here, but this was a very fresh fruity smell. All their products do smell the same. So i did love that, and this is just like a light mist spray. Then i followed it up with the split end serum, which is like this light and creamy texture and you're supposed to just focus on your ends, of course, and i actually really really liked this cream now split end remedies you know, but this did make my ends, Feel really really nice at the end of this blowout. So that's probably one of my favorite products on this line. Next, we're gon na follow it up with their shine booster, and if you guys remember this kind of reminds me of like the the gloss polishes we used to buy back in the day. This is basically what that is, and it gives a really good shine to your blowout. You can put it on before you blow your hair out and afterwards i decided to do both so before blow drying. I decided to go through a couple of my parts and apply all three of these products. Now i will say that was kind of tired, so i'm just having a whole bunch of products. So i will definitely let you know near the end which products i think you should pick up specifically so we're just going to use the comb attachment on my dyson and just kind of go through my hair. I make weird faces when i blow dry. I don't know what it is. I don't know why i look disgusted, but i promise you. This is not like a hard process or even a tedious process. I love my dyson. I love how fast it works is so here's my hair afterwards and i will say it still smelled, really light and fresh. I loved that i added some more of the shine booster. You know just to add a little pizzazz at the end. You don't have to do this, but i added some of that in there i will say my hair didn't feel as dry as it usually does when i blow dry my hair i've spoken before on my channel about how i hate the dry feeling about you know. After you blow dry, obviously, but it actually felt pretty moisturized and my eggs felt really good so that split end serum in that primer. My faves, after that i went to bed because we all know many twists are like a three-day project. So this is just a little style. I put my hair in just a flat twist going back into a bun. Okay, hey guys it's the next day and i actually went to the gym with my blowout so um it is a little shrunken. The other things i do and that i added just recently into my regimen to prevent you, know the itchy scalp and the dryness, and everything is this, as i am dry itchy scalp care, the olive and tea tree dandruff oil treatment - and this is the this - is What it looks like - and it also has salicic acid in it about 1.8, and that also helps just combat itchiness and dandruff, and anything like that. So if you're ever like dealing with itchy scalp, which i have a plenty of videos on that on my channel, this is definitely a really great oil. That i love like all i do is apply this to my scalp one time once a week, and i feel good we're doing these a little different, this round of mini twists. So i followed this girl on instagram. Her name is curly code black. I believe something like that and she lives rides or dies mini twists, and you can follow her and see her growth journey with her mini twist they're gorgeous they're, beautiful, so one of the tips she gave for laying down her mini twist is she uses a micro Lock grid pattern. Now i've talked about my grade pattern here on youtube with how i get them to look thicker, and this is kind of similar in pattern. So if you follow that video you've seen that video, i use um a gridlock, bricklaying method and it's kind of similar like that. There'S just more sections and more like straight parts and it's another extra step. So i want to try it out see if it's a cleaner see if it does give a even thicker appearance like let's see how my hair reacts to it. It does add an extra 30 minutes to the whole micro um micro, not my girl. The whole mini twist process, but i do want to try it out and just see how my hair likes it once i'm done parting, i'm going to um well here i'm going to show you a picture of like the parting that i'm going to try to do It looks like just this: is its own i'll, explain it after i part, so i'm going to just try to mimic that photo and kind of just get my parts to be boxes and whatnot. So, let's see how long this takes me, i'm definitely gon na time. It for you guys so um. Let me get started i'll, be back when i'm finished partying and i'll. Let you guys know how i went. Okay, i tried so basically here ear to ear. I have four sections ear to ear the back. It gets a little winky, but i'm sure to you guys so the bottom i did just two big boxes and then i kind of did four across they look kind of wanky. I know, but here's box one two, three four, then the top i just kind of like triangled it out, or maybe it's better this way so the top. I just did one two three right here in the center crown area like three triangles, not the straightest. I think it didn't have to be too perfect and i can clean them up as i go so that took me okay, so that took me about 30 minutes. Like i thought i don't know, this is gon na help or do anything on my necklace. But it's time to start twisting, so my favorite all-time product right now for mini twist is this, as i am twist defining cream, it's phenomenal. It provides shine. It provides hold it's just, but in combination with this um i'll probably use a light gel or i might just use the big papa from um the do today's mini twist. Combo is gon na, be these two, so i'm gon na get started. I'M gon na. Do these two sections in the back at least because i hate filming the back and i hate doing the back, because it's tiny it's shorter back here! So once i get more close to the front i'll show you guys how it's looking, how it's going and all that so uh yeah, see you guys soon. Okay, guys, hey welcome back, it's um a few hours later, so i'm working on this side. I have the back and this side done so we're going to work on this side and the sides always like the best side to kind of catch on camera. Basically, as you can see, i can't decide if the whole sectioning, like their micro locks thing, is working. I will say it's helping me keep track of how much i have left or everything, so i probably won't be able to tell till the end. But meanwhile, i wanted to just update on the bricklaying method that i like to use to make my hair look thicker. So, as you can see, i already did this row with four mini twists and yes, i have low density, um, fine, textured hair, so they look really tiny. We'Ve been here with this conversation already anyway, so i always talk about laying the next ones in between these boxes, so it can look more full when it lays down so um. The easiest tip i've learned is actually just put the comb. The pointer like right in the middle of the braid and then curve out your next box. Let me demonstrate so i'm just going to in the front here. I'Ve also laid some edge control, which is actually not laying that well and i'm not sure why. But it's not my favorite edge control, so i'm not surprised it's acting up so we're just gon na like do a sliver. Oh no, my comb literally just broke garbage. I do like a little sliver of hair so making sure that's the right thickness, maybe a little more okay get that out of the way. So this is the piece we're gon na work with now. If you see these little pieces of my hair that are really short, you can refer back to my faux loc, takedown, video and i'll. Explain all of that part where this box is part right. Can you see that right down the middle of this box so boom that will ensure that the next row of mini twists will start laying correctly put it in between this one like see how now it's going to lay right in between those two, that's what we Want i'll show you guys just how they kind of lay down when i'm done. So i'm also using that, as i am cream on here and i just kind of dab just a little bit onto this section and then i grab a dab of the gel onto the section and like always, i'm starting with a mini braid and then i'll start Mini twisting so now you can see how this lays right in the middle of these, and this will just give the illusion of your hair. Looking fuller, fuller, the more you do it up. You go so basically, as you can see, they're all falling in between each other and it'll. Look so much better when you're like styling it like give it that full illusion if you have thin parts, so i'm gon na finish the rest of my head. With the same manner, with the same parting method and um, i have this much left. So just these two squares and these middle squares and then i'll be done. Wish me luck guys. So here we are looking flat. Um, here are all the parts, though, and how they're looking i hate the first day of mini twists, because they do look really flat on fine textured, hair and the way my hair is cut. I think they just lay kind of wonky here they are here's. The back i haven't even seen the back myself, so you guys get the first look. I will say the parts are super clean and that sectioning them in that micro lock technique, definitely um helped. I don't see any harsh lines or anything and they're laying pretty nicely so um, not a bad method at all. I don't think also i like to mention that i did trim my ends while i was doing this so not every single twist, but a majority of them got like a cute little dusting on them. So it's also a good time to like check your ends when you do this style, it's a good length tracker, so my mini twists are definitely longer than my other mini twist video, so that's fun to see um. I can also see like what parts of my hair are longer than others and how it's kind of uneven. So that's just something for me to keep in mind um overall. This did take me gosh. I stopped last night. My hair is shorter. Now so it doesn't take me as long, but i will say i'll probably say five to six hours broken up. So i did three hours last night and then i just finished today and that took me maybe an hour and a half so five to six hours. I'Ll round up, please stay tuned for part two, where i'll actually show you my weekly maintenance, routine. What i do on a day-to-day basis, thanks so much for watching, i hope you enjoy it again, like i said, make sure you are subscribed and turn on your notification bell. So you don't miss my second mini twist video going into even more detail and tips, and things like that so yeah. Thank you guys so much for watching. I hope you enjoyed give me a like if you did join the family and i'll see you guys next time, bye,


Comments
NeliaBedilia: This may be my fave set on my new short cut! Look at that growth
Curl Code Black: Yassss queen loved this tutorial! I love how detailed you were showing each step ! Im going to try doing mini twists on blown out hair The grid and parting is soooo good ! Loveeee how your mini twist came out Thank you so much for the shout out queen! I really appreciate it!
Aliyah Carty: I love mini twists!! They are my go to style. But I definitely have to work on my parting lol!!
CammyjOfficial: yes! Love love love mini twists! You are the queen of this style!
Tristian Cunningham: I love how your mini twist come out everytime. We have very similar hair and I can never get my mini twist to look like this. Maybe my hair is a little too fine ♀️. I'll keep trying til I get it right. Great job and thanks for sharing
Joanna M.: They look great!! I need to try this
Mandisa McClary: They look really good... Nice job!
Sherrie H: How long do you keep it up? Do your retwist or take it all down and do it again?
paris october: I really want to try mini twists! I just don't have the patience! Maybe i'll do it soon.
Fasting My Way to Jenn: I love mini twists. They are versatile.
Phenomenally Patty: The amount of patience! but oh so pretty!!
CCCRRR: I really like these
LaToya TV: I can not do mini twists again, it took a week to take down
JaiChanellie: Yo background music got me knuckin and buckin lol