How To Do Melted Lace Wig Detailed Tutorial | Make T- Part Wig Look Like A Frontal Beginner Friendly
- Posted on 19 April, 2021
- T Part Wig
- By Anonymous
#LaceWigTutorial #DetailedBeginnerWigTutorial #WigDealerMeltingSpray
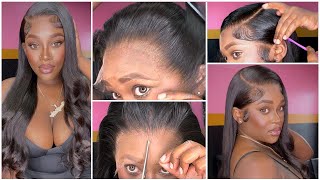
See how to melt your lace wig and protect your edges at the same time in this detailed lace wig instillation tutorial! In this video I do a detailed beginner friendly tutorial on how to install a lace front with with a bald cap! This is very detailed and shows all the products needed to do a bald cap, install your lace front wig as easy as possible! This is the best Amazon wig I have found! It’s soft to touch and the hairline is unbelievably natural!!! This Human blend wig is amazing!
Get this wig: https://amzn.to/2OYDDP8
Get this glue: https://amzn.to/3tl7nEG
Got 2 Be Freeze Spray: https://amzn.to/3ah2lSb
How to do Braidless crochet on VERY SHORT HAIR Tutorial: https://youtu.be/u1TmWZjag98
See how to do a bald cap in 60 seconds here: https://youtu.be/31tz_Zsvdxo
See other 60 Second hair tutorials here:
Other 60 Second Hair Tutorials
*****Knotless Box Braids Crochet Method TUTORIAL in 60 Second: https://youtu.be/pn3A5KFJKcs
*****How to Bleach and tone hair from Black to Blonde Tutorial!: https://youtu.be/PimP1yePnG4
*****Boho Knotless Box Braids: https://youtu.be/9HOMW-6e0ts
*****How to: Removable Quick Weave Tutorial : https://youtu.be/juagv54XNrc
*****Outre Melted hairline Martina in 60 SECONDS! Perfect hairline
***** Butterfly Locs Tutorial: https://youtu.be/PfcHP8E8bOo
Beginner Box braid tutorial: https://youtu.be/WELIVU-Qsvg
CHECK OUT MY OTHER VIDEOS!
Eyebrow Tutorial: https://youtu.be/__Gtwfp-a2k
Lash Tutorial: https://youtu.be/iODPOfZBXG8
Lace Frontal for beginners Tutorial: https://youtu.be/bxcabd3_Yvo
20 Creative Ways to style your box braids: https://youtu.be/IBSq1kC0P8I
Find out about and follow my Smile Direct Club Smile Journey Here: https://youtu.be/f4b-86t51s8
Instagram: @hey_mrsjones
Business Inquiries: [email protected]
Family Youtube channel: https://www.youtube.com/channel/UC-gw...
Hello, everyone and welcome, or welcome back to a myeloma stilettos y'all, it's a melts and clearly i'm hyped. Let'S jump into today's video i'm using this kaleidoscope bleach and this 40 volume developer. You really just want to make sure that this mix is not too runny. I used two scoops of developer in about. I ended up using about three scoops of bleach, just to make sure it wasn't too runny, because you don't want the bleach to run through um from the knots into the actual hair, and then your hair has blonde roots. So you just want to kind of pat it on top, as you see me doing here, so make sure you go ahead and you do that now after i'm done, i let it sit for about 20 to 30 minutes and then i'm washing it with this shimmery Lights: purple shampoo for blonde hair. I already had it um. So first you just rinse off all the bleach and then you see me getting my shimmering lights for the blonde and silver hair, and i am going to use that and you really want to make sure that you get all the bleach off because you don't want Bleach on your head, while you're, you know, wearing your frontal, your wig, your unit, your closure, whatever it is, so i'm just making sure that i'm getting it washed through on both sides. So that's very important rinse all the bleach rinse all of the soap out and then i'm also going to go ahead and i'm going to condition the hair. Look at that on my skin wow the parts that speech. But you can even see the difference, but i'm going to use this two minute protein reconstructor. So this is the condition that i'm using, because it's just what i had on hand um just use whatever conditioner you have and comb it through. So that's another thing that i did. I made sure that i went through and i combed the hair out got a little naughty there, but it was easy to detangle that with the comb - and this is a nice unit, i didn't experience a lot of shedding or anything, and i really love this hair. I'M gon na have all the details in the description box for where you can get this hair. I got this hair on amazon. It was a great deal so now i'm about to do my cap. This is the gel i'm using because again it was the gel that i had on hand. A lot of people use got to be. You can use whatever gel is a strong holding gel just to lay down your edges and everything in place. So that's what i'm doing here and i blow dry it to make sure it gets a little dry. And then i'm going to put my cap on be sure to pull your cap over your ears um, because you're going to cut a little hole, as you will see me, do and you're going to loop that around your ear. I have another tutorial. That'S like 60 seconds on how to do a ball of cap. So if i'm going a little quickly here, you can watch that tutorial as well, where i explain the whole ball cap situation, but you should probably be able to follow it like i'm doing right here, but i'm going to go ahead and i'm going to spray. Some got to be along my hairline, so i personally desire to keep my edges. So what i do is i spray. This got to be, and i spray it right around my hairline and then a little bit in front of my hairline and then i also spray it around my ear and then i blow dry it and i actually do two layers of the got to be, and Then, after that, i let it dry. This is the unit you guys after it has dried. I let it air dry mostly, and this has two clips in the front. It has one clip in the back, it has adjustable straps and it even has a clip in the middle after that tea part. This is a tea party unit. You guys so i'm showing you that right here this is a tea party unit and so yeah. That'S the construction of the wig and before i put it on, i am going to use my tinted lace. Spray by eben and i'll have a link in the description box for this as well, and this just helps again to make sure that the wig looks nice and like your skin. Basically, so, even though i bleached the knots, i still wanted to use this, because this is a neutral type lace and it's still just a little lighter. So i want to go ahead and i wanted to spray that you can use makeup if you do not have this tintedly spray, and so i set that to the side, and now this is dry so again, like i said, i'm doing that next layer and you'll See that with this layer i'm going a little bit more forward and again it's because i value my hairline, i value my edges, so i do bring my cap up from my hairline. I don't want um any glue or anything right on my hairline, so you go ahead and you cut the cap and the cap is going to roll back when you cut it, and that is completely fine. You want to just keep cutting and cutting until it gets to a place that you want it where it's not too far back, but you want to get it nice and smooth, and this is another reason that i bring it forward, because i know it's going to Roll back, and so if you start just at your hairline once it starts rolling back, then it's going to be all up and through them edges honey. So you want to make sure that you bring it forward enough that you're going to be able to protect your edges. You want edges after you take this wig off or you knit until whatever you got, you want edges after the fact. So after you are done, cutting you're going to go in again with your got to be, which you're going to see me do in just a second after i finish all of my cutting all right, so i'm spraying a little got to be right here on the Edge of the cap - and i'm just doing it piece by piece, i'm rubbing it down with my finger and i'm going to let that dry as well, so make sure you get every little piece where it's kind of sticking up or anything like that and dry. It again - and you know this is not the perfect ball cap, but you're gon na see it's still gon na work out. I get my morphe powder. I powder it up just to get that nice blend going, so i don't use the even spray on my actual cap because it's kind of wet. So that's the reason i don't spray. The even i go ahead and i switch over to the powder for this part. So, that's why i do that if you were wondering almost got alcohol, so you want to cleanse your forehead with the alcohol. This is some glue that i got from amazon. I really like this glue. It dries super fast. So that's one thing that i like about it, and also it came with this little spreader thing, because you want to make sure that each layer of glue is very thin because that's going to help it to dry faster. If it's thick and clumped up. It'S going to take a long time to dry and so for the best adhesion. You want to apply it in front of your hairline and you want to smooth it out as much as possible. It got clear so now i'm applying the second layer i want to say i only did two layers this time, i'm going to go ahead and i'm going to smooth it out once again a little too forward there. So i smoothed it but go ahead and let that dry - and you know it's dry when it is clear - so it's clear so now i'm going to pull my unit forward and i'm going to stick it down now. Some people don't cut their unit until after it's already on their head. I prefer to cut my unit the extra lace off my unit before i glue it down. That is my preference, so that is what i do, maybe one day i'll switch, but not today. Today i cut it first so now i am using that alcohol swab to just get that additional glue off and now i'm going to tie it down, and then i will be back with the final look. You guys, i'm so happy. It'S a melt. It'S a sleigh! Honey - and this just goes to show again - your ball cap doesn't have to be so perfect in order to get that perfect sleigh, because honey she's slayed don't forget to like comment and subscribe to the channel for more tutorials 60. Second, hair, tutorials and lifestyle tips i'll see you guys next time: peace,


Comments
A Purposeful Pursuit: Thanks so much for watching! Subscribe for more hair tutorials and product reviews
Christine McKee-Jones: It looks natural