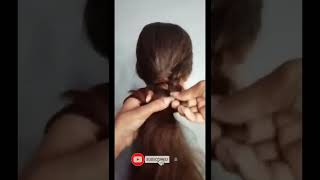
Natural Hair - Half Up Half Down W/ 4C Clip Ins
- Posted on 31 July, 2022
- Heatless Hairstyles
- By Anonymous
Hey y’all! In today’s video I’ll be doing a protective half up, half down hairstyle with clip in extensions for natural hair.
Socials
Instagram: https://www.instagram.com/nylasimone__...
TikTok: @nylasimone2
Business and email inquiries
Current Count: 209
Hey y'all welcome back to my channel sugar nyla simone, for those of you who do not know for those of you who are returning welcome back y'all, make sure you guys subscribe, hit the like button and comment below what is something that you liked about this video. I know it's the beginning, but just go ahead and comment, but today i will be installing these clip-ins. As you can see, these are some 4b4c clip-ins that i purchased to test for my hair business. As you can see, this hair is does look short shrunken, but it's actually 16 inches. So don't let the shrunkness fool you. I went ahead and stretched my hair the night before, because i did want the my hair to match. The clip ends a little better since they are elongated and when my hair is in the shrunken state, it is very short, so i want it to be a little stretched out before installing this. So, since today is a protective hairstyle, i didn't want to do too much to my hair um. That'S why i braided it up, and i didn't want to do too much to the clip-ins to see how it would react or how it would look and its like natural state after i washed these clip-ins how it would blend with my hair. So that's why you only see me not that's why you don't see me in this video, adding any like extra product or anything to it. Um you'll see what i'm talking about towards the end of the video. I wanted to see how it like reacted or how it went well with my natural hair, but right here, i'm just parting out my hair, so that i'm gon na have a little bit of leave out, since it is a protective hairstyle. I want most of my hair put away, but um just a little bit of leave out, won't hurt. You know, especially in the middle so right here, i'm just parting, the hair, all across my head, making sure that line is straight and yeah is so now that i have my hair sectioned off i'm going to go in with my instant control and lay down the Front of my hair uh just to tame it, because my edges are all over the place and i don't want them to be out that much again, this is a protective hairstyle. So i want to make sure that my hair is put away as much as possible when going in with edge control, though don't brush too hard. It looks like i'm brushing really hard, but that's because i have it sped up, make sure that you're just putting on a good amount, not too much of your edge control, so that you're not over loading. Your hair in the front because overloading can make your edges fall out and too much product of anything could be too bad, so just make sure you're being generous with the edge control and yeah. So, for this part, i'm just sectioning my hair off in two so that i can do two braids in the front i'm going to cornrow off camera, though um right here. I realized that i had too much hair. So i need to go in and separate that hair again into smaller sections, so that part is actually going to be like where i make my ponytail y'all will see in a little bit. But if you see that you have too much hair just go ahead and take out some hair and you'll be good girl, um, but yeah don't do too much with this hair. Uh hairstyle make it your own um. It'S super easy super fun, as you can see here, i'm only putting a little bit of hair away because why not, but yeah, i'm not gon na stay on to explain how to do a cornrow, because i barely know how to do one myself so enjoy this. Clip might give you some insights, so this video was inspired by a youtuber. Her name is chef b um. She is a natural youtuber, a naturalist. I don't even know how to pronounce it, but she does like natural, hairstyles and protective hairstyles. So this will be my attempt in doing that, but if you guys haven't already check her channel out, go ahead and watch that video um yeah so right here, i'm just swooping down my edges because you know i barely got any and they're very light because my Hair is very thin in the front, like i said um, so i don't want to do too much, so i just gave myself a little swoops, but right here i am just going in with my edge control again and parting down or putting down yeah sectioning. No putting down this hair where i'm going to like use as my ponytail, i want it to be as sleek as possible, but not too sleek, because i don't want to do too much or have my hair hurt um when it's in a ponytail, so yeah, i'm Just going in with my bristle brush and just smoothing that out, like usual y'all, probably already know how to do this part. So i don't know i'm explaining but yeah, and then i'm gon na just put that in a ponytail y'all see how little it is. It won't even matter at the end, because the ponytail at the top is going to like cover it and kind of create this illusion that, like i, have a lot more hair in a ponytail. I don't know if that makes sense. But yeah y'all see what i'm saying and then i'm gon na braid off my hair um, so that it can be out of the way, and i can also apply the clip ins to create a ponytail look. And then you see how like my hair right, there is kind of like messed up that won't even matter because the ponytail is going to um cover all that up. So don't worry about having uh. You know even parts when you do this, but right here, i'm just applying the clip ins to that braid, i'm like stretching out the hair so that it's not too defined, because i don't like that defined fake look if that makes sense, and then i'm just adding The hair to the ponytail, as i'm going and i did add a clip in to like the bottom of the braid, just because i want that part to be, like my, where i add like a hair ponytail or a hair hair like rubber band. Well, you know like a ponytail holder, so that's gon na be like my ponytail holder, the hair. You see i'm like wrapping it around. That'S, what's going to be like a ponytail, but once i done with that, it is time to install these clip-ins. But y'all. Look at this, you can install this ponytail like a bun, so if you didn't feel like wearing it, look how cute that is you see how cute that is anyway, so this is all my leave out that i'm going to have um covering up with my hair Or with the clip ends and again i did not do a flat braid down because you do not need to especially with puffy hair like this, so installing these clip-ins, all you have to do, is open up the clip and then apply it to the back um. My head is very small, so you only see me using four bundles because i don't like a big poofy look on my head due to it being small too much hair on my head looks kind of crazy. But if you love a full poofy, look girl go for it because it looks good on most girls but not leases. So you won't be seeing me doing that, but right here, i'm just installing those clip-ins they're easy to install some of them. I didn't brush out the hair just because i did want it to be a little defined in the back. I don't know i didn't want it to be too poofy in the front or in the back, like i did in the front so yeah. So after installing this for west, i just took out my leave out and i blended it seamlessly with the with the clip ends, and it was super easy. It took like two seconds just to blend um. These wefts did not tangle. I'Ve been wearing them for two weeks and they have not yet detangled i've been putting my hair in a bun in a ponytail, i've been sleeping on them, i've been doing whatever you can think of with them, and they will not come out and they are so Easy to manage, but y'all. This is how the hairstyle came out. It'S super cute. It'S super easy and i hope that you guys try out this hairstyle and let me know what you guys want to see next and i'll see you on my next video bye.
Comments
C J: Loved this video Nyla!
C J: “Don’t let the shrunk-ness fool you.”