Quick Easy Shag Hair Cut
- Posted on 20 February, 2022
- Long Hair
- By Anonymous
Quick Easy Shag Hair Cut
In this weekend episode we look at a super fast way to cut the shag haircut this incredibly easy shag haircut has Slightly thinker ends than a normal shagged by disconnecting the front from the back resulting in a beautiful shag haircut. Hope you enjoy it!
Join The Life Of Hair Digital Academy with the link below and receive 50% off for the first six months
https://www.thelifeofhairacademy.com/o...
insta @thelifeofhair1
Use Code TLOH10 at Yoi Scissors For 10% Off!!!
https://www.yoiscissors.co.uk/?rfsn=59...
CUTTING TOOLS
Favourite Scissors
https://www.yoiscissors.co.uk/collecti...
Great Value Scissors
https://www.yoiscissors.co.uk/collecti...
Cutting Comb
https://www.yoiscissors.co.uk/products...
Sectioning Clips For Long Hair
Sectioning Clips For Short hair
Cutting Collar
Neck Brush
Detangling Brush
HOT TOOLS
Hairdryer
Best Hot Tool For Clients
Straighteners
Tongs
Wand
COLOURING TOOLS
Detangling Brush
Pintail Comb
Tail Comb
Sectioning Clips For Long Hair
Sectioning Clips For Short hair
Tint Brushes Wide
Tint Brushes Narrow
Balayage Brushes
Foil
And this foil https://amzn.to/312uk4j
Balayage Board
Cheaper But Just As Good Balayage Board
Slim Balayage Board
Balayage Board With Teeth
FAVOURITE TONERS
Best To Neutralise Yellow
Best To Neutralise Yellow Orange
Best To Neutralise Orange
My Favourite Brown EVER
What I Mix Them With
And if I want make any of toners a lighter colour I used this
STYLING TOOLS
Paddle Brush
Dressing Out Comb
Defuser
Small Round Brush
Medium Round Brush
Brittle Round Brush
Straightening brush
Sectioning Clips For Long Hair
Sectioning Clips For Short hair
Dressing Out Brush
Detangling Brush
Mannequin Heads I Use Sometimes
DISCLAIMERS:
We are a participant in the Amazon Services LLC Associates Program, an affiliate advertising program designed to provide a means for us to earn fees by linking to Amazon.com and affiliated sites.
This video was not paid for by outside persons or manufacturers.
No gear was supplied to me for this video.
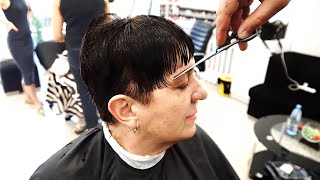
Welcome to the life of hair., My name's James Atkinson., And in this week's episode I'm gon na show you the fastest way that I've ever discovered to cut the shag.. You can adapt this to the wolf cut as well, but we're gon na show you the shag in this particular episode. And then in a subsequent episode, where we're gon na show you how to cut the wolf cut, but in a slightly different way. As I say, it will be an adaptation.. I hope you enjoy today's episode. And if you do, you know what to do hit the thumbs up. Button. Subscribe, if you new here for more content, tips, tricks tutorials on all things, hair. And let's get on with today's tutorial. Okay, so I've prepared my mannequin before I started just to save you watching me put in three sections, but basically it's three sections.. Now we're going to talk about the back a little bit first. And I think the back is quite an important thing on this particular scenario.. What we've done is we've taken a section that goes in between the occipital bone and the crown area. And we've taken a horizontal line that splits the head into two basically back to front. And that's really important to start off with.. So what you can do is you can start with that pop a clip in it.. You can't go too low, but you can definitely go too high. And then what I've done then? Is I've created a rectangle section in the side here by taking a line across the parietal ridge., And then I've repeated that process in exactly the same way here, on the right hand, side. That's given us a rectangle shape through the top. I've just secured it with Elastics so that you guys can see very clearly the sections. We're gon na take the elastics out to cut it, but I suppose, ultimately you could leave the elastics in.. You could be inspired by my good friend Lee Stafford, who was the original ponytail haircut hairdresser back on this morning, which is for anybody. That'S not. English will have no idea, but it's like a breakfast TV, show. And subsequently repeated by many hairdressers, including my good friend, Paul Watts, over on his channel.. So we're not gon na cut it with the bands in, but ultimately you probably could cut it with the bands. In., Anyway, on with today's tutorial, I'm not adverse to band hair cutting by the way by no stretch of anyone's imagination.. If that's what you wan na, do, if you wan na, take these sections and hold it up in the air elevate it and snip it, it will work perfectly for anybody that jumps in and says''. Why didn't you just cut it with the band in ?''? I want to kind of take it a little step further on and kind of show you something a little different today, but hopefully that might work for you. And if it does then. So we're gon na take this top section comb it into our hands like that Grip it as if we're gon na do a ponytail twist, the ponytail all the way around by pinching it in between our forefinger and our mid finger., Bring it down to the point where we wan na cut it and cut a square line. ( scissors snipping ). Now we'll have a curve in the hair that's longer in the corners and shorter in the middle.. So let's take that section. Down. See how it's sitting. Is it the appropriate length? If it is happy days, we move on., I'm pretty happy with that length. And that looks good to me.. Now we need to connect in our side panel.. So then, we just simply pick up our side panel, even with the clip or grip it's still attached and we pull the hair forwards and we've got a guide here at the top. Now, a piece of hair that we had there previously from the section we just cut. And depending on how much length you want to retain, will depend on how you angle your fingers towards yourself.. So I'm angling, my fingers here at about at 45 degrees. But if I want to kind of go for the full blown shag effect, I'll need to cut a square line here. That will be a square line through this front side.. So I'm gon na cut a square line, but you can obviously leave it softer.. If your client's a little nervous about having the full blown shag. Look then you you can leave it a little softer, but by over directing you do retain quite a lot of the length here anyway. And then we do exactly the same thing here on this opposite side, comb, the elastic out, pull it towards us finger angled. Just about square. And from the point at which we had from our top section cut a square line down towards the ground. Just like so then we can make sure that we've got the same length on both sides. And if we need to make any adjustments. This is the time to do it. And that's pretty much. Bang on. There's a tiny bit here on this side to adjust, but we just take that off just like so. And there we have it perfect.. So we need to just give it a little shake now.. Now, because of where we put that initial section so low down past the crown area, we don't necessarily need to connect the back end, especially if you want more density and oomph in the back and a bit more thickness as well. Because what we'll ultimately discover here and I'll show you firsthand what this actually looks, like. If we just take a vertical section straight down the center back, like this elevate, the hair straight up, we will see that there is a very small amount of hair that we Could possibly connect in to this., But if we connect that in remember we'll be eating hair away and bulk away from these ends., And so that's, maybe not something that you want to do.. The other thing is obviously the more length that's in the back. The more we create that short to long effect that the shag is well known. For., So bear that in mind, and if you want to connect it in my advice would be, is to probably visually connect it front to back just using a visual blending. Technique. Put the head over to the side, pick up the hair, where the two are not connected. And then from the point at which they're stopped being connected. You can come and gently slice out and connect the two bits of hair together. And that will just connect the front to the back, but only visually, which is a good thing, because obviously, then we retain some of that thickness through the perimeter, which is actually something That a lot of clients have said to me when I've used this type of haircut on them. That you know, one of the things is the ends get so wispy at the bottom.. Now this is quite wispy here, anyway., So I'll dry, this off and I shall show you the finish: result. Dried. It off started it a little bit. Haven't finished styling it., Just wan na show you on the fringe area.. If the fringe area feels you know like, you need a little bit of weight out of it. A little lighter pick up the fringe area and just point cut into the edges.. As long as you elevate the hair in the same direction of which you cut the section, then it'll be happy days., So pick up the hair.. Now. What you need to remember to do, though, is to if you're gon na cut the sides is pull'em into the middle.. They need to be over directed back into the center.. Don'T pull them straight out from the head, so you can pull the hair back into the center of the head. And that will give you exactly the same cutting line as you achieved by pulling all the hair into the middle previously.. That'S the only thing you need to remember, specifically about softening up the fringe area., And here we have it a fantastic easy to do. Shag, haircut., So, quick by the time you've got the sections in you've cut them. It'S probably less than five minutes to cut those sections. And, as you can see the results, I think speak for themselves.. Just a beautiful look on all hair types.. It really lends itself to all hair types.. So if you wan na get more volume in thin hair or if you wan na, get more texture in fine and straighter hair, and if you want to get amplified waves or curls, this is the haircut to have.. I hope you've enjoyed this episode and I'll see you again in another one.


Comments
Bereth: This is literally the most perfect shagg I have ever seen. Thank you for the clear instructions!
Iron Roots Family Farm: Just did this cut and couldn't be happier!! I had straight hair down to my hips that was cut straight across. Followed this video and just made a few adjustments for the length of my hair. First round was at about my check bones and did two more sections in the back that I pulled forward the same, but cut one at my shoulders and one at the end of my ribcage. Then I went back and made a few pieces around my face about the length of my nose. Looks like Nicole Kidman from the movie practical magic Thank you for the easy and well executed tutorial!!!!
Britni Gillespie: Just did this cut on a client, total game changer! It was adorable, thank you so much for the tutorial!
Tina Davies: I'm 62 and I've had the shag cut since I was 14yrs old,I have over the years tried different styles,most recently the bob cut,I tried to put up with it but it's a style that always looks perfect and neat,nor not for me like my hair scruffy and shaggy.
McKenzie: Thank you so much for this video. I just cut it on myself but kept my “bangs/fringe” long just past my chin and I love it. ❤️
S. Houle: Just did it! With my mid long hair I am not a hair dresser but I am really proud of the result TY for sharing your knowledge
bugggg: Thank you so much! I was so scared I would mess it up but this tutorial helped me have a lovely shaggy hairdo
Jessica Wing: Love this tutorial! I have used several of your methods successfully in the past! I’m wondering if you have a tutorial for a deep V haircut. Thank you!
Blüte Nandini: Thank you so much! Thats possible to do at home at myself. I was trying a lot techniques, but yours seems the best!!
Anthea Krieger: Love the shag!! Thanks so much for your tutorials!!!
Lyndsey Logston: Just did a perm on a client that gets the shag mullet and it looks amazing. Such an easy cut with such amazing results!
K D: Amo esta clase love love love! You are an amazing teacher. Muchas gracias
Susan Tomes: Another fabulous tutorial. Excellent teacher. Thank you.❤️
andrea dixon: Love it definitely going to be using this technique rather than smaller sections
Kimberly Granger💜: WOW! I thoroughly enjoyed this tutorial!!!! Thank you!!!
Anna-Maria: Perfect explenation, thank you so much
pimpmyride: Easiest I’ve seen. Going to share the video with my students. Thanks!
Christos Armpouniotis: It is lovely James ! thank you for this video !
ks1961ks: Wow. That first section cut was awesome!
Lauren Steele: Thankyou for sharing James, another brilliantly informative video ❤️x
Angel Rose: There's so many different ways to cut hair and even the same style, it's quite amazing, isn't it?
Frieda muljono: Easy and quick this shag haircut ...stunning result Thanks James for sharing..love it❤
Jessica Anaya: Ty so much it really helped me out ✨
Ava Channel: Awesome - thanks for this. I agree that sometimes the back looks too thin and wispy. I also think sometimes it looks like a bowl cut from the ears up - too heavy & separate. But I like this cut. Thank you again.
Jsmum: You are really a great stylist!!!
Christine Robe: Love it!!!!!!!
Carolyn’s Sister Can’t Cook: Have you been able to get this beautiful cut to work for a pixie that is growing out? I'm 57, always had a shag when I was younger and my hair would grow. Now... the hair on the sides of my head doesn't grow very quickly and my hair seems to want to stop growing just at the base of my neck. I can grow a perfect mullet!! My hair is fine and straight. HELP!!! I have a hair appointment soon. And we are going to attempt a short shag.
Kristen England: Fantastic tutorial
Sheila More: Wow I just need to get my haircut that way from somebody I can try to do it the ponytail but it would be nice to get someone to do that thanks for sharing
d c: I appreciate you defined it by the ear or with the ear being the point to part from
#8472 CubeBuster: Awesome... fave vid for shag! Thank you.
kya Speare: I already have a lot of layers from doing the unicorn cut (pulling all of my hair to the front of my head in a ponytail and chopping) on my hair, can I still do this as well?
Cersei Mack: James, that looks fantastic.
Cait Face: I’m gonna do this when I get home
Bernie K: Awesome
Jesus Christ is Lord: Very nice. Thank you
Lyric Berlin: Scared to go back to a salon. I had them put a perm in my straight as a board virgin hair and they burned it. It broke off in the front and was frizzy in the back. It was a mess. I just went for it having never cut my hair on my own and it worked. Might not be exactly even but it is cute....thanks
sthom4bad: How do you do this if you start off with really long hair? Like to bottom of rib cage.
jennifer carpenter: So glad you didn’t cut it with the bands in ❤️
Elizabeth Torma: Great tutorial!
Penelope Ray: I love your short hair! Off topic, but I was looking at your new education series and to pay is all in pounds. Is this only for the UK? I’m in Texas, USA. THANK YOU!
David: How often do you get the right type of hair ,length volume and youth, coming in for a cut easy on a silent model.
craig bryan: Thanks so much
Suzanne Lyle: Irvine Rusk did a nice polytail cutting collection in the mid 90’s. I had a great VHS of it ♀️
Greda K: Estoy aprendiendo a cortar pelo decente Lol, venga
euphoricrecall: wonderful
Fonny Irawati:
Klok: Just did this and thought I would be as happy as everyone else. But I absolutely hate it, it looks horrible on me and idk if I did anything wrong but i followed every step and i hated the end results so much. I've never regretted a haircut this much, I would actually prefer to shave it all off than needing to keep this while waiting for it to grow out. Ngl I'm in my grief stage with my hair (saved it for 6 years) and now it's all gone and I'm so fucking devastated. I fcuked up big time.
Brizzie Palma: I have a lot of hair and also is very thick. Can I have this hair cut?
Marylou White: formidable James , merci
b: where’s the part 2 for the wolf cut ? :o
nutcracker 29: I think hairdressers like yourself should warn people that if you have poker straight fine/thin hair. This shag style hair is a disaster, makes us look like unkempt crows.
captain goodguy: The “julie klausner” cut.
Erika: if I had only listened to this video, I'd have thought I was listening to Jon Richardson. :'D you sound exactly like him
Barbara Matthews: Why can't I find anyone able to cut my hair in a shag? I'm old enough to have worn one back in the 70s. I was a kid, but I still rocked one. I have naturally curly hair and I can pull it off, especially if bulk is cut out of the back.
no name: looks very hippie chic.