Seamless Layered Haircut Tutorial For Long Hair
- Posted on 27 January, 2021
- Long Hair
- By Anonymous
Hey everyone, we hope you are enjoying our HAIR channel, please hit the like button for me if you enjoyed the video and leave a comment with what you would like to see more of on this channel✌
Filming Set Up
Camera - https://amzn.to/2R7X5H6
DJI Osmo Pocket - https://amzn.to/34bA9fq
Vlogging Lens - https://amzn.to/348lLnY
Joby Tripod - https://amzn.to/2wdeNBH
Studio Tripod - https://amzn.to/2X6hRue
Mic - https://amzn.to/2wdqmZv
Ring Light - https://amzn.to/3dRJzRv
Studio Lighting - https://amzn.to/34e2t0G
Follow us on Instagram
http://www.instagram.com/paulwattshair...
http://www.instagram.com/paulwatts.lif...
Business contact: [email protected]
Post to: Paul Watts Hair, 7 Market Place, Kettering, Northamptonshire, NN16 0AL
Fitness Channel - https://www.youtube.com/channel/UCMy2N...
Music: @epidemicsounds
DISCLAIMER: All opinions in our videos are our own. This description contains affiliate links. This means that if you click on one of the item links above, we will receive a small commission at no cost to you. This commission helps support and grow the channel and allows us to continue to produce videos. Thank you for the support, we really appreciate it.
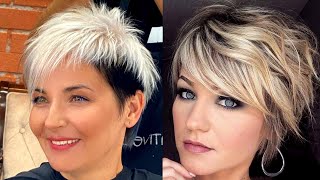
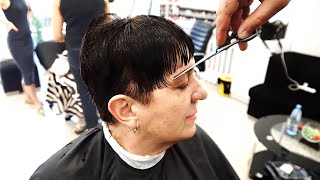
Hey everyone so we're back from another how-to video with one of my favorite layering techniques, i'm using the salon super quick super easy and something that's really bang on trend right now, so we're going to start with sectioning finding the high point of the head. That'S going to tell us where we're going to start sectioning from taking our central section. We'Re also going to use that, to section from the high point to the back of the ear on both sides to create quadrants we're going to find the it's simple to bone and then a centimeter above the ear as our first section. What i'm going to do is on the opposite side, so using my finger as a guide from the occipital bone, we're going to go to a centimeter above the ear, and that's going to be our second section. Centimeter from the ear to a centimeter above the hairline is our third section at the front. These are all creating triangles on top of the head and then lastly centimeter above the hairline and then a centimeter above the ear section down, and that is our last section. In our quadrants, so starting off with putting in a fringe at the front just to start with we're going to pull down a central guide to the nose and point cut that off. We'Re then going to use that as our guide going forward through the front. We'Re going to over direct all the way over to the other side of the face point cutting to create softness, so over directing this far over will maintain length at the back of the perimeter of the hair and also point cutting is going to create loads of Softness through the front so, as you can see on this side, we're just over directing right over point cutting and we're gon na follow. On the other side, we're going to start with the first section now, which is one of the triangles on top at the front. Flipping out the underneath, so we don't pull that up into our section. We'Re going to take a tiny guide at the top of the head right on the top of the high point. We'Re going to point cut that in you can take it as long or as short as you want just to create different lengths of layer. We'Re then going to pull our sections up to that guide now over directing slightly up into the middle. This is this will create softness, but also maintain length on the perimeter, so we're keeping a really strong, dense perimeter with this haircut and then mainly putting in the layers on the internals. This is a really simple and quick haircut, something really simple that assistants and newly qualified stylists can grasp quite easily, so you can see just combing through pulling it up and point cutting off second side we're just going to mimic the same on as we did on The other side, this is going to work through every section on the quadrants so pulling that section up into our guide that we've just taken we're going to point off the hair to where we cut before using our guide. And then every section comes up to that guide. Last section now, just over directed right up to that high point point cut it off. This is going to create a really soft looking layer, i'm going to move on to the back now so taking out the clip clipping out the hair underneath. So we don't pull it up into our new section, we're going to take a guide from the previous sections. We'Re going to pull up a piece of our new section over direct it up to that high point and then, as you can see, as we have done throughout those sections will come up to meet that high point. This is a super super, quick and easy way to put layer into hair. You can cut it blunt if you want a really hard layer or, like i'm doing just soften it off point cutting. This is going to cut down on refining time because it's all going to be really soft. This is a haircut technique. Layering technique that you can manipulate to be like a shag. You can take it a bit shorter around the front to create a bit more of a bullet, or you can just really follow my pattern that i'm doing here and create a really bang on trend. Layered haircut we're gon na move into the last section now. So click out underneath we're gon na take our guides from the previous sections, pull up our new section up into that and follow exactly like we've been doing throughout. So now we're on the last section we're going to move on to the length and just put in a blunt line just to add to the thickness and density of this haircut. So here is the last section: once we've done this we'll take out all the clips drop, all the hair down comb it through and then move on to that length and make sure we've got a nice one length blunt thick, looking haircut, just combing it all through Making sure it's just nice and neat we're not going to section or anything like that when putting the length in because we've already put the layers in we've lost a lot of the bulkiness. So what we're going to do is we're going to brush it all down and just take off a little bit of length to make it make it all nice. And even so, we are just combed the hair, all the way back and just putting in a blunt line, put it with my comb and then what i'm going to do is i'm just going to get in my fingers and just make sure we've got a nice Blunt line, so what we're doing now is we just wrap dried the roots and now we're moving on to mid-lengths and ends just making sure that it's nice and smooth still using the denman brush just working it through just great smoothness melt the layers together and once We'Ve done this we're moving to straightening the hair, so just get your straightening irons, i'm using the one hand straightening technique so having the comb and the straighteners in the same hand sectioning through and keeping out the way with your thumb and then combing through reason. For this, is you don't get any clip marks so now, just comb it all forward putting in our middle section or middle part in and then we're going to put it all forward and just make sure we've got any overhanging layers and if we have just to Blend those in and melt it all together, point cut it off, make it really nice and soft. So how simple does this technique look guys? Let me know in the comments down below i'd love, to hear how easy you think this looks. Does it look quite complicated, or does it look like something you could do all we're doing now to soften off this front area is exactly like we did the beginning, we're just taking it and over directing it to the other side of the face and we've just Basically, melting the layers in with the front area and the fringe, so you can see it's all melted together. Just using some freehand technique to take off any little wispy ends add a little bit of texture in there. But that's the final look of the haircut. I'M going to mess it up a little bit, so you can see a bit more of the texture, but that's how the fringe sits. That'S how the layers around the hair sits and, let's just add, a little bit of movement to it. So all i did was run my fingers through, as i'm doing, trying to lift the hair up. You can see how much volume you get from it really bang on trend with what we're seeing right now. So that is the final look. Let me know in the comments down below guys what you thought of it. Are you going to try out on a mannequin head? You can try it out when we get back into the salons, really simple way to layer, hair, add loads of texture and something that's bang on trend. So thank you for watching we'll bring you another how-to. Video very, very soon make sure you subscribe hit. The bell hit the like and don't forget, to share this video with your friends. It really does help the channel grow, we're now currently sitting at just over 7 000 subscribers. So thank you to every single one of you who have subscribed to the channel and everybody who is watching the videos. But again please share and if you want to talk in the comments, i'd love to hear how you get on with it. So see you on the next video

Comments
Paul Watts HAIR: Hey everyone, what do you think to this technique? Super quick and easy for you to follow?
sewer~rat: Youre literally my favorite youtuber ive been wanting to cut my hair in layers/a shag and your videos are actually giving me motivation
Annette Moffat: Fabulous! I didn't realise just how much Maths is involved in cutting hair, now I know why me and Suz did typing at college love this, thanks for sharing!
Ravon Johnson: That looks amazing!
Izabel Francisco Aragão: Gostaria de traduzir para o português ! I like! I love!
S Andrews: Loved it -
Lynette Dalton - STITCHIN MY STASH: this is how we learned to do it in the 70's. enjoy your channel
Hoggle: What’s the best product texturizing spray for this. Not necessarily brand just type
P. Mary YaYaBear: Really great instructions, backround music unnecessary.
Suzanne Watts: I think it looks fab. X
Izabel Francisco Aragão: Legendar em português!
Pra Verchiel Errante: Too bad you're so far away, it would be great if you cut my hair. I would like you to give me some advice on what kind of haircuts suit me for my face type, since I am almost 6 years old.without cutting my hair, I would like to make a change
Barefoot Contessa: So wish you could set up a salon in Cornwall ..... not the most up to date county in the UK
Victoria Escudeiro: I want a fringe looks like Abba
Lesley Graham: Looks great! James Alexander just dropped your name on his last vdo...
Lesley Graham: Ooops..Atkinson!