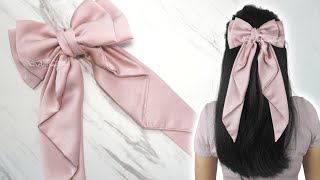
How To Make Hair Bows With Ribbon | Hair Bow Tutorial | Layered Tails Down Equestrian Tux Bow
- Posted on 04 August, 2022
- Long Hair
- By Anonymous
How to make this pretty layered long tailed tux bow
MEASUREMENTS
1.5" ribbon
top
1× 22cm
1x 42cm
base
1x 25cm
1x 46cm
Subscribe for more EASY TO FOLLOW HAIR BOW TUTORIALS https://www.youtube.com/c/CatherinesRi...
Join my Facebook group
https://www.facebook.com/groups/768238...
For all your crafting needs visit my Amazon shop
https://www.amazon.co.uk/shop/catsribb...
DISCLAIMER:
Links included in this description are affiliate links. If you purchase a product or service with the links that I provide I will receive a small commission. There is no additional charge to you! Thank you for supporting Cat's ribbon bow tutorials and follow alongs so I can continue to supply free tutorials each week!
I'm always happy to help if you are struggling with any part of tutorial and need more advice
And I love seeing creations made using my tutorials so do pop across to the Facebook page, I reply to everyone and offer lots of bow making tips, and information every day as well as the tutorials
#Catshairbowtutorials
#catsribbonbowtutorial
#CatGoodband
#ribbonhairbowtutorialbyCatGoodband
Hi everyone today, I'm going to show you how to make this double layered long tail, tux bow and it's super simple, so simple and really pretty. It looks really really good against, like over the top of like long tailed, long, ponytails and just ponytails in general. So there you go and what you'll need is some 1.5 inch ribbon? I have these two Navy versions. I'Ve got this standard gross grain Navy, uh Navy and I've also got this gold edged Navy ribbon, just to give it a little bit of a pop and what you need is four pieces in total for your longer one, which is the plain colored you need um. 25 centimeters and 46 centimeters, so the tail is 46, the middle. The center is uh 25 and then for the shorter top layer. You want 42 centimeters and 22 centimeters, so you don't want a masses of a difference in in length as you can see, because we just want a subtle difference, so you can see that little bit there and there difference there we go and, as you can see, I'Ve already taken all of them and I folded them in half and I've heat, creased and pinched. All my centers with my lighter. So the first thing we're going to do is the top layer and from here what I like to do is wear your creases, which is here fold that side half centimeter over and then you want to fold side half a centimeter over. So your bow is even and then fold it like this to make sure it is actually fully even and then heat crease it again and then what you do. Is you pop a clip over that? So it holds it in place. So when you sew in a moment and we're going to do the same again so I've already heat creased fold it in half and heat grease, so we've got a nice clear line to work against and you bring it in half centimeter over that side. Half a centimeter over this side. Can you see then fold it across that crease and make sure that's all nice, and even and again just re-crease that Center and using your finger, take on your clips. You'Ve got that ready to sew in just a second as well right and then, with your ribbon and again, I have folded this one in half and if you want new towels this nice long length. Basically this should be three times the amount of your Center. At least so from above, you want to go in for one two, three four, which will give you two creases in my room. It would help if I'd actually tied my thread off then I'll, just put it foreign we'll start again so from above one. Two. Three: four: you can get two nice Peaks and then we're going to do exactly the same amount into this one from above with this side, where the lineups on the other side make sure you're going through all your layers take the clip off now one two: three Four one: two: three: four: if you get anything like this run your light over, so it's all nice and evenly balanced what you want to do make sure they're both facing the right way like this pinch them. So you've got your two creases on each from your thread round right around the center. A couple of times make sure it's all nice and even and balanced, and then you can do a stitch off through the back, draw extra and there's your top layer and then we're going to repeat exactly the same process for our slightly longer bottom layer. You could do this as a truffle layer as well. You just need to go a couple of centimeters up on the next layer to sort of give you the same amount of difference. You basically want to go up about four centimeters and again we're going to start with the tail, because I've done four on this one. We want to do four on this one as well so from above on the crease one, two three four one, two three four make sure you're capturing all your layers again from that crease. There take clip off one two, three four trying to make them, as even as you can you'll see here on the back. You'Ve got two if you've got two you've done it right and again bring them down. So it lines up like this about all you want to do is pinch them, so you've got your two creases get this right in the center wrap that round a couple of times same as before, and then Stitch this off in the back. Try not to jab yourself with your needle like I just did, and there you go. So it's all tied off. The other thing I do is, I have some bubbles here or hair ties whatever you refer them to I'm from the UK, so we tend to call them bubbles. I don't know why we call them bubbles, it's just what we refer them to. So I'm just gon na wrap my thread round a couple of times to tighten this through and the other thing I'm going to do rather than gluing my layers when I do it with a ribbon. I like to do this. I like to go back through the back of the base row through the Center and then take my top layer from behind again through that Center right through there, and then you can use that to line them up nicely and again. Remember to take your thread three bubble, not wrappy bubble round into a mess, make it all nice and tight like so Loop out there. There we go, make it all nice and tight, and then I do a stitch off in the back again. Now, if you prefer, you can use glue, it is entire lip to you, which you prefer the same. With this, you don't have to sew. You can do the exact same thing with um, no sew tutorial and I've got the tutorial. It'S exactly the same thing as you would do for a normal standard. Basic tux bow. So that is your two layered bows and last a couple of steps. Is you want to angle it straight up, make sure to move it out of the way. So you don't capture your other layer. I want to do exactly the same on the other side angle it to get you nice, triangles sort of 45 degree angle. So don't quote me: I'm terrible at your geometry. Just like I am at Mass, don't forget to heat seal, so you don't get any fraying and use the clear blue bit of the lighter rather than the orange bit of the flame, and it means it'll seal without burning or damaging your Ribbon. So there's those boots. Then I've got a little bit of nine millimeter and if your glue gun it ever breaks down, this is a useful trip to know, but do be careful with it with your lighter onion glue. Stick because I can't bother to get my glue gun out today. I don't need it very much, Bring It Around once you've glued it wrap it round, twice still make sure to go through your bubble, slash hair tie. Do it nice and tight round again bring it through. Okay, hear that out of the way I've got two Heats in again and again just enough to heat it for one dab and there we go and then our last step is I've got a little bit more of this. I normally do about three centimeters well about three inches or like 10 centimeters. It'S got about this side and make an S shape against your thumb and with the lighter in the clear blue, get the flame and pinch it together. Be careful because if you use the orange bit that's what happens you see the bits were in the orange bit of the flame and then you do the same. The other side, you can see how I'm accident prone at times come on you, okay, so pinch them. So I get the pinch here and here and again we're just going to make this hot enough, so we can get a double glue and from the back you want to put this at a slight angle. This side Bring It Around. So it's over the middle. You can get that nice scrunch and then good that way. That way, so we want it to angle slightly this way and we're just going to do our last dab or heat and dab with our lighter and there you go like I said so, if you've ever completely broken your glue gun and you need need to do Some bows: that is a quick trick for you as well, and this is look you get. You can just adjust your tails and there you go. They look really cute as like pigtail sets. They look really pretty as just like those by themselves and they're. Very very simple, but very, very effective and they're, not the most costly bows to make either so they also work to that Advantage as well. Thanks for watching everyone, bye,
Comments
Aimee Boyes: Love this bow Cat!
Naomi Andrews: Sorry to be a pain but do you have 1” measurements please