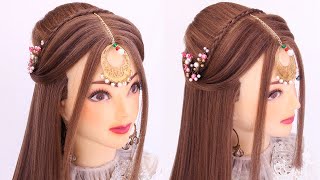
Bow Tie Braid, Braided Hairstyle For Long Hair Tutorial
- Posted on 07 June, 2017
- Long Hair
- By Anonymous
You'll love this adorable braided hairstyle with bows made from hair! This hairstyle would be great for school, recitals, weddings, flower girls, church, communions, and other special occasions.
This bow braid hair tutorial and basic concept was inspired by a photo we saw on an awesome Instagram account by @mylittlebraids. We thought the lace braids and feathered strands were so delicate and beautiful, we had to give it a try! The elastic bows sitting centered between the 2 lace braids look a lot like little "bow ties" to us. So cute! If you like this hairstyle, you may want to check out our "bow tie fishtail braid" https://www.youtube.com/watch?v=ln_Buw... from a few years ago which is also a very cute style using hair to make bow ties!
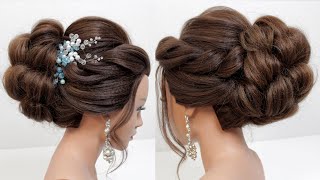
We placed the bow tie braid in a headband type design, along the front / side of her head and ended the style in a hair wrapped side ponytail. Of course, you could end this hairstyle with a low side bun, or braid as well. I'm thinking a pull through braid or elastic braid in the ponytail would be very cute. Adding beads or jewels to the center of each bow braid would be so pretty as well.
The trick to getting this hairstyle to turn out well is taking tiny sections (micro braiding) as you are creating the initial braids. If you want to use larger sections, you could always make 1 or 2 hair bows instead of 3 though!
The tiny elastics we used in the center of our bows are "Goody" brand. Example: https://www.amazon.com/gp/product/B006...
We always get questions about where we got our styling head or mannequin when we use her for hair tutorials. We found it on Amazon, similar to this one: https://www.amazon.com/gp/product/B01L...
Have you watched our other popular hairstyle tutorials? A few of our most watched, trending, and best hairstyle videos below:
• Twisted Edge Fishtail Braid •
https://www.youtube.com/watch?v=C4fTz0...
• How To Make A Perfect Ballet Bun •
https://www.youtube.com/watch?v=882m4Q...
* No Heat Curls, Bandana Spirals *
https://www.youtube.com/watch?v=-cI-iN...
• How To French Braid For Beginners •
https://www.youtube.com/watch?v=CPE1kt...
• Pinwheel Bun Tutorial •
https://www.youtube.com/watch?v=G-SE5G...
If you try this #hairstyle, feel free to take a picture and post it on Instagram with the hashtag #hair4myprincess. We love to feature our favorites on our Princess Hairstyles Instagram account: http://instagram.com/hair4myprincess
*Thanks for watching! Please subscribe: http://youtube.com/hair4myprincess
*Find more hair tutorials on our website: http://princesshairstyles.com
*Facebook: http://facebook.com/princesshairstyles...
*Instagram: http://instagram.com/hair4myprincess
*Twitter: http://twitter.com/hair4myprincess
*Pinterest: http://pinterest.com/hair4myprincess
*Our Free App
Google Play: https://play.google.com/store/apps/det...
Princess Hairstyles YouTube Channel features hair tutorials for Princesses of all ages and places! On this channel you will find quick and easy hair tutorials as well as how to braid intricate, complicated and unique hair styles. Cute hairstyles, beautiful hairstyles, and the best simple everyday hairstyles, easy braids, messy buns, last-minute hairstyles, back-to-school hairstyles, hair hacks, hairstyle compilations, hairstyles for a wedding, prom hairstyles, updo tutorials, fishtail braids, waterfall braids, tutorials for long hair, pull through braids, wedding hair inspiration, hairstyles for medium hair, half up, half down hairstyles, tutorials for short hair, hairstyles for layered hair, new hairstyles, 5 minute hairstyles, braided hairstyles, and more!
*Royalty free background music from the YouTube library.
*This is not a sponsored video, some links are affiliates.
Hey guys today we're going to be doing a hairstyle on our mannequin and I'm going to start by sectioning out a small piece of hair here kind of just along her hairline with the rest of this hair. I'M just going to put it in a temporary ponytail to keep it out of my way. With this section, I'm going to be making a lace braid and I'm going to make it very tiny. So I'm going to take small strands as I'm working my way down. You can make a French braid or a Dutch braid with this hair. It doesn't really matter I'm going to be making a French braid, so I'm splitting that into three and I'm bringing the outside strands over the middle strand and then, as I mentioned, this is going to be a lace braid, so I'm not going to be bringing in Any hair from the back side of this braid just a front sight, and I found that it's easier to use my comb when I'm taking tiny sections like this. It just makes it more precise there on the back side of the braid, I'm going to be removing and strand every time. So I'm just going to split that little piece in half and fold that over and then leave one half out here again in the front. I'M adding and then again in the back, I'm removing a piece, so I'm just going to continue that until I've used up all of the hair in this section, I'm basically going down a little bit past her here now that I've added in all of that hair Above her ear, I'm just going to make a regular braid down a couple of inches and we'll tie that off point. What you'll want to do is count all of these little strands that you took out. I ended up with 15 strands total, so I'm going to make three sections with five sections in each one. If you end up with an amount of strands that you can't divide evenly by three, you may just have to split it so that you have one left in one section, and it's really not going to make that big of a difference. So what I'm going to do is take the first five strands, I'm going to add an elastic to these strands and I'm trying to make it kind of in the middle at this section so about right here. So now I'm going to take the rest of these and just do the exact same thing. Alright, now we have the first half of that done, I'm just going to put these little ponytails out of the way, and I'm going to make a section here right beneath it. That is smooth, so you'll just want to comb that hair down until you feel like it's smooth, you may want to add some pomade or gel to that, and then I'm going to come back about an inch and a half and I'm just going to make another Part along the back of it and then to keep that tight and smooth. I'M just going to add another elastic here at the base of that section. Now we're going to make one last part line back here and you want to make this section about the same thickness. If you did this one up here, it doesn't have to be perfect, but that's going to keep your braids more uniform, looking and then again. I'M just going to tie this extra hair out of the way. Okay, with this section of hair, we're going to be doing the exact same thing as we did with these braids up front, except for instead of removing a strand each time, we're going to be adding a strand in each time. So again, you're going to want to take tiny strands as you're making this braid. You want to bring them in about the same size as you did over here. So I'm starting with the three sections and I'm bringing the outside strands over the middle strand. And then I'm going to be bringing in pieces here on this side of the braid, so you're, always adding from her scalp on the left side of the braid and then you're, adding from these little ponytails on the right side of the braid. If you can see that these little sections are kind of going crooked, you can add or subtract as many strands as you need to do like I did five over here. I'M only going to do four here because I don't want it flashing too far down this way. Now that I'm done with this section, I'm going to start adding in from the next one and then you'll just continue that until you get to the bottom. So again, I'm just going to tie this off temporarily so that we can finish the hairstyle. Now, I'm just going to take everything that I have over on this side and combine it into one elastic, so I'm taking both braids as well as the smooth down piece and I'm just going to tie it all together. Alright, here's how it looks like from the front now at this point. You can really finish it. However, you want you, can pull the hair around and make a side ponytail or you could make a bun here or some kind of a braid I'm just going to brush everything over and as I'm doing, that, I'm kind of bringing the hair over this part line. Here so that it doesn't show up quite so much, I'm just going to leave this as a side ponytail and then I'm just going to take a small section of hair and wrap that around the elastic to cover it. Okay, here's the finished style. I think it turned out really cute. The other thing you could do is add a bead each of these elastics or a little jewel. If you wanted to dress it up,
Comments
Painted Petals: wow!! this is GORGEOUS!! you always come up with the most amazing, beautiful hairstyles, & always give such great detailed descriptions about how to actually DO THEM, & not just WISH u could lol.. I love re-creating your hairstyles on my daughter, & while they never seem to look just like yours, they do look very well done with our own little twists & turns. Thanks for this tutorial!
Angela Smith: I totally luv your styles, also I really enjoy doing them in my daughters hair, she always looks gorgeous an people always comment about how nice they look, so thank you for sharing them with us all,
alexandra badescu: hi! I am new on this channel and i love it. your hairstyles are incredibly amazing. thank you so so much.
clair de lune: I love it
Halsey Clark: That's a really cool hairstyle thankyou!
Pauline Monk: very pretty, now just to get my 2yr old to sit still long enough hahaha
Claudia Montero: Amazing!
Marcela Impellizzeri: Gorgeous! !!
Art Life: you are so talented and your all hairstyles are super.
Trenzas Nmba: beautiful love it ⚘⚘
Xia Lian Wilson: I think this would look really cute as pigtails! But I don't have the patience to try that! haha
Genaya Taylor: I bought a mannequin head about a year ago and the hair is very frizzy and dry, how do you keep your mannequin’s hair so smooth?
Delmy Pleitez:
Karan Gandhi: wow
Carmen Garcia: wooow beautiful
David Alfaqeeh: woooow
paoleth calvillo: omg I'm love for mi for you