Diy Hair Bows | How I Make Hair Bows In Bulk | Dutchdesignink
- Posted on 07 October, 2022
- Long Hair
- By Anonymous
In this video I am showing you how to make a hair bow. And im also making hair bows in bulk to show you how i do it as efficient as possible. I hope you like this video and try to make your own bows.
Check out my online store:
Follow my socials:
https://www.instagram.com/dutchdesigni...
https://www.facebook.com/dutchdesignin...
http://www.pinterest.com/DutchDesignIn...
A little about me :)
Im a 21 year old from The Netherlands. I started DutchDesignInk in 2019 with greeting cards and now have a wide range of products. I decided to make a youtube channel to film my proces for you and myself. I share the tips and tricks I have learned in the past few years.
Machines:
Husqvarna classic 95
Silhouette cameo 4
Epson ET-2650
Brother Innovis 700EII
Camera:
Canon G7X Mark iii
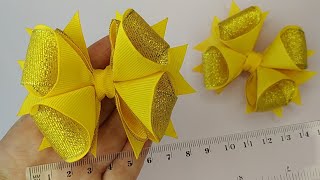
Hello, everyone and welcome to a new video. My name is Judith and I have a small business named Dutch Design Inc. So I make my own hair accessories and I really want to show you how I do that and how I make hair bows in bulk. So I am going to make these bows. They have a clip on the back, so I am going to show you step for step um, how I make these bows and also in bulk. So I get you through the process of making the bow and making bows in bulk and how I do that so yeah, let's get started, I'm really excited um. I have really cute prints that I want to make bows with so I am making 13 bows today. Um, it's not a lot, but I want to make everything in this video so um that I don't have to make that many and you can follow me easily step by step. So yeah, let's get started uh. The things you need is, of course, something to measure it. Um scissors, then a piece of fabric, a clip and I use hot glue. I also use an ironing to iron down the edges, so yeah let's get started and get on the first step. So I have some strips here of fabric and I am going to cut them into the bows. So let's get started with the first one. I have a strip of 11. by 20. 11 by 20.. So I'm going to cut that right now, let's make this so, as you can see, the small part is 10 centimeters and the long part is 20 centimeters. So I am going to cut another one another one. So for one bow you need one of this. Then a small strip of fabric, four centimeters, four centimeters on the short side and 11 centimeters on the long side. So we are going to fold this in and iron it. So you have the um the middle piece of the bow. So we also need these two times, because we also have the big Parts two times. So what we use for one bow is one big piece and one smaller piece, so this is again 11 centimeters on the short side and 20 centimeters on the long side, then four centimeters on the short side and 11 centimeters on the long side. So that's what you need for one bow. So now I'm going to cut all of the others and I'll put it on a time lapse, foreign! So now I'm going to iron everything and I'm going to show you what we're going to iron. So you have your big piece here and we're going to iron over this part, so only a little part and then also on the other side. So and then the small parts we are going to fold over also on the long side. So if you like, a bigger middle piece, you make it bigger and if you like, a smaller middle piece on the bow, you make it smaller. So it's on your own preference. So this is just like this and yeah we're going to iron everything I'm going to do the first one um step by step and yeah. So let's go and heat up the Cricut ironing, so my heat press is all heat up. Mine is at 165 degrees Celsius. So what we're going to do is we're going to fold over just a small part of the long side of the big piece and we're going to iron it so that it stays there like this. Then you turn it and also do it. On the other side go over it, so it will stay there and then what I do is I fold this piece over in the middle, so the short side will stay down like this. So here you got the opening. Then you have eight small square, then the smaller piece you're going to fold over the first and then the other side. So you have a small strip and also we're going to iron death. As you can see, it will stay like this as a strip. So you have two pieces: a strip and a big piece folded down to the middle. So I'm going to do that to the rest so enjoy the time lapse. So I ironed everything. So here are my 13 Iron's bows and again a small strip and then a bigger piece fold over as the bigger piece. So the next step is getting a needle and some threads to put the two pieces together and yeah make it a bow. So I am going to get a needle and threads, so a needle - and I have my big bowl of tread here so we're going to get this through the needle and just get a long piece of string, cut it and put it in a knot double so. I have a small knot here and then a long piece of string. Then I'm going to take you a bit closer, so I can get you step by step. What you need to do so so this is our folded piece. Why I fold it is because now I know where the middle part is, as you can see here, you see, obviously where the middle is so we put this a little over the middle. I always put my scissors on it and then get the other side and also a little over the middle. You hold it down or you can pin it or clip it and then, with your needle you're, going through make these like this. Maybe it needs a little bit practice, but that's okay! You have to learn. So if I am happy with how my bow looks - and I am I'm going to pull it all the way through going to get the threads all the way through and then spin it around a few times, then close it with putting the needle behind through the Fabric, so you can make a knot, so you can cut off the excess threads. Also on the back, it went to focus. You can cut that away. So now you have your bow, your middle piece, then, with the smaller piece we are going to glue it over the bow, but we are going to do that all at once. So I'm going to first make all the bows like this and then I will be back with my hot glue and put the bow together, foreign foreign. So all the bows are done. As you saw and yeah uh they are really really cute prints. So I have 13 bucks ready um. What I'm going to do is heat up my glue gun and you can also do this with fabric glue. But so I personally use a hot glue gun because it doesn't have to dry that long with fabric glue. It has to dry a really long time and I like, with a hot glue gun that it's just ready in like a minute. So um, that's what I do. You can use regular um fabric glue, it's what you would like and also with um the ironing Parts, because um, if you don't have an iron or you don't want to use an iron, you can also glue down the edges. So you don't have to use the ironing. If you don't want to, you can also glue it and also with strips you can also glue them. I prefer to do it like this, because it's very faster with a big batch than gluing everything and waiting for it to dry, so yeah, let's go to the next step, so the last step is to glue the middle part to Depot. So we are going to do that right now, so what I do is first put a little bit on the top of the bow and glue it to the middle piece. Did you have enough on this side to flip over to the other side and a lot from this side, so the excess threads we can cut after so then I am going to get this together cut off the excess. Thank you to have a little bit left. Flip over then put on glue and folds back. What you can do to close. This is just put a little bit here. You'Re not going to see this part because the clip is over, it so put it right down and then it's all glued down - and you have your bow, then the only thing that's left, let's put any clip, these are 67 millimeters and what I do is just Slide them right in here you can glue them down on the ends to the bow, but I personally don't do that because it's great like this, so I'm going to do the gluing part again, so you can see again what I did so you have the smaller Piece here and your bow so on the on the top of the bow, we are going to put a little bit of glue and glue that to the small strip that we have then have it like this cut off the excess and have a little bit left. Folds One Part over and then glue here and put it over then to close this just putting a little bit of glue here, press it. So that's it again, then the clip just slide it right in here. Sometimes it's neat, and sometimes it needs a little help or from the other side like this, and then you have your bow so really easy. Now, I'm going to finish all the other bows foreign. So all of the bows are ready and they're done and yeah. They are super cute um, you can. Oh, if you don't want to use this big of a clip. It'S okay, you can also use smaller ones or you can put on a nylon, headband or just a regular hair tie, and you have a super cute bow. So yeah, I hope you really enjoyed this video today so um. If you want more of the videos like this, like a DIY, really, let me know in the comments so yeah um. I want to know what you think about the video. If you liked it, if it helped you, I hope it did. Um
Comments
Star of Destiny Kreations: Nice job! I havent made any bows. You make it look so simple. I like the fabrics you used. Also, have you made the knotted or twisted headbands? I heard that product is an untpped potential for etsy.
Dianne Keen: I really liked your video, so simple to follow. I'm about to cut some strips to make some bows for my 2 little grand daughters. Thanks again. Will be watching for your other videos.
Jubilee Ohwofasa (IAMNERO): Because I know this video is going viral Very lovely video ❤️❤️❤️
Handmade By Diana: thanks for the Video Judith, you have a sweet accent. and your method of bow making seems very easy. Diana, Australia xx
joanne mentor: thank you, Judith , I enjoyed the show