Princess Jasmine Inspired Bubble Braid By Sweethearts Hair
This is a Princess Jasmine inspired braid on our lovely model Chloe, she has very long hair, but this style can be achieved on mid length hair!
To purchase the SweetHearts super strong hair elastics click the link below:-
https://sweetheartshair.com/product/ha...
To purchase the Sexy Hair Spray Clay, for added texture, click the link below:-
https://sweetheartshair.com/product/se...
If you enjoyed this tutorial make sure to like, comment and subscribe and check out our other videos.
If you recreate this style, be sure to tag us on Instagram or use the hashtag #SweetHeartsHair or #SHvolumiser
For more updates from Beth and the SweetHearts team follow the link below...
✨Website/Store: https://sweetheartshair.com
✨Instagram: https://www.instagram.com/sweethearts_...
✨Facebook: https://www.facebook.com/sweetheartsha...
✨Snapchat: SweetheartsHair
We also have a SweetHearts blog: https://sweetheartshair.com/blog/
Click to purchase our amazing Detangler spray: https://sweetheartshair.com/product/sw...
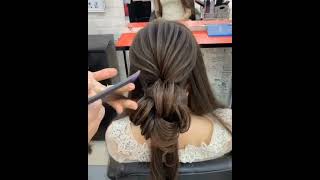
Hi everyone, its Beth from sweethearts and I'm here with the lovely Chloe, and I'm going to show you today how to do a jasmine, inspired style so princess jasmine. That is so. I'M gon na be doing like the big bubble braid, but we're gon na make it a bit more interesting. So hopefully you'll love the video. Let'S get going so I've just scraped up the top bit of hair here and just put it into a little elastic like that. Okay, I have covered that elastic up, but you don't have to do that bit so just use my fingers just tease that little bit out there, you can back home. If you want to, I haven't today and then you're going to take a slice of hair from both sides like that and that middle section as well combine those together and just pop an elastic in so before. I'Ve already faded that I'm just using a bit of clay spray just to give a little bit of to it to the hair, and then I want you to get your fingers. If this is for a child, you might choose not to do this bit and keep it nice and neat, but I'm just gon na create a bit of softness and a bit of texture on the side, bits here and then gon na come to this middle section. This middle section, you really want it make that pop, because it's supposed to look a bit like a bubble, so you really need to just take your time and pull out that middle section. So before we move on to the next bit, I want you to cover this elastic again. If it was on a child. I wouldn't bother with this bit, so I'm just taking a strand of hair. You probably see me do this a few times now so wrapping it round like that and then just pop in an elastic in to hold that into place. Okay, guys next section again two slices of hair, so you don't want it to bunch there, but you need to make that bubble bit. So I'm just bringing it down slightly, combining all those strands together and again using my fingers to create that bubble effect. I kind of don't want it too neat, so I'm trying to sort of not make it completely symmetrical. Moving on, I am just covering that elastic or you could always use hair ties that are matching the outfit, so it looks kind of like if they're supposed to be there, but I'm just choosing just to cover them up. Okay, so last two bits of hair here, just gon na place that about there just putting the sides out a little bit and then most importantly, this bit in the middle. So try and remember it isn't just this top bit that you've got to pull kind of. You can go almost like to the back in the sides as well to really create that bubble effect. So now we haven't got that hair guys connecting we're just doing the bubble bit really make sure that you concentrate on the front at the sides and the back. Okay, so make sure you're pulling out that back bit as well. It'S just from the front because I haven't got that much hair left now. I am just gon na do just a little bit of back home in that center piece there. So nothing fancy just a few little push ups with the comb just to help give that little bit of volume. Okay, so fluff it up a bit just smooth over the outer edges. Just so you can't see that back pain which doesn't look very nice and then I'm going to punch off okay guys. So that is our Princess. Jasmine hair finish. I think it was pretty easy. Don'T you? I think anybody could have a go at this one. So I'm just going to give Chloe a little spin for you. So thank you so much for watching. I am please subscribe like and comment that a bit great and also command find us on Instagram a Sweetarts hair


Comments
Little Princess Hairstyle: *_Demasiado bonito y fácil de realizar. Muy bella tu princesa. Saludos_* ❤️
Anna K47: Great tutotial! Looks gorgeous and is simple enough to try on my own hair.
kimber4372: I've been watching these on mute and missing your adorable accent! Braids are amazing- can't wait to try them out on my girls!
Jennifer Kopenga: Came out great!! You did a fabulous job
Mkc Lore: Wooowwww!! She has a long, long hair!! So this style looks amazing on her! Love it!! ❤❤ Hello and xoxo from México Beth +SweetHearts Hair Desing
glow wills: Love it! Also your models are so pretty.
Nakit za lepotice: Gorgeous hair! <3
Devi rajmohan: Looks elegant... By the way, is this hairstyle suitable for casual, everyday or workplace scenarios?
Stefane Pontes: Que lindoooooo
Мир Оля: Отличная идея обернуть прядью перетяжки между бочками
Orquideas com a NANDA: Beatinful
سمارت لودنك: Beautiful
Molly G: Hi this is my first time on this channel and I'm glad I subscribed. I like the look.
Alicia Christy: Your amazing talented..
Sabneet Kour: soooooo pretty
Kusum Rawat: Beautiful......like it....
latasha wells: Super cute
Ruth Mejia: precious!!!
María Jesús Koch: loveeeed
Sangita Das: awsome
jojo m: so cute
Shauna Beveridge: ❤❤❤
Sincerely Kenzie:
علجية معدنوسة: Nice Good lack
Wesam Hasn: حلووو
Nadia Ali: nice