How To Cut Perfect Face Framing Layers For Longer Hair - V-Shaped Layers
We’re excited to share another face framing technique that is especially great for your guests with long layered hair. By utilizing a V-shaped design technique, you will provide your medium to coarse haired guests the perfect face frame with the right amount of lightness and movement!
Tools used in this video:
Signature Series Short Cutting Comb
https://www.samvilla.com/collections/c...
Dry Sectioning Clips
https://www.samvilla.com/collections/a...
Signature Series 7” Dry Cutting Shear
https://www.samvilla.com/collections/d...
Learn more about this technique at
https://www.samvilla.com/blogs/hair-tu...
Watch more face framing techniques: https://www.youtube.com/watch?v=8dOxqs...
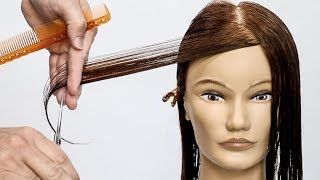
Hi everyone, I'm Andrew Carruthers education, director for Sambia today, what we'd love to share with you is a fresh technique on how to add face framing so we've shown you a couple other techniques and what you can do is you can go to our YouTube page. Do some searching around and you're gon na find other techniques for this as well? But what we want to do as a company is, we want to offer you as much value as possible and the way that we do, that is giving you options, because not every technique is gon na, be the right thing for every client. So this is just a fresh idea and we'll talk a little bit about who it's gon na fit best. Let'S get into the sectioning, so section Shana's hair here we're gon na find that high point of the head. It'S that upper surface of the mountain easy way to do that. Take your comb, just horizontal with the floor, bring it down where it touches. The head. First is going to be the highest point, make sure your clients in natural head position when you do this, we're gon na find that high point and we're going to connect our point where the hair becomes weak behind the ear. So if I go to just the top of the ear, what happens is this is the area where density actually changes. So if they come to the top of the area, I actually have this area of the hair that isn't going to be cut inside of that area. So, coming from just behind the ear here and following this hairline is going to make sure that we get everything that we want into the side of the haircut so to isolate this, I'm gon na drive grab one of our dry cutting clips. What'S cool about these clips, is they have a little rubber piece in there that you can see that helps to just hold the hair nicely between and it holds the hair flat together? So it's not gon na add a crease to the dry hair and it holds a lot of hair and all holds it extremely well. So we're gon na mirror that same parting. On this other side, now I'm gon na find that point just behind the ear place. A finger there place another finger here on the tooth and my comb and just connect the dots, and that gives me a nice clean parting grab, one more dry, cutting clip and pull that out of the way so that I have isolated our front. To start this, we're going to now part off the upper surface of the head, and what that is is anything that lives above the round of the curvature of the head. I'M her parts almost right on it, but I'm just actually going to slice a little bit off of there. I'M gon na have you tilt your head down just a little bit and that's gon na be our first parting there from that partying. What we're gon na do so we're gon na grab the seven-inch dry, cutting shear from our Signature Series, because we have a lot of dry hair to handle here, and these shears have the strength in the blade to be able to hold on to this hair and Not push it actually, I'm gon na. Have you come back to natural head position. My over direction is everything forward to a square line in the front, so I'm over directing to this almost imaginary wall in front of her face. My elevation is 90 degrees, horizontal, which means horizontal and flat with the floor. Now, as far as length goes, I just need to kind of determine where my shortest point is gon na fall I'd actually like it's a fall kind of around jawline, so I just need to kind of picture. Okay, if I cut that length, where is it going to fall to and if you need to go ahead and pull a little piece out and measure it there for yourself, I feel pretty comfortable with that length. So what we're gon na do is we're gon na cut a v-shape into this. We want our longest points on the outside and our shortest point on the inside there, and you can see with that seven-inch dry cutting shear. It makes pretty quick work of all that hair. It'S a lot of hair cuz. She has fairly thick hair, it's on the medium side, but definitely is shine towards the thick side and when it's dry like this, it tends to push out of the shear. So the seven-inch dry cutting shears excellent for this. So what you can see will happen from that point is even that I start to get my my shape built in now. How do I tie that in besides I'm going to take my parting down the center and by the way I am coming from the center, because she does move her part? It doesn't always come off this side, part if it was always based off that side part. I would shift my center point to that to that place so that it started more evenly. So, with this side now we're gon na do is I'm going to bring the side in the elevation is staying the same 90 degrees, horizontal and again the over direction is straight forward. I'M gon na find my shortest point from my previously cut section and then I'm gon na find my longest point on the perimeter here. So I know if I save this piece right here: I'm not gon na cut away the perimeter and I'm gon na come in and just connect the two, the other nice thing too is she does have a little heat damage around the front, and this is gon Na get rid of all that and it's gon na feel really fresh and really healthy. So, let's step to this side, so we can work our section on this side again: elevation is 90 degrees horizontal and that / direction is straight forward towards the mirror. My finger angle is straight vertical as well, and then once I find my section, I stop my pink or the tip of my fingers at the length that I want and I rotate that knuckle out until I find the length at the perimeter and just cut that Off as long as my perimeter lengths were balanced now I will have balance on either side because I had a guide from the perimeter and the center that I set in that first section. So, let's take these clips out, we'll just give it a little shake see how this all came out. Ooh I like this. This is fresh for you, love and it just happens to be your birthday today. So this is a great birthday haircut and, like I said, the the other benefit of that, is it really cut away a lot of that damaged hair that she had around the front from excessive tulle heat, which I already gave her a talking to. She knows now to turn her iron down. We don't need to be baking, our hair with 450 degree irons. So again, just to recap: the technique, we're gon na start here at the high point, draw our line to just behind the ear where the hair becomes weaker and the hairline drops do that on both sides. Our next section is at the top of the round of the head above that parietal Ridge area, and making sure that we're just getting that upper surface. That section is all over directives straight forward to a wall, and elevation is horizontal 90 degrees, horizontal flat with the floor. We'Re cutting that v-shape in make sure you give yourself a visual cue of where that first length is gon na sit on the face, and it's something that you, where you want it to hit. We cut that v-shape in then we bring the sides down. Elevation again. Is 90 degrees, horizontal and straight forward is our over our over direction and we connect the short that longest point of our v-shape and the top out to the lengths and the perimeter. It'S actually a pretty simple technique, and I think, if you watch this a few times, it'll be something that you can have ownership over. What this is great for is these medium to even thicker heads of hair, because you do have a lot of layer and a lot of lightness through this, so this is gon na be great for those girls that need that movement. We hope you enjoyed the technique and if you have any questions, please add your comments in the box just below the screen and we'll do our best to get back to you thanks so much for watching I'm Andrew Carothers


Comments
Miss L: This is the best layering tutorial I've seen yet. My hair was bit messed up and this video is the reason my hair is now layered exactly how I wanted it. It's even and beautiful, and I was able to cut it myself. Thank you so much for these awesome teachings!
Tofu is Rice: Excellent job! I cut my own hair and it turned out great! Thanks so much for the tutorial. Your videos are not only for professional haircutters and stylists but for amateurs as well. Keep the vids coming --love them!
callie dayer: I'm a hairdresser and these are great tips! I've been doing this same cut for years and it comes out great every time!
Maggie Mihaylova: Thank you so much for this tutorial. It is so simple, but it frames the face perfectly! I'm now a beginner and this helped me a lot! Great job!!! :)
Page Living Beautifully: I just love this technique! I have really thick, long and coarse hair, this technique is perfect for me! Simple and looks amazing! Really appreciate your teachings!
mistyhollowpro: Really great tutorial! I find that the way I learned to cut layers like this for the face was very difficult for me, and not easy on my hands, but this looks much easier, and less painful for your hands. ^^' The results are also very pretty. The layers are beautiful and look great for her face. Also, a happy birthday to her! :D I hope she enjoys is! Once again, thanks for a great tutorial. ^^
Danell Maconachie: Thank you! I was able to do this to myself! First snip, I thought, oh god! What have I done!!! But seriously, it turned out better than I thought it would!!! I have waist length hair, so this was a great alternative to full layering. My face is perfectly framed and I have lost no volume /bulk through out the back lengths. Your amazing xx
megalopolis2015: This is so neat. Her hair actually looks longer now. It's like magic.
Hayley Gregory: This technique came in so handy today when I had a super long length client who wanted very short face frame!! Quick, easy, effective and perimeter left in tact. Love and appreciate you Andrew and Sam Villa team ❤️✨❤️
Veronica Campbell: I'm a new stylist and I've struggled a little with long layers and creating a connecting face frame that is consistent...this video was excellent and I'm very confident now thank you
Angel Wyatt: This was EXTREMELY helpful to me!! I’ve been searching for a new method and this is the best one I’ve come across!
Smiler MC: I cut my own hair with this technique and it worked amazing!
Melissa Boone: This is amazing. I'm in cosmetology school and have learned face framing. There are however more steps involved, but this is less time consuming.
Claire Eileen: I really enjoy your videos, both Sam and Andrew. I love listening to you both. this video, I didn't notice a huge before and after difference even though I know you cut the hair. I would say that is due to lighting. It's always clearer in real life. I also enjoy watching you two work on real models more so than the dummy models. Not really sure why. It's the same result, but the real model is just more enjoyable. Thanks again ☺
gym princess: Great video. We used this method back in the 1970's. However, the "V" shape cut in the front section is brilliant...new to me. Her hair fell perfectly and brought back memories
Emily Bear: Thanks for this video. I have fine hair and followed your instructions. The result was absolutely amazing! I actually have style in my hair now. It is the first time I’ve ever cut a shape into my hair.
Chesa Djanelle: I've been cutting and coloring my own hair since I was 15. I can't wait to try these!!
Anna Holland: Love this I do this with a lot of my long hair clients, it was so good to have a straight fwd very detailed but simple instruction.
Joy Padayhag: Would be nice to see a before and after/side-by-side comparison. I’m not really noticing any significant changes.
klaritydawn: This was truly an amazing video. I could actually follow and understand exactly what you were teaching here and that is Truly Amazing to me! The only thing that could possibly make it any better is if I had an appointment with you to do my hair. I'm addicted to watching your videos. Thank you soo much!
hayleadeanne: I’ve used this video so many times to cut my own hair. Always turns out looking great too
Ana Garza: Hi! Did it just a few minutes ago and it looks great! Thanks so much for the tutorial!
Leila: This is really interesting, and yes, you did simplify it. Thanks so much !
Ddee 51-G2G: thanks so much for the tutorial on this layering, I've watched maybe 10 videos to learn but your video made it clear and simple. wow! how simple you've made it for me
Pinksupergrl95: Wow Im not a hairsylist but I so appreciated how you explained not only what should be done but why it should be done. I do go to my hairstylist fairly regularly but find I could use this if I wanted to try a trim at home. Thanks!!
Marlen G P: Thank you for the "how-to". It works very well I think. My only concern is that my left hand index- and middle finger can't keep the hair in a locked grip the whole way out. It makes the hair on the left side (closest to the hand) slip out and when I make the "V"-cut it makes the left side thicker and longer. Any suggestions on how to manage this problem? :)
dimpybaby: Wow.. Awesome Love the idea of a V. trim right in the front. I always used to wonder why mine looked choppy.. Thank you ☺️
Giovanna Gutierrez: 10/10 content explained so well and showed us every step i love it!
Vicky Skye: beautiful! I'm a cosmetologist but you explained this is such a great simple way thanks
Maria Mihaela Iamandi: That depends on the physiognomy of each person. It's totally different for a person with a high forehead compared to one with a narrow forehead. A person with a high crest versus a person with a stubble. Then it's not the same for someone with a downward-pointing triangle face versus one with a strong, upward-pointing triangle chin.
enirffeJ: Excellent!! Love the V technique! :) this is one of the best, if not the best face framing tutorial I’ve ever seen. My mom also agrees (she thinks she’s the best hair cutter with no formal experience lolol, I love my crazy mother). Also agree - I thought she was a mannequin until she blinked. Lol very pretty lady :)
Ndisndk Ndismsidn: great tutorial looks so easy to do.. im gonna do this to my hair tomorrow thank you!!
Daphne K.V.: Great tute! He explains his steps simply, yet thoroughly.
Padisch: I just did it on my own and it turned out great! Thanks so much
Geraldine GH: This is my favorite tutorial on cutting layers for long hair. Thank you for the video.
TiptoeWolf YT: hi guys! i've been a hairstylist for about 10 years and just found your videos. i love them but i would really like to see you do more haircuts from start to finish on REAL people. start by telling what the client wants and what kind of hair they have. thanks!!
Elizabeth Peterson: Awesome description...thank you. Been looking to cut my own hair properly and this demo was great
Marilyn: I can watch you all day long !! You are an amazing teacher!!
NS Rayfield: Worked like a charm - thanks for such a great video. My hair frames my face perfectly now :-).
Page Living Beautifully: Thank you so much! Saved me from a bad cut...! You’re a great teacher!
The Spirit School Cantt: Awesome . I love the way simple you defined this beautiful hair cut ♀️
MSME2U MEM: Awesome and so simple. I'm looking forward to doing this. Thank you
Karen Harton: Andrew explains things so simply he is fantastic to watch and learn from. Thankyou
Maria Amelia Batista Teixeira: Amo essa engenharia de corte. Explicativo. Maravilhoso vídeo. Não falo inglês. Mas so as imagens duzem tudo. Thank you ❤
Amy Pincus: I really liked the video and your technique and the end result was amazing. One thing that I found confusing was when you were preparing to cut the sides you said the elevation is horizontal. It looked to me like you were holding and cutting on the vertical. It was a good visual so I appreciated what you were demonstrating even though I didn't agree with the verbal. No problem, it's all good. I am a stylist for 25 yrs. and have seen you many times. You are an excellent educator.
alistasia: Andrew thank you for explaining step by step the technique. Fantastic!!!!
Tereasa Rudisill: I love how you teach, it's so informative. Well done every time
Vivian Lopez: Thank you Andrew. You did a great job at the Orlando Premiere. You were all amazing instructors!!
gfam Lccbbg: Very specific and educational tutorial. Thank you thinking if trying this. Will watch as many times as needed.
Bulgarian Cosmetics: Great! I cut my hair with this way and it looks very good. Thank you!
Rafaëlle C: If only my hairdresser used the same technique as you! I had many short layers all around my head which would really make my hair look less thick, the long ends were very slim. But initially I had long and thick hair, so I never liked the outcome after the cut. If I would make a pony tail, it would look super short. I didn't like it! So I decided to let my hair grow for 2 years, and not use any heat either. It became very long and then I started cutting it myself into one layer. My hair looked very healthy, thick and long, I'd get many compliments. But I didn't have much movement in my hair anymore, I remembered that I used to have a lot of volume when I had my layers. So for a moment I thought I had to choose between volume in my hair or having long thick hair. So one day I researched on youtube and noticed that to obtain what I truly wanted I had to frame my face with only the front part of the hair and to leave the back part long and thick. I've been doing this technique for a while now but you're video actually helped me perfect it this time! I'm sure you wouldn't recommend someone to cut their own hair though, especially not a hairdresser, like me haha. My cut is not perfect for sure, but last time I got highlights I told the hairdresser I was cutting my hair myself and he was very surprised! So thanks for this video, I love how my hair looks
Unknown Unknown: I've been asking a stylist to put a shorter layer in my hair for a while now they all insisted would not turn out right. My hair has gotten too long and thick not to have this top layer! I just used this technique and I obviously didn't perfect it but I have a decent top layer and my hair looks and feels a million times better. Thank You!
Bee Classy: Great tutor! I will definitely use this technique. Hopefully he has a tutorial for layering the back of the head hair.
212taffy: Great tutorial and amazing shears! Will try to get a hold of them once I could afford to.
Women Who Rock with Success: Great thorough and detailed tutorial!
Adernn Nider: I just spent over an hour searching for this bc I used it to do a trim (on myself) a few months ago and it was effective. Somehow this video works opposed to the fifty others.
Dawn Bennett: Better taught/explained than my teacher did! TY!
michaele Clark Pittman: Thank you for a great tutorial! Well done.
Hokuspokus: I tried this and it worked like magic. There are more detailed tutorials with more professional techniques on youtube, but for people like me that have zero hair-cutting talents I can confirm this method is fool-proof. Definitely the easiest and with better results.
Krystal Skye Brisson: May I ask, is this a technique that can only be used on dry hair or would it be appropriate to use on wet hair as well? I'm having trouble with layering and looking for the best tutorials I can find. This was very helpful! Hope to hear from you! Thank you!
Zoy B: Great technique! Definitely trying this. Thank you for the video!
Kamala Love: Omg before she blinked I legit thought you were using one of those Barbie heads for your demo. She’s gorgeous. Also, thanks for this demo- so helpful!
Marianna Fila: Excellent video. Very easy to follow. Thank you so much!
ilovemylife2012: Just cut my hair like this, because I ruined it with my own technique few weeks ago and now it looks great! Thank youu :)
M. Reyes: Couldn’t count how many videos I have watched but your tecnique is the simplest and easiest to follow!! The result is gorgeous frame to the face!! Thank you!! Subscribed right away!
Martha O: thank you for sharing this technique, I am going to used to cut my own hair. Best educational video. You are a great teacher!
*Intzar Ahmed* Sulmani: Sir, Glad to see your very nice & easy way to instruct the haircut simply...The demonstration of things was so perfect... Appreciated Sir. Guide us forever ❤️ the same way..
ejfiel13: Great tutorial! Directions were easy to follow. Thank you!
Caterina Iona: God Bless you!!! I had a terrible haircut which I did to myself trying to cut the sides of my hair. My mistake was not cutting a V cut shape. I couldn't fix my hair no matter what I did not even with the iron. I just followed your steps and I can now fix it in five minutes. Fortunately I hadn't cut it short so I had a lot of length still. Thank you so much for sharing.
Meand Lia: Thank you, finally a video that speaks "common" language. I tried to watch another video and he used terms I had no clue what they meant - I am not a stylist or anything so I am not familiar with the terms of what is taught in school for this, I am just learning. So again, thanks!
Swathipriya Prabhakaran: I am using the same technique to cut my own hair. And i look fantabulous in this style.. thanks a tonnnnnnn
Melissa Ann Almonte: Glad i saw this video because i'm planning to cut my daughter's hair with this style... V-shaped, in layers. Thanks for sharing
Dinah Lawrence: I love the face framing technique and look. How do you do it for someone who always wears a side parting?
chen da: Love how you teach! thank you very much.
Batanguena with little know how in Belgium: very easy technique I love it. Thank you so much for sharing the beautiful technique. I will always remember that.
jose martin chilet: loved it! thank you so much for the tips :D
carole clare: Just like Sam you take your time to explain clearly each step so it’s easy to understand. Some others I have watched whip through what they’re doing explaining just as quickly and you can’t take it in. Thank you for sharing ♀️♀️
Marlene Maharaj: Very good tutorial, rather simple concept easy to grasp. Thanks for sharing
KS Huffman: Thanks for the easy instruction. I use this technique too.
Leticia Fabros: What an easy way. Love this video hair cut tutorial. Clear & awesome. Thanks
Safiye Unal: I implemented the technique and satisfied with the result one hundred per cent. Thanks for this wonderful tutorial
kevin Swinyer: You show nice techniques, but I prefer to continue to use my Creaclip tools, they work perfectly to help create the same exact face framing layer style, without having to waste time to section off the hair.
Melanie Rose: Wow! Thank you! This teacher was excellent!!! Love the narration, very clear cut (pun intended)
Rubaiat Rahman: So easy! Thanks!
Lynda Bales: Will definitely try this , thanks you explained it perfect.
Gilly Vasquez: Thanks for the new technique. Looks fool proof. Nice and easy.
Holly Lanagan: Beautiful hair - so healthy and shiny!
Iole MacDonald: Keep the tips coming. Andrew I love the way you explain things. Ur definitely one of my favs
1theqtpie: thank you so much. I went to hair school an never learned this technique. just cut my own an it's beautiful (that's a hug) thanks again
susan x: perfect! great tutorial :-)
Lorrie Minor: Super great video, so easy to understand. Thank you!!
Sevi Regis: Excellent tutorial. She's very pretty and her hair is beautiful, so that cut worked really well
Maria Lee: Awesome vid. I’m cutting someone’s hair like this today. Thanks so much.
Maria Valdez: Love it! Thanks!, my hair looks Beautiful!!!!
ScotsLeo Queen: Awesome tutorial- you explain the WHYs!! Thank youuuu
EPNUL: He is great! I just love how descriptive he is. He makes it easy to understand.
Joni Callahan: Love watching, been a hairdresser for 30 yrs. recently changed jobs wanted a refresher !
silvi thomas: Really a wonderful tutor!
SlikSilk 15: Your not to slow so I don’t lose interest and not to quick so it doesn’t fly over my head and really break everything down. Gracias
RAJENDER KAUR: Explained in an awesome way!!