3 Easy & Quick Headband Hairstyles | Short, Medium & Long Hair
- Posted on 18 June, 2020
- Medium Hair
- By Anonymous
Here's 3 easy & quick hairstyles for everyday life! These styles takes 2-3 minutes per style so they are perfect choices when you need to hurry! ANd the best part of this tutorial is that these looks work out almost every hair lenght! Long hair, medium hair and short hair, if the hair is just in that lenǵth that you can braid it! Chin length hair is already long enough!
As I mentioned in the beginning of the video, these are also great braids for beginners if you want to learn braid your own hair! If you don't have much experience to braid your own hair, these are quick (you don't need to hold your arms high for long time!) and easy to do plus you can see all the time what you're doing through the mirror! For these braids you need only dutch and french braids. Headband hairstyles are practical but beautiful way to keep your hair up. If you like open hair these are great compromise to get hair back but half up hairstyle!
Don't forget to click the thumb up and subscripe my channel!
Thank you!
Check out my Instagram account @myhairstyle_xo to get more inspiration!
www.instagram.com/myhairstyle_xo
#easyhairstyles #braid #easybraids
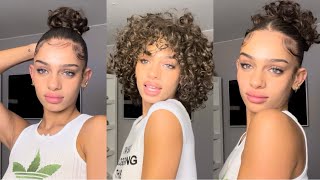
Hi in this video, I will show you how to create these three easy and quick headband hairstyles. These hairstyles are crazy for short, medium and long hair, and if you want to learn braid your own hair, I think these paths are great place to start for the first style. You need a curvy part line like this put the rest of the hair behind and then start the braid take three small strands of hair and then start the braid bring section from side all tightly under the middle. Add hair from the left side of the prayed right under left under add hair right under left under add hair right under left under add hair right under left under add hair. Keep on repeating this pattern, notice that you need to pull the hair. You add in on the top of the part line. Getting the circular shape is based on that, as you create the right shape, and then you pull the hair through that shape. In that way, the parade will go on the direction you draw on first place. After the last adings you can stop prating in here or then you can prayed until the parade isn't desired length. I think it's nice when the parade frames my face, so I go on until the end of the hair, and here you can see how the first hairstyle looks for this next hairstyle. I won't create the pattern part line. I think it's nice when it's a little bit softer anyway, you need again three strands of hair and then you start to pray like a French braid prince strands from sides over to the middle. This time add hair from the right side of the prayed so left over right over add hair left over right over add hair left over right over add hair left over right over ad hair left over right over ad hair. Keep on repeating this pattern. This time you need to pull the hair, you add in over the hairline and then you can get the preyed on your forehead like it will be the bangs. I don't want that prayed to followed my face, so I will add some hair under the hair. That will stay open, so prayed like before and when you print right over then add hair under the hair that will stay open. That'S how I can get the prayed under the hair, then just continue braiding until it's undesired length and here's. The final result of the second hairstyle you our beginning, the third style - by creating the side parting practice, then I take some hair from the front and laid it out, and then I create the slice for the braid. This section I will start the parade so take again three strands of hair and start the move strands from side under to the middle. This time you need to add hair from the both sides of the parade so left under. Add hair right under add hair left under ad here right under ad here left under add hair hunter right under add hair. Keep on repeating this pattern. I want some extra volume for this vowel, so I pancake the prayed, I'm creating just pinch. The adds of the prayed and pull it gently out then keep on praying like before. When you add it almost all the hair from the Middle's piece of hair, then I add also some hair from the front, so the front part will go inside the parade too. So, every time when you print the left strand under add piece from the front like this, then just continue operating until the parade is undesired length. You can also stop on this point if you like, I will continue operating until it reaches on the back of my head, so I can tie that inside the hair. In that way, the hairstyle will look like this. Thank you for watching this. Video have a great day,


Comments
SpazyAzy's Art: I will have to try these out! I love how you do it outside!
luisa citlali perez: hermosooooooo
Ксенія Янгол: ❤
Gauri Thapliyal: Nice
mrsamac5: Please what is your native language?