The Cutest Boho Braid | Half Up Hairstyles Easy Tutorial | Long, Medium Hair Beginners Step By Step
- Posted on 12 May, 2020
- Medium Hair
- By Anonymous
boho braid half up easy braided easy hairstyles for beginners long and medium length hair
❤ Product links listed down below ❤
SUBSCRIBE TO MY CHANNEL: http://bit.ly/2Qshbdn
FOLLOW ME:
➜ Instagram: https://www.instagram.com/juliechristi...
➜ Facebook: https://www.facebook.com/juliechristin...
♥ PRODUCTS MENTIONED ♥
TEXTURE POWDER https://shopstyle.it/l/bhjat
RUBBER BAND CUTTER https://amzn.to/3bkXXPO
……………………………………..
♡ MY AMAZON FAVORITES ♡
➜ https://www.amazon.com/shop/influencer...
------------------------------------
♡ BUSINESS INQUIRIES ♡
------------------------------------
Please note: some links are affiliate links and if you make a purchase through this link, I will receive a small commission for referring you to the product. Thank you so much in advance if you decide to make a purchase through my link.
♡ FOLLOW ME ♡
Instagram @JulieChristineBeauty https://www.instagram.com/juliechristi...
Facebook: https://www.facebook.com/juliechristin...
……………………………………..
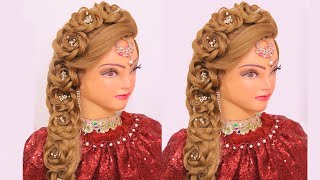
Hi everybody welcome to today's tutorial. Today I am going to demo the acutest half up rate and hair stopper yesterday and what I love about this is. It looks really interesting, there's a lot going on, but it's actually super easy, so it's really fun. So this is my cute model bringing onna. She has landed me her gorgeous head of hair that we're gon na work with today. So since this is a half up, hairstyle we're gon na start in the front and we're gon na actually start with the braid. So my preference is to have hair hanging out around the face with a half up. I think it's really cute, so we're just going to pull out some of these little pieces in front of Rihanna's face and then we're gon na start with a inverted French braid. So a lot of people refer to this as a Dutch braid, so you're, just gon na take a small section of hair divided into three and instead of doing a normal French braid, you are just going to basically do upside down. So, instead of bringing your side pieces over top you're going to bring them underneath when you combine it with each section, so we're just going to go ahead and get a good amount of hair. With this I'm taking bigger sections. Just because I like the way, it looks all right and I want um, I want the sections to be kind of hidden. So as I go down and bringing the braid angled this way and set up straight back, I think that's cute and I'm just gon na bring it all the way to the back. And when I get to about the ear I'm going to stop taking sections from the bottom, because I like the way it looks, I like the illusion of the braid just kind of sitting on your hair. Instead of you being able to see all of the pieces coming up into it, so I'm only taking from the top and I'm going to go to the very middle of her hair of her head. This is all Brianna's hair. This is beautiful, so amazing, okay, so when I get to the very middle, I'm gon na stop and I'm just gon na keep braiding a couple more times down and I'm gon na put a little clear elastic, and this is just to hold the braid in place. You can use a clip you can use whatever, so here we're gon na take these elastics out in a second, but from you the elastics are the safest, because they're gon na stay, so what I'm gon na do. I want this this braid to look very natural and more soft. I don't want it to be very perfect and precise, so I'm gon na go ahead and loosen it up a little bit thicken it. So what I love to use for braids. This is the by big sexy hair. This is the powder play, so let this is is this is actually a texture powder, so I like to sprinkle it right on the braid and it comes out really fast. So I just angle it and I lightly tap it with my finger and you can see it's white, so you can see where it's being applied and then what I like to do is just tap it into the hair. So when you tap it into the hair, it disappears. You can use your finger. I like to use a comb mostly because it has a ton of texture. This almost feels kind of like cornstarch, like it's very you know on your fingers. It'S very rough like there's a lot of friction and that's what gives us such great texture. So I use the comb first, so I don't get it all over my hand and then I just happened the rest and it works well, even though it's white, it works. Well, on brunette, hair too, you just have to use a little bit left and work with it. So now that the that's in there it's gon na make it really really easy for me to pull the braid apart. Breanna has beautiful thick thick hair, but I just love like a giant chunky braid, I think they're so pretty and they look different like there's kind of more going on and they're really pretty they're just more eye-catching. So I love a full braid and if you use any sort of a texture spray or a texture powder, you're gon na be able to achieve a really fat braid, even if you have thin hair and because it has so much basically resistance. So much texture in there it's gon na stay so usually loose braids tend to slide out like they're so cute when you first do them, but as you go throughout your day, it's like your style just falls out, but if you use the texture powder, they do Not so when I doing a second French braid over here, I'm just mimicking what I did on the other side and I like to start with a fairly big section, because if you start too skinny it just kind of looks funny when it's going into that fat. Braid, I hope the camera can see what I'm doing I'm going to do this side kind of fast, so Briana's hair is naturally curly. We have a before video, we'll show you guys look. We can actually show now cuz, I'm just doing the same thing. We'Re doing on the other side, so we're gon na show Brianna's hair before we streamed it. It'S amazing I kept telling her the whole time, I'm like I'm so jealous of your beautiful hair. It'S awesome so he straightened it for her. I just put in a lot of Moroccan oil and I actually really really really love the Moroccan oil and heat protector spray. You get a lot of smoothing with it, which I love. So if you, I love it for straightening, hair cuz, it protects it from the high heat and it makes it really really smooth. Ok, so I'm doing the exact same thing on this side just doing an inverted French braid and once I get to the middle, I'm just gon na keep braiding down a couple times and then I'm going to tie it off with a little hair tie and if You'Re still working on your French braiding skills. This is a fun braid to do it with, because the less perfect it is kind of the cuter it looks. It looks a little more boho, a little more beachy sort of romantic okay. So more of that texture powder - and I just like to top it in with my comb - and I don't really do it on the roof. I just tried to sprinkle it right on that braid and if you need it, if it's not fully disappearing, you can just massage it a little bit and then I like to start at the top just pull it apart and your sections don't have to be pulled Apart, even it's okay, if they're a little bit different, I like to grab from the very outside of the hair first and just slide that out and then I'll pull out a couple more pieces that keeps it from completely flattening your braid all right super cute. So now that we have these two braids, I'm actually going to bring them together. So what I'm going to do is I'm going to cross them over each other, because I love the way that looks and then I'm going to take another clear, rubber band and just put them both together in a ponytail just right over top of each other. Like that, I think it's cute when you tie them over each other, because it just creates a little bit more movement. If you just place them side by side, you can see little line where they come together. I like it on my hairstyles, when you can't tell how you did it so, whenever you're, covering up lines or pins or sections when you kind of mesh them together, it kind of makes it a little more interesting. Okay. So now I need to get rid of these ravines. I love these little hook tools. You just get them from Amazon, so they have a blade inside. So what you do is you just slide part of the rubberband in and it just cuts it open and is the very best, especially for a long hair like Briana's wear it kind of hurts to take out the rubber bands so easy-peasy, okay. So now we've done our French braid technique. Now we're gon na do a pull-through braid technique, so I'm gon na grab a little section of hair under just right under this one and combine it. So this is gon na, be our second section, and if you can, you want to make them both. Even that can be a little bit of tricky, be a little bit tricky because, if you're grabbing too much hair from the bottom you're not going to have any hair left hanging down, I want I want her hair to still look thick. So I want to go to mount underneath. So just keep that in mind so they're not exactly the same. The section is a little bit thinner. You can pull from your top section up here, so I'll separate these two until they're about even and then what I'm going to do. I'M going to clip this section together and I'm going to start on top. So I'm going to start with my top section and we're just gon na split it right in two. Then I'm going to drop it on either side of this section and bring this one through on top. So I'm going to keep doing this all the way down. So I'll explain it again if you didn't catch it, so what you want to do is your two sections that are left hanging out: you're just going to bring those in to a ponytail together. This is one of my favorite types of braids because it's super super cute, but it's really really easy. If braids aren't your theme this this technique, what I'm doing back here is super easy. Okay. So now we still have our two sections. I'M going to split this little guy in half again so top one in half and then you're going to bring your bottom section through it and you're going to clip it out of the way I'm just going to put a little rubber band on it again. I just like the little clear ones. I have black ones too. So if I'm doing a brunette or some very dark hair black hair, I will use the black rubber bands. Okay. So now that that's up, I'm just gon na pull on my pull on my sections. A little bit and we're just gon na do it again so split right in half, bring the bottom side through and clip it out of the way. I love these um these alligator clips, because when your hair is in it, they bend to accommodate the thickness. You have thick hair like Brianna, they're, fantastic okay. So as I go once I get a couple sections down, I'm gon na start pulling these apart, her hair, since it's so thick, I'm not gon na. Add the texture powder down here, but if your hair's on the finer side - and you really want it to look full, I would add more of this powder on the braid. You can put the powder on before you even start the braid before you do. The rubber bands, but it adds so much grit to the hair that it makes it a little bit hard to work with. So I like to do it after I do my braid technique. Okay, super cute, so I'm just going to keep doing that. I'M going to split it apart, bring this through and we are live. Most of my tutorials are livestream. So if you guys have any questions, you can add them to the live chat and I can get to those in a second. Do you braid your hair? Very often Briana, sometimes I usually like my sister braids or when I try to braid it is yeah yeah. Your hair is still long and thick. It'S probably nice to have somebody else. Read it yeah and Briana is a twin. So that's awesome. You can just hug, you have to braid each other's hair mm-hmm. That'S honestly! That'S the best way to learn here. If you start by braiding somebody else. First, your mannequin or something like that. It just eliminates an obstacle for you, because if you're doing your own hair, it's just hard to get your hands behind your head, you can't see what you're doing so. I always tell people just to order like a cheap, mannequin head or if you happen to have a twin use, her practice, I'm gon na go. You can stop halfway with us. That'S really cute. I'M gon na go about two thirds of the way down. I don't know why, but with half up sometimes I just don't like the look of the braid going all the way down. I think it's cute if it kind of cuts off so as I get towards the bottom, when these pieces are thinner like this, just naturally everybody's hair thins out towards the bottom. I like to pull apart each piece as I go, because you don't have as much hair to work with, and you don't have to clip each section like this one I'll do without clipping you just split the one in half, bring it underneath and lift the bottom Up and you can just keep it out of the way with your hands, it just helps when you're first learning this braid to do the clip method, just because it keeps your sections really clean. It'S super easy, but you know do that, okay, so what I like to do, how I like to finish it is I don't um, I don't love, always like a hair tight at the end, with both bones. Sometimes what I'll do is I'll? Just take my little comb and I'll just backcomb the bottom, and that way the hair spreads apart and it just looks like naturally her hair ended the braid. It'S cute, I think, to not have a little rubber band and I'm also going to show you how to hide this. So I like to hide all rubber bands and all little bobby pins when I'm doing styles. So what I'm going to do with these is I'm just going to pull them apart a little bit more, so that each rubber me on slides up into the previous braid. I think that's really cute and you can make this as fat as you want. If you want it super super chunky, you can really get in there and pull it apart. Okay, so now to finish, I always love to cover the rubber bands. So what I'm going to do is I'm you're, just gon na take a teeny cute little section from either side over here and I'm grabbing it from under this breaks. Like I said, I want it to look like the style is all hidden by the braid. I'M gon na take two pieces and I'm just gon na cross them over that rubber band and I'm gon na pin them up like that. That'S really cute, so we're just going to take a bronze little bobby, pin and just push it up in there same with this side, and what I'm going to try to do is I'm going to try to overlap the bobby pins in a little X. So we already have one in there, so I'm just gon na push this one up in there and exit with that other one, and that way they won't slide out. It'S not hair will stay hidden. Then I'll loosen battle a little bit. I think that's super cute. I'M just gon na give her a little side to side spin. So you can see, I just love it. I think it looks really different. It looks very complicated, but it's super easy if you practice your braiding skills. So this is the inverted French braid, the Dutch braid, and then this is just the full through brain. That'S all you need to do and again just to finish it I'll. Just go through and pull little pieces make sure everything is looking the way I like you can add more texture powder, okay and then I'm just going to finish with some hairspray. So this is denying me hold me tight hairspray, it's gon na finish. So what I like to do is just push down some of those flyaways, since this is a textured look. It'S gon na look a little bit nasty, which I love, but I do want some of those flyaways to be pushed down. So that's what you're going to do with your hairspray at the end. So let's go ahead again now that it is finished, let's go ahead and shoot the before video one more time, so you guys can see we always do the before and after with makeup. So it's fun to do them with hair too, and it's super cute - and this is what I love about this, because there's so many rubber bands in it. This will stay all day. Briana can run around. She can go to retract me if she wanted and put it in a pony or something like this, and this will stay like it is not moving so super cute. I hope you guys liked it. Thank you for watching, and we will see you on the next tutorial.
Comments
Laura Foncellino: So cool! I love it. Beautiful model! By the way Julie- so love your outfit - I'm a big animal print w/ black fan. Your ponytail is also cute!
Jen S a Cocooned Butterfly: So beautiful Julie you are so talented! I don’t know how to do a French braid yes I know just regular braids prob easy but looks hard but I’ll rewatch thanks for sharing!!!!
Juliet Toler: WOW! That's GORGEOUS!!
Melissa Stockwell: Wow! That is exquisite!
Elizabeth Vera: Beautiful braid!!
Millie Reyes-Pabon: Wow!! So beautiful