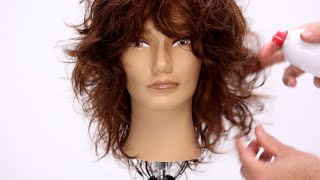
Quick & Easy Medium Shag Haircut For Women | Medium Length Layered Cut | New Hair Cutting Techniques
- Posted on 14 September, 2021
- Medium Hair
- By Anonymous
Quick & Easy Medium Shag haircut for women | Full Tutorial Step by step
Medium length Layered Cut | New Hair cutting techniques & Tips
*Giving is hold forever*
When you're working with a ponytail technique, i think what you're going to find most often is that sometimes it takes a little bit longer to map it out and to actually place your ponytails more than it does to do the cut so again, something very quick to Do once you get these ponytails in okay, so, for example, i knew the look that i wanted to go for and today what we're going to do is we're going to work with a heavier, rounded out fringe area, a more solid perimeter and then just a very Broken and shattered interior, so when you're working with a ponytail cut, when i do them in the salon, it's always something that gets a lot of looks people will turn their head and ask. What is she doing? Is she crazy? Has she lost it? It'S such a fun technique, so when we do any type of a ponytail cut - and you can do this - i've done them with one great big ponytail. I'Ve done it with four i've done it with ten. There is no limit to it. So how we talk about mapping it out is that you always have to remember that wherever your ponytail is sitting is going to be the shortest part of that section. Okay, so with this particular look like i said, i want to see something that has a little bit more fullness through the interior and again a more solid perimeter um. I was reading an article the other day and it made me so happy, but they were talking about how big hair might be coming back. So i kind of took a little bit of inspiration from that, because nothing would make me happier than going back to a point in time when nothing was more important than great white, bon jovi and white snake and the bigger the hair, the better it was. So i'm going to embrace that big hair kind of feel today. So when you're placing your ponytails, you always want to work with either a diamond section, a triangle or even some zigzags, okay, so zigzags the bigger the zigzag, the the the more chunky-ness or more um. I guess the right word would be disconnection that you would see within that haircut, so i chose pretty much to work with triangles and diamonds. Okay, and i didn't do anything with the bottom. I just dropped that out again. I want that to be a little bit. Heavier okay, so all of my sections, i've got a triangle in the front and then everything else is a diamond going around. Okay. Now, in the front, i want a more rounded fringe area so by sectioning in a triangle to get that fringe section and then pulling everything down and dragging my my pony into the center when that's released, you'll see a nice roundness to it. Okay, so i prepped her hair with two of my favorite products in the whole entire world, so i use the rusk wired and also some of the rusk thick. So these are from our designer collection - and these have been around for a very very long time because they are so phenomenal in the designer collection. Things are color-coded, so they will either be red or blue or orange or purple. So anything, that's red or orange. In this case is going to have something called thermplex and what thermplex is is it's a heat activated conditioner that, with the addition of a blow dryer a flat iron or a curling iron, it's going to drive that product into the hair the greatest thing about it, Though is that you will get the benefit of product without the feel of product in your hair, i personally love that i don't like a real heavy feel of product or really strong, strong hairspray in my hair, so i blew it out and really kind of got The shape in there that i wanted so we're going to start cutting, so i'm going to be using a lot of different of the a lot a few different blades today, so the first one that i'm going to use is going to be our delta blade. So i don't know if any of you guys have had the opportunity to play with these. I would really really strongly encourage it. All of our blades are going to feature a rotating thumb on them. So, if that's not something that you're using in the salon now, i would definitely encourage you to pick some up and play around with them. It will take you, i don't know, maybe a couple days, some people it takes a week or so to get used to it, but once you're used to it, the benefits are fantastic. I'Ve been doing hair close to 32 years now. I know crazy and probably for the last 20 22 years, i've been using that rotating thumb and it honestly has saved my shoulder my elbow my wrist. My back the whole thing so what's happening is with that rotating thumb. It'S really allowing you to work in a more comfortable body position: okay, so, as i'm cutting off length and through the top or going around the ear, i don't have to really lift my shoulder all the way up to get what i need. Okay. So when you're using these you're going to find that your hand is able to be in a more comfortable body position, so if we take our hand, this is the interactive part of today. If you take your hand - and you shake your hand out - where does your thumb fall, your thumb naturally just kind of falls back when you're working with a stationary thumb, it's driving that thumb forward so now you're in an unnatural position? Okay, so watch so here's. My rotating thumb, here's my natural hand. My thumb is still staying back, so it's in a very comfortable position and then, as my hand, kind of moves around that rotating thumb is going to stick with wherever my blade is going again, just allowing me to stay more comfortable okay. So, let's start so, i started with my first diamond section right on top of her head here: okay, so we're talking about. Where is it this guy right here? Okay, i want there to be a lot of fullness in through the top, so by dragging this into the center of my section, that's where i'm going to see a lot of that volume pop out again wherever your ponytail sits within your section is going to be The shortest part now know that you can also drag this around so say i wanted, which would be kind of silly, but it could work too say i wanted to have more fullness in through the front. I could drag these ponytails forward. Okay, so that's going to give me my shorter my shorter pieces. Okay, i lied we're not going to start doing this yet so again. I want that bottom or my length or my perimeter to be a little bit more solid, but i don't want it to be super crazy, heavy. So the first thing i'm going to do - and i already went in earlier this morning and established the length in her hair. So what i'm going to do is i'm going to take my gamma blades. Okay, gamma blades are going to be a 35 tooth, texturizing blade. So what happens with these is that it's going to create a very velvety feel in the hair, and i have to tell you i use texturizing blades, basically on everyone, and that doesn't mean that i'm dissing, you know, point cutting or using a razor there's a ton Of different tools for us to utilize in the salon and whatever you choose to use is completely up to you, perfect. Okay, whatever works for you use it. This is what works for me, so i'm just going to take vertical sections right around her head. Okay, so i'm going to start right in the front and i just want to remove some of the weight okay, so i'm going to come in and just slide that out keeping my fingers moving so that i'm taking off some of that bulk in there okay. Let'S turn a little bit more, this way, so just vertical sections all the way around nothing too crazy, because i don't want to shatter that perimeter line coming in about halfway through the the section of hair, keeping your fingers sliding and you're really bouncing these blades around. So that you're, almost rick laying them sliding it right out and again these are the gammas. This is a 20, i'm sorry, a 35 tooth. You know a lot of people have a lot of different feelings about the texturizing bleeds and i think, once they kind of get explained the right way or a different way. I know i hear people tell me one thing one way and then somebody else tell me. Basically, the same thing in a different way, and i catch on a little bit more. It'S just the way. It processes, okay, when you're working with a texturizing blade, it's very important to take into consideration the texture of hair that you're working with okay. I personally feel that every head of hair can have a texturizing blade in it. Even that really curly textured hair can still have a texturizing blade used within that haircut. You just have to pick the right one. Okay, if i had a really curly head of hair, would i use the gammas, probably not the the more teeth, the more weight i'm taking out of it and a lot of times with curly hair? There'S that perfect balance of having some weight but not too much weight, and then, if you take too much of that weight off, then what happens? Is it really encourages that hair to kind of frizz up? We don't want that to happen so on a curlier texture of hair. That'S when i use utilize my alpha blades, so the alpha blades are an eight tooth, texturizing or weaving blade. I always find that it's best when we're in the salon to not refer to these. As a thinning shear, i have really really fine hair. Now, if you tell me that you're going to come at me with a thinning shear unless you're going to my thighs, i really don't want anything to do with it. But if you tell me that you're using a texturizing bleed that, in my head immediately clicks that i'm going to have a better texture of hair, so choose your blade wisely. A lot of people will think that this alpha blade is going to take out the most amount of hair when in all actuality, it takes out the least amount of hair. Okay, because there's a larger space in between the the teeth. That'S leaving more hair in each section, okay, so the alpha bleed is a great great blade for curly hair. The gammas, like i'm using on my mannequin, are pretty much my standard go-to. I find that this is a great great choice for just about any texture of hair. Then, if i have somebody that has really thick hair, that's when i'm going to hit up with my beta blades, my beta blades are a 25 tooth texturizing blade and you can see, there's two smaller teeth or closer together teeth and one larger. I hate the word chunk, but there's it's a chunk. It'S going to create a chunky, chunky feel with a velvety appearance as well, so just kind of keep that into consideration. Take your texture of hair think about it, use the right blade and i think that it will completely change how you feel about using texturizing blades. You know - and another great thing too, is to think about this when we're cutting with a texturizing blade, we're cutting blocks into the hair. Okay, so we've got longer hair and then we're cutting in blocks of shorter hair. That hair can't really collapse onto itself. A lot of times when you're point cutting you're creating a v within the hair and that v can then collapse on the hair okay. So if that's what you're? Looking for that's great and again, i'm not saying that that is a bad choice, but i really like that blocking i've gotten for my clients and for me i it gives me some volume. It gives me some movement um. My old boss always used to say that we attracted the kind of client that we are so i have a lot of shorter haired, thinner, hair, chubby funny last minute, they're they're, very, very similar to me. So that is how i choose my blades. So i'm going to continue on and again i'm just removing some of the bulk out of the the bottom of this and this technique too. Honestly, you could do this on wet hair. I just chose for the live today to do it on dry hair, because then you can see the complete finished, look and again going about halfway through that section working in a bricklaying pattern, so that i don't create steps of weight in the hair. A lot of people have a tendency to want to do their texturizing, where they're kind of taking a pop here taking a pop here, going back down through the ends and really what that's doing is in a way it's kind of creating steps of weight in through The hair, so by bricklaying it we're getting a much better distribution of the weight removal. Does that make sense last one in the front all right now we're going to move in to the top so with the top i'm going to first start by using my delta happy monday, everyone i'm going to start by using my delta blade, which again those are The straight blades and i'm going to start right in my crown section. Okay, so again, remember all of the hair that we're dealing with hair first has to travel from the section to the ponytail and out of the ponytail okay. So, even if i were to take this - and it may not be the prettiest thing, but it could be done and cut down low here - i'm still going to have about an inch of hair, that's coming to the ponytail and then about an inch and a half Of hair, that's coming out of the ponytail okay, so you've got a lot of play. People see this and kind of get really really nervous with it, but don't okay! So again using my deltas, i'm gon na remove that length. Okay, so that one's done so i'm going to come into the side and i'm going to pull it out from the center kind of judge that length a lot of times. I'Ll kind of pull this as a sort of a guide. But it can be kind of tricky, so you got ta there. We go. Okay, take the length off her fall, messed up. My ponytail kind of judged that, and you know, don't get too wrapped up in. Is it precise? Is it precision because we're going to go back through with the texturizing bleed and break all of that weight off of there? So no worries i mean if you've got one, that's this long and one that's this long. That might be a situation, but don't get too worked up about it. Okay, so those three are done. I'M gon na move to the back. I'M just going to clamp these out of my way, because i get very particular about stuff like that. Okay, so we're moving on to this one again, just kind of eyeball feel judge that length. This is truly one of my favorite cuts love this love, this love list, it's fun! It'S like it's like the suduko of hair, cutting like you kind of have to map it out. You have to really think about it and then the last one okay. So if we were to pull these all out right now, what's gon na happen is we're just gon na have big holes of weight and through, oh, you have to do the front one big holes of weight in throughout that haircut. So that might not be a good thing, so, of course we're gon na go in and texturize it to soften it up. Okay, so remember how i sat on this front one i want to see more of a rounded fringe. So again, i have to think about where that length is going to sit when it falls, but remember i've got hair, that's coming all the way to my ponytail and all the way to the ponytail okay. This is also a really great technique. If you want to cut a really beautiful, swoopy bang, if we were to drag our ponytail to one side or the other, it just creates that really soft beautiful side swept bang. But i want to see more of a heavier fringe. So i'm going to judge where that length is that's going to be long and again using the delta and all of the blades will have that rotating thumb on it. So even the texturizing blades are going to allow you to work more comfortably. Okay, anybody getting nervous! Yet so i'm going to go in actually i'm going to use my beta blades. So remember again, the beta blades are a 27 tooth texturizing blade. They are going to be the most aggressive they're going to take out a lot of weight, but they're also going to give me a more chunky kind of feel in the hair. So we're really going to see a lot of texture with that. Okay, so i'm going to just start writing through the top and a lot of times when i go in and texturize, i feel, like the section might be a little bit too big for me to work those blades through the right way. Okay, so a great way to determine where you need to start texturizing the hair - and this is not even just for the ponytail technique - it's really just in general, when you hold the hair up. Okay, if we go right up to those ends, see how that hair is standing straight up. But if i come down a little further see how that hair then starts to bend. Now i blew her out. I flat ironed her there's product in her hair, so where that hair is going to start collapsing, is going to be a little bit different. Just due to the fact that i kind of controlled it okay, but i'm going to come down a little bit deeper with it i'm going to go there, we go and again working with the the beta blades going to take one cut slide it out come through And bricklay that okay, so i don't want to see a solid line, so see how all of that hair kind of released and we have more movement to it now. At this point, i kind of look through it and just kind of see where i want to take off more texture. But this is exactly what you're looking for when you're doing a ponytail cut. So we've gone from something heavy, like my right hand to something more loose and airy like, in my left hand, okay. So i'm going to clamp it again out of my way and take the last little bit of that section, again: kind of judge where that weight is so where that hair is starting to collapse or bend just a little bit straight cut slide. My fingers, bricklay bricklay bricklay and then break up those ends. Okay, i feel like we need a little more out of the center, so i'm going to go for it moving on to the next one again breaking it in half. We don't want it to be too much hair that we can't get a really good judge of the amount of texture. That'S going into each section kind of spread it out again see where it's going to collapse. This one's going to be difficult, okay straight cut, then we're going to start that bricklay and really just breaking through those ends. So i don't see any concentration of weight or really solid heavy line, spread that out see where it collapses. Then you can even take it all in one section, make sure it's spreading out how you want it to i'm just gon na detail it out a little bit more okay, so i just broke up a little bit more of that length and through the the center. Okay and then i actually did a color on my lovely model today, so i did that friday. I think it was and i just used the rusk deep shine permanent. I did the 6.66, so the red red and i used the zero lift. So i mixed it to be demi-like, and then i also did a really old-school. Rusk color placement - um, not gon na lie, forgot to take pictures of it. So the color placement is, we call it our halo placement and what it is is that you're you're gon na make a section. That'S gon na kind of sit where that, where a headband would sit right, just about a one inch wide parting right, where a headband would sit, and then it kind of comes around through the bottom right below the occipital bone, so i just did foils um. You know sliced foils out and did back-to-back, and i used the 7.44 copper copper in that section there: okay, dividing that in half kind of shaking it out or spreading it out a little bit doing that again see how that hair gets real pokey. Wouldn'T you love it? If big hair came back, i think it would be so fantastic. There was even talk. The the actual video that i watched was a girl that she kind of did her hair like farrah fawcett. So it was all like that big feathering. I mean i wasn't there to experience it, but i heard a lot about how people used to feather their hair back all of the time. So it would be nice for me to live that for the first time ever wink wink. But i just there's something about big hair that it it's just fun, one more and remember. When you're doing this, you really want to keep your fingers moving and really have those blades bouncing around. We don't want it to get stuck in one spot and i'm going to come down a little bit deeper with this one, because i still feel like that. One is a little heavy. So i'm going to go right in through the center and break that up getting those guys out of my way, not that one spread that out there just wasn't enough coming off okay. So we want these to all look like pom-poms or the top of a pineapple, but you really again, you don't want to see a straight line in your ends. You want that to be all broken up. Okay, so now, let's do this fringe area this one's going to be a little bit more. I think we're going to just freehand this one. A little just see that i almost took off my finger. Okay, so ready! This is the best part. Now this is when the ponies come out, so you can either take them with your comb. I like to kind of slide them through my blades. These are the mannequin blades, so they're, not as super important as real hair, blades. Okay, the moment of truth, so we're just gon na shake it all out. I'M gon na actually press these out. Those rubber bands left some uh indentations in her hair per se, so i want to smooth those out. So i'm going to use the smooth, titanium, rusk pro flat iron. So this i love this flat iron because it's got a really nice long kind of uh plate to it. So the plates are really nice and long and the handle is long as well. So it allows me to just work through here a little bit easier, so i just want to move remove some of these indentations here, and this will go up to 450 degrees. It heats up so quickly, so i honestly just turned it on about a minute or so ago and we're ready to go. So. Keep in mind, too that when i was prepping her, i also used, as i was using using the flat iron, the thermal flat iron spray. Again, this is from the designer collection. It also has that orange cap, so it tells me that i'm going to be able to get the benefit of product without that heavy feel of product in the hair, so that is already in her hair. So i'm not worried about applying anymore. I didn't think about ponytail indentations today, okay, so you can see how that really created a lot of volume by using that technique by using the ponytail technique - and i don't know big hair - i'm hoping it's the new jam now, i'm just going to give this fringe A little bit of buns and, like i said you can do this technique on uh, you know wet or dry hair. Then i'm going to use some of the polish 03 from the rusk pro line just to separate it out, give it a little bit of shine and hopefully that will help to kind of pull this down a little bit too. So she was sitting for quite some time this morning with her rubber bands getting ready. So i want to just remind you guys that there is always great great information on the rusk deep shine, color stylist chat on facebook, so you guys can go in if you're not already part of that a lot of educators are on that page. So if you have questions, we're always happy to help you in any way that we can a lot of great formulations even from you know, just non-educator stylists that are out there that are using the color um. You can follow me if you want on instagram at sherrysha, rie underscore dot com uh our underscore rusk on instagram all right. So that's that and, like i said, remember too, every monday and friday we've got more great lives. It'S a little too big, yeah monday and friday great other lives all the fantastic educators that really take time out of their busy lives to get in on get on here and kind of share information with you in a new way, uh since the whole covent or Ordeal, it's kind of a great way to get some education get some inspiration all right. So then, i'm just going to use a little bit of the rusk weightless spray just to kind of finish. It put everything into place all right. So here is the finished. Look! Okay, so we've created a lot of volume. We still have that heavier weighted perimeter to it and again the color 6.66 red red as my base, and then i did the 7.44 copper throughout
Comments
Conrad Nel: love it. Definitely NOT too big. Good good great FAB!!!!
Naseera Nieves: Started to rush half way through, that's why I don't go to beauty salons!!!! Aaaaaahhhhh!!!!
Tisa6: Big hair has not been a thing? #80'sgirl
Lisa Chowdhury: Talk too much