Pixie Cut Wig | Tutorial | Beginner Friendly | Maayerlyn
- Posted on 23 October, 2020
- Pixie
- By Anonymous
Hey guys, hope you enjoyed my little tutorial and learned something
Don’t forget to like, share and subscribe for more upcoming videos
Follow me
Instagram :
https://www.instagram.com/maayerlyn/
Shop Custom Wigs https://www.instagram.com/maayerlynbou...
Snapchat: maayerlyn
Twitter: https://www.twitter.com/maayerlyn_
About me :
19 years young
MTL
Aquarius
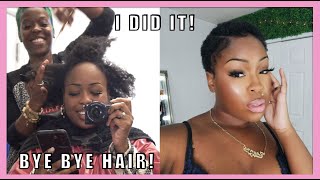
Hey everyone welcome back to my channel today. This video is you're gon na be watching me turn this full lace, wig into sort of a pixie cut type of wig. I do not remember where i got this wig from what company, but i know it's aliexpress and basically i'm just going to change the style turn it into a new wig and we'll see how it goes. So if you want to see me, do that just keep watching i'm a bad, don't let them tell you so first things. First, i am creating my part. This part is important because once you create your part, you cannot go back since we're going to be cutting the hair in different heights to create that pixie over the eye. Look so pick your part, and you stick with it, so we are actually going to work on wet hair because it's easier to cut and also this is my first time doing this. So the first step will be sectioning your hair into three three three three. What did i see three? Three? Three big sections, so we have a small section on the side that ends just behind the ear. A second section will just be the back basically back ear to back ear. It'S really important, you do it in the back of the ear. I don't know why it's important, i just know it's important it'll, be better to cut section and it'll be better to blend. Also, when because they're going to be different heights sort of so the second section will be the complete back and last, but definitely not least, will be your third section and final section, which is located in the front again. It'S you section it from the back of the ear. There'S still hair left over, so i'm just gon na put that back to the second section, and now you have three sections to work with next step. Now this step is optional. If the work your the wig you are working with is already short mine is longer and i want it to fall at the nape of my neck. So i have to cut it, but we are not doing a blunt cut. You'Re gon na see that i'm gon na blunt cut it. I'M only doing that to shorten the length we're not going to blunt cut this wig. We are going to be layering it. So again you can skip this step if the hair you're using is already short. So now, after everything is cut, we're going to get that to layering, you guys are going to do vertical sections like this and you are going to cut at like a 90 degree angle. So the hair is going to go straight out. So, basically we're going to be layering it. The hair is going to go straight out and you are just going to cut down i'll show you what i mean in a minute. So, as you can see, i keep combing it and combing over over again. It'S because you need to really make sure that the hair is straight and i kept losing grip, because i am wearing very long nails, so i had to switch to a brush and basically the hair has to be really straight for the cut to go super. Well. So, as you can see, the hair is going straight out like that and you're gon na decide where you're gon na cut it and you're just gon na cut straight down like i'm about to do right now, so you are going to do that. The entire back sections cutting vertical um sections and then putting the hair straight out and cutting straight down like i said before. This is a little more difficult for me because i'm wearing super long nails. But if you don't have as long as nails in mind or no nails at all, you should be okay and again full disclaimer. I am not a certified hairstylist or whatever i everything i learned how to do. I learned it with practice or youtube. So, just a little disclaimer right there, my so just to give you guys a quick view. Look how amazing the back looks after cutting it. The way i did i'm just gon na comb it out to get knots out if there's anything like that and i'm just gon na fluff it up to show you guys the layers that i created cutting the way that i did so now. It'S time to move on to the second section, i keep a a spray bottle next to me because i'm working on my hair and it dries over time. So this section is gon na be shorter than your back section and we're basically going to cut it. The exact same way we cut the back section but shorter, so here it was too long, like i said supposed to be shorter than the back section. So i just went in, and i did it again and, as you can see, i literally cut my fingers using these shears. These are hair scissors, do not use regular walmart or irregular craft scissors use actual hair scissors. Please i forgot to mention that to cut the hair, so, as you can see, it has like a the grading effect. I think that's the english word for it like it seems it's it's short, but as you go further from the back, it gets a little longer. So you can blend and from the back to the back foreign. So now we are into the front section. This section is gon na gon na be a little different, because i want the hair to fall in front of my eye in front of my face. So i'm not gon na comb it to the side and cut it. I'M gon na cut it exactly. I cut it, the other section, but i'm just gon na comb it forward, because i want it to fall and cover my eyes foreign. So now up until this point, if this video gets a little repetitive, it's the same, cutting cutting method that i'm doing the same technique, except that the hair falls towards the front. So you guys can watch the rest of the video after the cutting i'll, show you how i flat ironed it. So i can get the style that i want now when it comes to flat ironing this hair we're gon na, do what we didn't want our mama doing to our hair, when we were a little we're gon na give it a little bump. At the end, it's important that the hair doesn't just fall flat because it is layered just give it a small bump at the end, i'll i'll show you guys what that does in the end, just make sure you do. The little bump doesn't need to be drastic. Just a tiny bit now the front section i wanted to have a little volume, so i am going to flat iron it going upwards, that's just going to give the hair a lot of volumes and it's going to fall beautifully in front of my eyes. So you will see that when i'm flat ironing it the flat iron will be going in an upwards direction. Yes, so so so this is me trying on the wig right now. It'S not glued, i'm just seeing how it fits honestly. I need a round of applause, because this was my very first time doing something like this and it turned out amazing. I think i'm going to turn around and show you what the back looks like, but this is what i this is what it does when you flat iron in an upwards motion, you get a bounce, you get a volume, and this wig really turned out super super Great i'm gon na glue it down in a minute so guys. This is me with makeup. In the final final look, i haven't drawn baby hairs to the wig, yet that's why the list is still showing a little bit, but this is it. I really really hope you guys enjoy this video or at least learn something from it. Click that little picture you see at the bottom and subscribe to my channel for more upcoming videos related to hair beauty or just my lifestyle in general. Thank you guys for watching, and i really really hope to see you guys next time. Bye,

Comments
FellowEarthlyng: We love a self-taught Queen!!
Maa Adwoa: Thanks Now I’ve an idea of how to cut mine