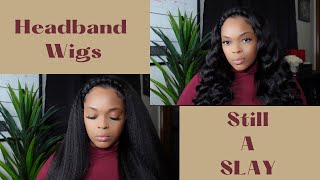
No Need For Melting Or Gluing Diy Headband Wig For Only $20 Baddie Hairstyle |The Ponpons
- Posted on 04 February, 2021
- Pixie
- By Anonymous
#headbandwig #nogluenolace
I'VE DONE IT AGAIN!!! I've created another budget-friendly Headband Wig and it's 22 INCHES LONG!!!
.
Hair was purchased from my local beauty supply store.
Purchase Headbands for Your Headband Wig⬇⬇⬇
.
Pixiecut Headband Wig
$15 DIY Headband Wig
Nia Wigs 16in Curly Headband Wig
.
Lookin' For New Besties
Instagram: @chante.ponpon
https://www.instagram.com/chante.ponpo...
.
Email: [email protected]
Hey friends, welcome back to another tutorial, it's your girl, chante, and in this tutorial i will be making another cheap budget friendly, inexpensive, headband wig and, as you can tell by my reaction, i am in love with this freaking look, so the hair is 22 inches long In the color natural black, it is synthetic and guess what it only cost me 20 dollars to create this headband wig, absolutely in love with it. So in this tutorial i'll be showing you guys how to create your headband wig, how to style your headband wig and as well as how to prep your natural hair for this protective style, let's go ahead and jump straight into the tutorial all right starting off. This is what you're going to need. This is a wig grip. This is what i'm, using as my elastic band, to hold my headband wig down on my head now. I chose this band because it has silicone on one side and then the cloth on the other side, and then it also comes with the velcro strap on it. As well for easy adjustments to fit all head types on my last headband wig, i had to sew a band together and add velcro to it. I just came across this and i was like, let's give this a try, and i was very surprised. It was super secure because of the silicone you don't have that slipping going on, so i loved using the wig grip. So this is your cheat code, use the whip, wig grip for your elastic band on the headband wigs. So i'm going in gluing all of my tracks onto my mesh dome cap. I hate sewing. It is just so long. It takes too long. I feel like gluing is just so much more easier, and all i have to do is just take my t-pins to hold the tracks to the dome cap, give it a couple of minutes to dry and then move to the next freaking track. So it takes no time in making this wig. I think it took me. This is time lapse, maybe 30 minutes just to lay all the tracks. Now i do let the glue dry overnight, just because there's a lot of glue, i'm putting on this dome cap so to make sure that those tracks aren't going to budge or try to come off of that cap. I do give them time to dry now, as you can see from the video as i'm laying my tracks, i'm trying to make it into like a u direction from one edge of the band to the other, and then once i get that nice, you and i'm At the crown of the head, we're gon na start laying those tracks going across so from one part of the? U to the other side of the? U and we're going to do this until we meet up with the band and then we're going to close all those tracks in because we don't want to be able to see all of those tracks and i'mma show you guys how i do that, as well as How i'm going to attach this wig grip band to the dome cap, all right friends, so we are almost done as far as with laying our tracks. So this is how i'm concealing all of those tracks that are behind this one track. So i'm taking one really long one and i'm kind of doing like an ear to ear across the front of the band, and i'm gon na lay two of those tracks directly in front of each other. So they kind of conceal each other and we can hide all that glue and all those cut wefts, and all that this is what is going to to conceal all of that going on within the wig. And then the band that we have laying. There is kind of i pushed it out of the way so that i could lay the tracks we're going to pull that back and we're going to have. It lay right on the edge of the wealth of the tracks, so we can cover that all up. So it'll all look seamless all right. So here is our finished product right now, so she has dried and i'm showing you how i attach my headband wig to the tracks. I just sewed it in there real good and, as you can see, you cannot see the welts of the track. It all looks like one seamless wig, and now we are going to cut the remaining dome cap off. We no longer need it. Our wig is complete and then this is pretty much where our edges are going to be so laid at anyway. So we need this part gone, and it is now time to try this on so before we do that. Of course, this is a natural hair channel. So we have to talk about caring for our natural hair, so i'm going in wetting my hair and i'm going in with the texture id coils daily, moisturizing cream. It'S pretty much a simple leave-in conditioner that i use daily, and this is what we are going to use to massage our scalp go ahead and work it into our hair and then i'm going in with a brush and i'm brushing all of my hair back. My hair is still really short and it's too short for me to be able to catch so i have to just brush it all back before i put my ball cap on and then we're gon na go into trying this gorgeous wig, and i just cannot wait For y'all to see these results like, oh my goodness, i just was amazed by how good this came out. I really just like shocked myself. I got ta like go out and make some more of these like, ah, and for only twenty dollars. It'S just insane. I don't i don't know what to say, but they go. Why did it take me so long to make this? Why? Why did it? Let'S go ahead and get into this like? Oh, my gosh, look, look at look hold on stiff, wear, stiff wear this one. Is it this one is? Definitely it oh, my gosh. This is 22 inches of hair. Like my goodness, it is i've. Outdone myself. I have outdone myself, like i don't know where to go from here like i just i really really like it, and on the flip side of all of this, for it to look this freaking good 20 dollars this. This was twenty dollars. That'S all i did was pick up. Some twenty dollar hair and made 22 inches worth wow like headband. Wigs are their takeover. It i mean it's just it's just no way around it like they're, so so simple and so easy to manage and keep up with and put on like this. This is the synthetic hair. It isn't human, but you can use heat. I believe up to like 400 on it. If you do want to put some bends or some curls into it, i wanted bone straight, so i got bone straight honey. The hair is super straight. We will have like we run into some problems as far as like styling and different looks, but um honey, i'm okay with just throwing in and playing until i'm keeping it down because there's just no way like the i just i can't get over it. I can't get over it. I can't i can't i absolutely love this new look um and for it to only be twenty dollars, giving me all the pocahontas rapunzel, whoever you want to throw up, and that makes vibes just giving it to me giving it to me. I got ta go somewhere, i got ta like get dressed and, like i got ta i got ta put an outfit on. I got ta like put some heels on, because we just not about to let this look go to waste. We just we can't let this this should let you know you need to make one this one right here should let you know right now: you need to be making one. You need this in your life like right now, asap immediately like run to the beauty supply store right now i am going to leave the links on of where i purchase my headbands, where i purchase my hair and all the materials used. I will leave all of that in the description box, for you guys. This was my first time using that type of hair that brand of hair. I love it. I absolutely love it like i just i just for y'all who have stuck it out for this entire video watching me make this headband wig. I greatly appreciate you, thank you so much if you aren't already go ahead and subscribe to our channel hit that like button. If you really are feeling this because honey i am, if i could hit the like button a hundred times, i promise you. I would let it count for 100 times. I promise you. I will thank you guys for watching. We will see y'all on another video. Don'T forget to check out our other links below to check out other diy headbands, as well as where to purchase a headband if you're not into all the diying, we will see y'all on our next video be safe and be blessed.
Comments
Kimberly Jones: You’re so pretty and so is this wig! Great idea about using a wig grip for the headband part of the wig. The colorful headband over it was also a good choice. Goes well with the hair since it’s straight and dark.
Laurice: This looks Amazing, & best of all, Less Sewing! At this price, little girls can wear one too. With all kinds of textures, styles and length. A quick do for church, school picture day, dining out, birthday parties, or other special occasions. In a snap, she’ll look like a little Princess ! Bip-pity, Bop-pity Boo! ✨Thanks for sharing
Valerie Coleman: Hey Cousin I love this on you. Thanks for the tutorial. You are so created in many things.
Yvonne Ellis: Thank You for sharing your video and I loved the way you that you made it so very easy.
Dee McDuffy: $20 !!!.. Where my keys and purse.. *thank you for this video hunny..
Sylvia M: Did you skip how you sewed the wig grip to the tracks?
Greatful I Am: For those who make wigs, this is probably nothing new or no big deal; however for those who are trying to learn how to do it, it would have been helpful if you had slowed down the video.
Jane Eyre: So pretty