Sassy And Chic Pixie Cut Wig Tutorial - Indi Tara Tutorial
- Posted on 04 January, 2017
- Pixie
- By Anonymous
heyyy!! sooo...
hair: Outre Indi Tara 27 pieces
soo i bought this hair for $14.99 at my beauty supply store BUT you can find it online for $9.99!! -
http://www.samsbeauty.com/service/Huma...
--------------------------------------------------------------------------------------------------------------------------------------------------------
Instagram: https://www.instagram.com/sarahsolbeau...
For more wig blogs, videos, tips and hair preferences/styles check out my website! You will also receive discounts and notifications on hair deals
Website: http://solbeautywigs.com/
Wig instagram: https://www.instagram.com/solbeautywig...
NEW HAIR STYLE GAMES POSTED EVERY DAY ON IG STORIES
Facebook: https://www.facebook.com/solbeautyoffi...
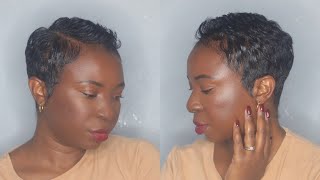
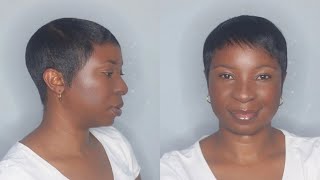
Hey everyone, so we're going to start off with this Indian Tara, hair from I'll try. We have two lengths, one two and three and chickens. We have the mesh dome cap or sorry this by next own cap, the hair glue scissors, the electric razor and the comb razor. So we're going to start off with our spandex own cap with a plastic bag on top of the mannequins. But I can restrict the glue from seeping on to the mannequin head. It'S going to cop the excess. I place some spots where my neck is, and I wanted to place the hair the longest length on the back of my neck, but um. I was trying to do something different and it kind of didn't turn out as good as I'd like it to look so we're just gon na ignore that. But I did put the longest signs, the long laughs, the longest length first and then I moved on to the shortest length. And I put that on top of the long slings, because I wanted to try something different you'll see later on in the video. But you don't have to do this. You can always start off with the shortest lengths first and then work your way up to the longest lengths and I'm just going to glue this hair on the perimeter of my head. But I'm gon na leave a space in the front where I want the bangs to be so. I'M just gon na measure cut some glue. You know pretty pretty easy stuff, you you it so now, I'm starting off with the bang area and I'm going to use the longest lanes for this area, and I'm going to put that right up the forefront of where I want the hair to lay and as You can tell it looks fairly like I've been going in a circular motion and I will eventually go on a circular motion, but I just prefer to like work in sections, because I hate gluing hair in circular motions like I just hated so much. I always myself but yeah. Now I'm gluing in the circular motion, because I have a smaller perimeter to work with you. This hair came with a closure, a custom-made, premade closure that came in the box, and I'm just going to use that as my closure today and I'm gon na make sure that the hole is small enough and I'm gon na put two on the bottom of the Closure and just place it on the top of the hair to conceal the wax and we're basically done in terms of gluing the hair. Now I'm just adding some extra tracks on the side of the wig because it looked very empty there. This is my first time making a short wig like this, so it takes a little bit of practice so get it like perfect, but I'm just gon na use my razor comb. You just cut off any lanes that I don't want like any long lengths, so get it as short as possible. I wanted to be really short, so I'm just using that razor comb again to just neaten that up a little bit more, you see I'm just using the electric razor to neaten up the back just to get it to look as nice and sharp as possible. I definitely wanted to look very short. I don't know I wanted like to look really really short and super chic and cute. That was look. I was going for. I decided to just shave it all off, because I just didn't want that kind of long length at the back of my neck anymore. It was a last-minute change. That'S why I added the short hair, the longer hairs at the nape of my neck first, but so now, I'm just gon na curl, the hair, because I wanted like the pixie curls and that was kind of the look that I was going for. So I'm just gon na curl it - and this is very hot, like it was so hot. Like look at my face um and using that with just my hands, not a glove is so dangerous. I would recommend using the thermal. I love her sure when you're doing this, because I didn't burn myself, but it was just so hot that I just couldn't deal and basically you're done like I'm basically done with this look, I'm just gon na you know shake it up a little bit more to My liking and I'm really diggin it. I'M feeling a lot actually looks really here. I look so different. I know I love it. Let me know if you're feeling it too you you hey guys, wasn't that super duper easy um. This was definitely my first time making a wig like this, and I definitely definitely want to make more in the future, because I think this wig had a lot more potential, then I gave it um. I definitely like the way it came out for sure and if you like what you see, don't forget to hit that subscribe button for more videos, because I'm making new videos every single week. Yes, you heard me right every single week, like it can't get better than that um, so yeah. If you definitely want to see new and more exciting videos, then hit that subscribe button. Really, it would mean a lot to me if you subscribed and liked this video. As well and I will catch you guys in my next video bye,


Comments
Kurosawa Gin: Looks amazing
Your Bestfriend: you're so talented and gorgeousss!!
Tamaria Lakayye: Love Love Love this VID!!! New to the channel & welcoming you too mines :) Xoxo!!!
Donna vivienne White: I can't see how you did the front