How To : Pixie Cut Tutorial.. Beginner Friendly
- Posted on 02 January, 2021
- Pixie
- By Anonymous
Hi loves, welcome back to my channel. In this video, I shared how I do my pixie cut.
I hope you enjoy it and learn one or two things...
____________________________________________
PRODUCT DEETS:
Miss Rollers or Dijavu
Lanell bond
Nova holding spray
Dome cap
Scissors
Razor comb
Clipper
Brush
Shearbutter
Above oil sheen
Above styling mouse
Curler
Small straightener
____________________________________________
FILMING EQUIPMENTS
Infinix smart 4
Ringlight
EDITING SOFTWARE
Youcut
Music: Shining Star
Musician: Koichi Morita
URL: http://maoudamashii.jokersounds.com
____________________________________________
VIDEOS TO WATCH!!!
HOW TO CUT LONG HAIR TO SHORT CURLY HAIR... Hair transformation, simple and beginner friendly...
HOW TO MAKE CURLY HAIR WIG USING MIRACLE HAIR...
____________________________________________
LET'S BE FRIENDS ON:
Instagram:@Marymoe12
Twitter:@Marymoe60
Facebook: Mary Moe
Facebook page: Mary Moe
Gmail: [email protected]
____________________________________________
Please friends, don't forget to like, share and subscribe to my channel...
____________________________________________
PSALM 91
____________________________________________
STAY BLESSED!!!
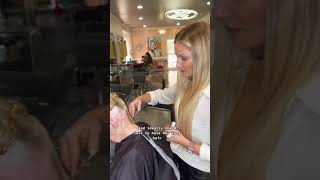
Hi guys welcome back to my channel, hey guys if you're a new subscriber. Thank you so much. Thank you for subscribing and, if you're returning subscriber oh thank you and today we're doing a pixie cut, guys a pixie cut. Yeah, i'm sure you guys are gon na enjoy this video. So, let's move right in so after placing the cap on the head, you now cut out the waves you are going to use and make sure you place it very well make sure you put it in the position where it will be flat on the head. You know the placement of your of your pixie matters a lot, so if it's not turned up it's better that way. So after placing it, you start putting your bones, you know just like, as i'm doing after placing bond on the waves i still like to place bone on the cap, so that you know it will be very faint. So you see the pose you see the way. I placed it now: the bundle the the waves is not toned up, make sure it's not turned off. You know, then, after that i put my spray. You know just to hold everything together and then i use my fingers to just smoothing everything. So you go just like that. You check for the right position, make sure it's not turned up. You see the way it is. Then you place it here, just in a way that it will be flat on the head. You know you see the way that one is now it's very flat. As i mean you turned it, the other way around it will be turned off you know, and then it will affect your coating on your trimming again. So you repeat the same process again. Put the bundles on the line of the waves then put, i said, the bond is the bond. Sorry guys put the bond, then steep boots bond on this on the cup, just to be very sure that the the waves is not going anywhere yeah after that you, you spray your way above variation above after that you you spray it. Okay, then repeat the same process: all right make sure it's not toned off guys avoid it being toned up. Then you add your spray just to hold everything together. Okay, so you trim you start trimming because me i trim as i go so that i'll have that very flat result, because if it's too full you'll not be able to trim it very well, so i trim as i go. You comb, you dream, you know she, you see the way it is now. It'S not turned up. That'S. Why he's already giving me a flat result, so that's what he wants, make sure he's not turned up. Okay, foreign, oh, is oh guys, see where i'm placing the pond. You want to go above the ear. Now we've been, you know, we've been placing it at the back of the ear. Now we're going above the ear a little bit. You know so we're trying basically trying to climb up. You know just just keep climbing as you go me. You see that you climb and make sure it's not turned up. So you make sure your placement is right. You know place it in a way that it will be very flat on the cap on the head. You get so it has to be very flat, don't place it the other way around, so that it's not torn up, and then your trimming will not be flat. So yeah make sure to trim as you go, okay yeah so right now we are ready at the top. So you see this is where we are facing right now. Is you guys? I see this part here that i want to make these parts high, because i love the look of it when it's high, so i'm going to place more waves, more heavy, you know without giving space just that top. You know you see where i'm placing the bone from that yeah so i'll just place the bone where i want the highness to end, so i'm not placing it all around because doesn't i'm not? I don't want it to be very high all round. So it's just these parts yeah, so i'm going to place more bundles of hair there more web stay, so you can make sure it will be very high without any space. You know not giving any space in between yeah. You guys see that so when i feel it's high enough, i will now stop and then you know try to do some trimming and they will move ahead. Yeah guys. My client said she wants um side parts. She says she wants his side part. So that's what i'm trying to measure and then you guys will see how i place the the wave so that i'll have that side part. So one part will be high, then the other part will be low. So you see these parts now, i'm starting with that's. Where i'm going to be placing my waves, i will not be placing at the other side. Okay, so yeah, just like that as i go, so that these other parts will be high, while the other side would be low just to have my side parts. Okay, i hope this whole thing is making sense, because it's not easy to explain guys. It'S not easy yeah at this point. If you've not subscribed, please subscribe, okay, help your girl subscribe, okay yeah, so you see what i'm doing. That'S it you keep play since you get to where you want the line to end. You know yeah, you guys see, i'm almost done so it's just these other parts, i'm placing i'm not listening on the other side, as you guys can see. Yes, oh hey guys see. So when i get to levels everything meets i'll, just place it and then make sure they are very close together. You know very close together and then i add my spray. Tighten everything up. You know yeah, yes, just to close the pot. This is what i'm doing to close the pot. You know placing it together so that the two parts meets and then ends. You know just close the pot yeah so place. It very well, very close, very tight and very neat guys. It must be very neat so yeah i use my razor the end, the scissors guys the end part of my scissors too. You know, pull it down and then we'll start trimming again. You know these other parts. Now i want these parts to be low. You know because the side part, so this butter is low, i'll trim it down and make it very flat and neat and now move to the other part. So i want the down part of this side to be low. Why the top part of it will be high, so you guys see how i'm trimming now i'm not trimming all the way. Oh i'm just trimming downward, then the top part will be high. You guys see what i'm doing and then the top part i'm just using my scissors. You know just to do some touching so that it would be very like uneven. You know just to give it that natural result, so i'm not trimming the way i did for the other part of the the head. I'M just like using my scissors to touch the top part, and then i comb again comb push the decide. I want to be high up. I push it up, so that will have space to trim beneath it. That is under it to trim. You know the down parts. I push the upper part up so that i'll have space for that. So you go over it again, especially even the back. You make sure you trim to have that very flat result. So i love my pixie coat to be very neat and flat, so you trim every way that you need to train foreign is so after that i go over my clipper guys. This is not clipper, it's not sharp again, so i just managed it and then i went back again with my scissors. I couldn't find my razor comb guys, so i used my clipper and then i went back again with my scissors. Just to you know, touch everything up, and then i use my coiler to flatten it again guys. This is my crayola zoo, the part that i want to be very flat and low. I use my coiler to flatten them yeah. You guys see it's coming at nine. Oh, my god, i love this pixie cut because after that i i used. I applied shea butter spray, the sheen spray, the sheen and then went right over the top parts with my streets now just to give the topper some cords. You know the top part. I give it some cords, you know yeah, then i'm going to write the game with my oe sheen, and this is the final result guys please don't forget like share and subscribe to my channel i'll, see you guys in my next video bye. You


Comments
belle_graciaz: Wow this came out so beautifully babe, I really love it