Pixie Wig With Blond Highlights|2017
- Posted on 25 June, 2017
- Pixie
- By Anonymous
Hey loves!
Another quick and easy pixie wig for you!
Hope you enjoy. Dont forget to give this video a big like and subscribe. XOXO
Making a closure for pixie wig
THINGS USED:
hair-Rush 27 piece
Bonding glue
Stocking cap
Razor comb
Scissors
Foam head
BUSINESS ENQUIRES
CONNECT WITH ME
INSTAGRAM - Kaybae_royale
SNAPCHAT- kaybaeroyale
FACEBOOK- Kaybae Royale
MUSIC -AJ BEATS
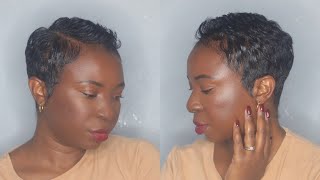
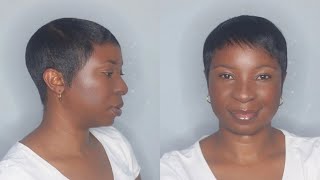
Right does so we're back to do another pixie wig and the first thing that I'm going to use is some cling film. This cling film is basically to cover the mannequin head, just so that you don't have residue from the mannequin head sticking to the wig cap and just messing up your wig. Now, as you can see here, I've already covered the mannequin head with the cleanser and I'm going to go in and just put my wig cap on to begin the process. Now for this wig I'm going to be using a stocking cap. These are pretty light and stretchy, and I'm just going to get into the hair for this style. I usually use a 27-piece or 28 piece hair. You can use whichever brand you want to use, and these hey. They usually come in like three different lengths. As for this pack right here, I have a two to four inches, as you can see, and I have a four to six inches and six to eight inches. So that's the length that this hair comes in, and so I'm just going to start by using using the shortest length in the pack, which will be the two to four inches. So to begin with is usually the same as all of my other picks a week. Just starting with the shortest length, and I'm just going to go in and glue down the trucks I'm going across the back area of the week cap, I am pretty much self-explanatory, and so you just want to continue to do this process. As for the purpose of the video and not making it super duper long, I am just going to take you guys a little bit further up, as you can see here, and I'm doing the exact same thing, continuing to lay the tracks from each side to the Other side - and we want to continue to do this process until we're further up at the top of the week. You alright guys, as you can see, we're just going we're just going further up to the top area and right here, I'm just going to continue and to apply the tracks going across the back area and from side to side. So we just want to do this up until we reach closer to the top and then we're going to go in and apply the track from the front area. So, as I was saying before, we're now at the front area of the wig and all I'm doing is just applying the tracks across the front and we're just basically, the aim is just to get the area of the top of the wig into like a small Circle, so I'm just filling in the gaps at the at the front and then also add in a few and pieces at the side area and also at the back now, as you can see that I have a little streak of blond, hair and that was optional. But I just wanted to add that into the wig and then obviously continue just to lay the tracks down onto the wig up until we come to where we have a small circle where we want to close the wig so right here, I'm just gluing my closure. If you want to see how I made this closure I'll attach another video to this week to this attach another video to this video, where I break it down so now, I've gone into cutting the wig. All I'm doing is going all over it with my razor comb and I'm just going to trim the excess hair, because we want to just basically smooth down the wig and you know, make it look a lot more flat and a lot more natural. So I'm just going to comb through it and then go in with my razor comb and just continue just to UM trim the hair down. So this is all that I'm going to be doing just trimming the front to make it shorter and going all over the hair. As I said before and distribute away all the excess hair just to make this hair look a little bit more natural and so that when it's been put onto the head it could look really really flat and just natural. So that's all I'm going to do for now, as this wig is not personally for me, I did not cut this week on my head. I decided that I would just kind of cut it on the mannequin head so that you guys could see. I mean how it would turn out, so you just want to make sure you trim all around the side areas like really low so that it could just look really really flat and natural you've seen that right. So, as you can see here, I have trimmed a lot of the hair off. I'Ve left the front area a little bit longer because when the my client puts it on she'll be able to you know stylee, however, she pleases and so yep - that's pretty much it for the week. So she's all finished, and this is what she looks like I'm sure she will looks really beautiful on my clients head um when she's wearing it. Then, if there's anything else that I need to adjust while she's wearing it and I'll do that once it's on her head. But this is the end result pretty simple if the pics a wig with a few blonde streaks going on in the front area. So I hope you guys enjoyed this video. Please don't forget to give it a thumbs up, comment and subscribe and I'll see you guys in my next video bye

Comments
yoyo mama: When you make a wig on the mannequin how can you get the lengths and sides correct but maybe it's going to be customized but once it's cut it's gone
Sham Murphy: so cute.
Monica D: Cute
yoyo mama: Oh and I hit like because it does look cote
Khadine Boyce: can't find that brand of hair online at all