How To Make A Headband Wig On A Sewing Machine | Beginner Friendly |
- Posted on 20 October, 2020
- Pixie
- By Anonymous
#diyheadbandwig #machineweftedwig #howtomakeheadbandwig
HEY BESTIES, WELCOME BACK TO MY CHANNEL. IN THIS VIDEO, I WILL BE TEACHING YOU HOW TO TURN YOUR OLD BUNDLES INTO THE TRENDY HEADBAND WIG., PLEASE DONT FORGET TO SUBSCRIBE IF YOU HAVENT ALREADY AND TURN ON YOUR POST NOTIFICATION.
.
.
.
.
.
BUSINESS INQUIRIES, WIG MAKING SERVICE, SEW-IN SERVICE
EMAIL ME
HERE TO SUBSCRIBE TO MY CHANNEL
https://www.youtube.com/channel/UC0Jqv...
HOW TO APPLY FRONTAL USING ECO STYLER
https://www.youtube.com/watch?v=ohP5nI...
HOW TO GET EFFORTLESS CURLS USING HOT COM
https://www.youtube.com/watch?v=0llv4t...
HOW TO WASH AND DEEP CONDITION YOUR WIG LIKE A PRO
https://www.youtube.com/watch?v=MLXLYu...
HOW TO INSTALL LACE FRONTAL USING GOT2B GEL
https://www.youtube.com/watch?v=GmwiuJ...
OMBRE BROWS-@makeupbyspells
brown headband- @turbanandaccessories
HAIR- www.madamtiticollection.com
WAX STICK- www.madamtiticollection.com
HOT COMB- www.madamtiticollection.com
#HEADBANDWIG #DIYHEADBANDWIG #SEWINGMACHINEWIG #SEWINGMACHINEWIGCANADA
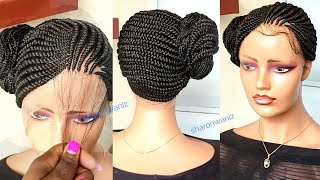
Hey besties welcome back to my channel and if today is your first time of stopping by then you're welcome to the family. Yes, okay, guys! So i'm back with another tutorial and i'm going to be teaching you how to make your own headband wig using a sewing machine or how to make headband work for your clients. You know all you just have to do is to transfer their measurements into your week. Um canvas with cat um, wig head and you're good to go, but today um, i kind of use my own head because it's for me to make this swing so, but before we jump into this video, let's talk about hair bandwidth. Headband wig is a half wig af bud. That'S simply how i i can explain it. So it's a wig that a band is attached to it in order for you to be able to wear it while leaving your hedges out or you can bring it forward. Okay, so - and why is that bandwidth back involved? Because this is what our mother used to wear back in 80s, 90s back in 80s? Right, yes, ed bandwick came back invoked simply because most of this korea company ran out of stock for lace, closures and fronts due to the pandemic like they could not produce. Yes, they ran out of um closures and fronts, and their bonds were not selling and like people didn't want to buy, so they came up with idea of headband weak. Yes, this is why they have to produce wig without using a closure or a front. Is why you see a bandwig everywhere everywhere? Moreover, most of them now have frontal zone closure, but they are pretty expensive, like they're, very pricey right now. So a lot of people are just opting for headband wig and if you have some units in the house that the closure is already ruined, why not make it into a headband? Because that's what i just did i've had this hair for like two years, and the closure was already not something that i really like anymore. I actually wanted to buy a new um frontal. You know i was going to buy a front so to attach to it and when i started seeing headbandwig i'm like, oh girl, think think think think think why don't you just make this unique into a headband? We can save money for front. So i'm like oh smart girl, yes and that's why we're here today, so if you're interested in seeing how i achieved my headband wig with my two years, burn dude has been cut into pieces then keep on watching, okay guys. So these are the list of the items you will need, and the first thing you're going to do is to double your tracks and to double your tracks. You want the tracks to be parallel to each other, do not place them on top of each other. Make them parallel and start sewing and when you're sewing after about one inch, you want to back stitch at least twice. I actually did once because it's just the tracks, but when you're sewing it on the wake up, you have to back stitch at least twice twice and when you get to the end as well, you want to backstage to lock the stitches in place, so they don't Unravel so, the next thing i want here to do was to place my wig cap on my head, listening exactly where the headband wig is going to be starting from then i went ahead to use some paint to hold it in place. Took it to my machine and did some adjustments, so i took it back to my head to see how things are looking and they're, not looking back and now we're going to start sewing, although i still have some extra that needed to be adjusted. But i'm going to adjust it while i'm sewing the tracks onto the wig cap, so you see that mac. You see right there. It'S just a guide for me to know where this weak canvas head. Hairline start from so i place the cap on my canvas head. Placing it exactly where the wig is going to be starting on my head and my head measurement is actually 22, which is the same um canvas head, i'm using so to draw my guidelines. To be honest with you, guys, guidelines actually depends on how many bundles of air you're working with i'm actually working with four bundles of hair, however, is 26 inches of air and the longer the hair, the shorter the weight. So you you have to keep that in mind, so your bundles will actually determine your guidelines. So that's it. So, as i'm working my way up, i'm now drawing my guidelines straight, i'm not covering it anymore so and i'm i'm drawing it very close to each other, because i do not want that wig to be looking flat, especially after adding the band. You need that a little bit of elevation. You know so people can see your hair. You know what i mean, so i got that headband from my local beauty supply and you know just spitting it on my hair to see how things are going to be looking. I did when i had to solve a vector, but i later removed it, but because the vector was looking my the oak part of the vector was looking my hair and i didn't like that. So i removed it to replace it with a brow oak. You guys will see that later on in the video just keep on watching, okay, so to sew your headband onto the weight, you want to use your straight stitches and whenever you're sewing on a sewing machine, always have it in mind that you're going to back stitch At least twice, depending on what you're doing for for this back stitching at least twice is fine. Okay, and i placed it on my head to see how things are looking. They weren't looking bad, so we're gon na start sewing, but before we start sewing, i would advise you don't sew on your first guideline because i later removed that in the video later on in the video, because, to be honest with you guys, this is my first Time of making it one week, i refuse to go check any video on youtube, because sometimes i like to stress my brain, like hey, thank god. Sometimes i like to think i like to think deep, like okay, headband, we. So this is just a wig that there's no closure, so how can we make it? So i was just doing things on my own and it was already 9 p.m, and i was going to use it the next day to church and i'm like city. You have to do this, so it kind of took me a while so anyways, let's get let's get going so to start sewing. I always use zigzag method and the setting that i have my mission is that 6.5 and 4.0 and my tension it's about seven. I guess okay, so all of those factors depend on your machine. How often you use a machine, so you just kind of have to figure things out by yourself and knew your own machine right. So that's it and, like i said this baby has been through a lot. If i find pictures of me working this hair different styles since that two years it was black, i followed it. I have black, have gold different things. You know anyways so whenever you're sewing, don't forget to backstitch, do not stretch your cap because you don't want your wig to be lumpy, so always place your cap flat and just move gently so right there you see the excess i still have. So i'm placing my tracks on top and sewing it down. So that's just going to make a more perfect fit for me. So i'm just doing the same thing. You know backstage at least twice it's my personal way. So that's why i'm actually backstage twice. If, if it's for clients trust me, i do three four times, because i don't want anybody to call me and tell me city. Oh, my hair is losing so it's my personal week. I can decide to take this down tomorrow and had a closure or had a frontier, so i don't mind, but if you're doing it for someone you want to back to stitch at least three times. Okay, you need to lock that stitches in place right. So don't forget you're not going to stretch your cap. Okay, just place things flat and move slowly. You do not want. You do not have to go one time, just go section by section little by little and don't stretch your cup like, i told you guys. This here has been through a lot, so i have pieces pieces everywhere so to join. If you run out of track and you need to join one, so you want to place the track very close to the last one and use and use your needle to hook it in place. My needle my sewing machine does have a needle lifter, so i press it to lock the needle in place. Then you want to back stitch it back stitches to join the other one. Then you start sewing just like so right now, i'm not doing any fast forwarding. Just showing you guys how to join the track, while you're sewing your mesh um, while you're sewing your wig, and that's just me showing you guys how things are looking you see, i joined those and they're not even showing, because i did it correctly, which i just Taught you guys so now we're just gon na go ahead and start sewing, but before we continue, let me show you guys how to join tracks. If you have pieces tracks like this, it's better you join them before. You start sewing it onto your wig cap. Okay and to sew pieces tracks together, you want to use your straight stitches and just use it to join them together. Just like that. So these are just going to be easier for you to do this, rather than doing that, while you're sewing your tracks onto the wig. So yes, between guys, you see this janome sewing machine is the bomb like seriously it's very pricey, but if a wig maker you need this like you can see, it does have um scissors. So you see i'm not using my scissors to cut nothing. The machine is doing the job, for me does have a lifter, where i don't have to use my hands to lift my presser foot up. I just use my thighs to just shift it. If you guys want me to do an introduction of my sewing machine leave me a comment down below and let me know and i'll be sure to do that: okay, but if a wig maker save money and buy the sewing machine, forget about singer after six months. Singer is gon na start, giving you problem and you have to replace it, but for this one life is just easier. So that's actually the reason why i removed the freckle because it was looking my hair and i didn't like that. Yes, so, yes, i went ahead to remove it and use a brow, although the next one i'm going to be making i'll, probably use that, because i'm out of brow, i don't know, maybe i'll go to fabric land. If i find one then i'll use that otherwise i'll use the vehicle like that, you know so guys we're almost there. So, as i was working my way up, i did not double my tracks because i didn't have enough anymore and, like i said earlier on in the video, how many bundles of hair, you have food to tell me how many bundles you should double or if you Shouldn'T even double at all, so keep that in mind. So at this point we are almost done so i'm just going to start sewing straight straight. Just exactly. I would drill our guideline: we're just going to store we're just going to sew on top of that and if you guys have any question, please don't forget to leave me a comment and i will be sure to answer all your questions and if you guys would Like to see videos of me plucking, glitching of frontals closure, let me know in the comment down below and if you guys actually want to see a video of me making this headband wig with needle and thread, then let me know and i'll be sure to do That, because i'm actually thinking of stretching one of my hair into this headband with one of my curling iron, because i kind of like to say, burn wig, to be honest with you guys. So at this point i was tired. I was sleepy and i'm like no titty you're not going to give up. You have to finish this week tonight. I think it was about 11 p.m already, and i was tired. I was already at my peak, but i wasn't gon na give up. Okay, so i put on the wig to see how things are looking so like i said this was my first time of making headband wig ever and there were mistakes and i'll be sure to share that with you guys. So i have the breakfall, but the breakthrough was looking my hair, so i didn't like that. I took that hole took a brow hook to attach it ignore my edges. Don'T worry when i slide this hair - oh my goodness. Oh, my goodness, you're gon na be licking your screen. I promise you because you're not gon na see that teenagers anymore and if you guys actually want a video of me, showing you the secrets to my edges, looking full, like you saw earlier on in the video in the introduction video. Let me know how i'll do it for you guys. You know, i love you guys, and i know you guys love me too, so anything for you. I will do it anything that will make you look good. Why not something for you guys? Okay, so guys um right about now, i'm sewing. Then they look onto the band. You know then. I later went ahead to remove the last track. I saw not the la the first track. I saw down so hard to the last trap because i needed that lift. I needed that elevation because it was looking flat. I really didn't like the way it was looking, so i needed it to come up a little bit, so i did remove the first track to sew onto the last track. Okay, does that make sense? I hope you guys understand that. Yes, so that's it so i went hi, it's so uncool. Oh, i said i was going, oh, my goodness, and when i had to wake up guys, don't mind me because i said i was going come on bye. You know come on, buy our school myself, alright guys. So let me get serious so i went ahead so that um so down we come at the back and at the front you see and i love the way things are looking now. Yes, don't look at my teenages okay, you see the way i slay this hair. Let me know if you guys want the video i'm serious. I would do it for you guys: okay, okay, okay, so we almost done. I hope you guys enjoyed this video. If you do make your own headband wig, don't forget to send me a picture between guys. Do you, like my brows? I did ombre brows and my friend did that for me makeup. By spells i'm going to leave my instagram down below you guys should go check out if you're in the city of mississauga toronto anywhere in canada, you can book an appointment with her okay and that's just me showing you guys that actually remove the first track. So add to the last track: okay, because i needed the elevation, so hey guys! Thank you so much for watching. I hope you liked this video. I hope it was helpful if you do make your own headband week. Please don't forget to send it to my dear on instagram. Is that slate by empty and don't forget to give this video a thumbs up, don't forget to comment like and share and make sure you turn on your notification bell for upcoming videos, and i will see you in my next one bye. I love you.

Comments
Crystal Michelle: The wig is gorgeouswould love to see more tutorials like thislove the headband too. New subby
kolade modupe: You are a genius with wigs. I love your wigs.
Nikki Fash: Love it saving for own sewing machine already. It’s kinda pricey for a starter
Omofa Faith: I learnt a lot, most importantly not to stretch the cap to avoid lumping. Thank you ma
Highm8nance88: When you add the tracks straight across, do the ends of those tracks have to connect to the previous track?
True Finesse: Please do a tutorial on how you get your edges looking full
kolade modupe: Will like to see the video of how to have full edges.
kolade modupe: You have a companion in your sewing machine.
Aiesosa and sisters Egharevba: Nice job sis where can one get the hair band
Epete Oghenevwori: Please do an introduction of ur sewing machine for us
Tomilola Fapohunda: Please share with is how you slay your full edges...thanks sis
kolade modupe: Well done darling